Table of Contents
Advertisement
Quick Links
Advertisement
Table of Contents

Subscribe to Our Youtube Channel
Related Manuals for Guilin Woodpecker Medical Instrument Fi-P WP4004


Summary of Contents for Guilin Woodpecker Medical Instrument Fi-P WP4004
-
Page 2: Table Of Contents
Contents Introduction -------------------------------------------------------1 1 Product introduction -------------------------------------------1 2 Standard icons --------------------------------------------------6 3 Contraindications ----------------------------------------------7 4 Installation and disassembly method of accessories ------7 5 Operation method ----------------------------------------------8 6 Charging instruction -------------------------------------------9 7 Safety precautions ---------------------------------------------9 8 Cleaning, Disinfection, Sterilization and Maintenance 10 9 Troubleshooting ---------------------------------------------- 16 10 After-sales service ------------------------------------------ 17 11 Environment protection ------------------------------------ 17... -
Page 3: Introduction
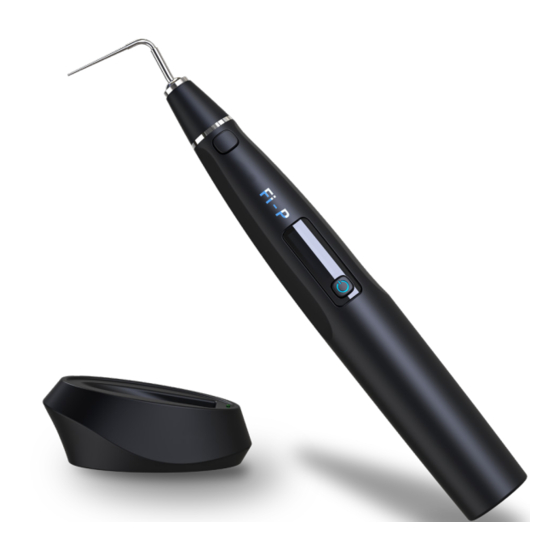
Introduction Thank you for purchase Fi-P Heating and Packing Instrument developed by Guilin Woodpecker Medical Instrument Co., Ltd, a Hi-tech enterprise developing, manufacturing, and selling dental instruments. Woodpecker has excellent Quality Control System. To guarantee correct and safe operation, please read this Instruction Manual carefully before use.Depending on the level of risk involved, safety requirements are... - Page 4 1. “ON/OFF” button 2. Heating button 3. Work Tip Protector 4. Work Tip 5. Connecting hole for power adapter 6. Temperature Level 7. Battery level 8. Charging base 9. Battery cartridge 10. Charging indicator 11. Power adapter plug 12. Power adapter unit 1 ) “ON/OFF”...
- Page 5 4) Battery level: The actual power of the battery is displayed in real time on the screen. When the battery is fully charged, the power of the OLED display is displayed as five grids. When the battery level is one grid, it indicates that the battery is low and needs to be charged in time.
- Page 6 and Packing Instrument is placed on the charging base, if the charging is being charged, the yellow indicator will be on constantly. When the battery is full, the yellow indicator will be off and the green indicator will be on constantly. Notes: After receiving the device, please charge it immediately.
- Page 7 WP5508 0.55 0.08 Table 2 Model of Work Tips 1.4 Introduction and scope of application 1.4.1 Features: a) The display can be set to both right and left sides, to meet the needs of both left-hander and right-hander. b) Cordless design for Heating and Packing Instrument effectively broadens the operation space.
-
Page 8: Standard Icons
1.7 Environmental parameters Temperature: +5℃ ~ +40℃ Humidity: 30% ~ 75% Air pressure: 70kPa ~ 106kPa 1.8 Storage and transport 1. The device should be handled carefully and lightly. Be sure that it is far from the vibration, and is installed or kept in a cool, dry, and ventilated place. -
Page 9: Contraindications
Humidity limit for storage: 10% ~ 93% Atmospheric pressure for storage: 70kPa ~ 106kPa Temperature limit for storage: -20℃ ~ +55℃ 3 Contraindications 1. People who are allergic to known natural latex and metals such as stainless steel, silver, copper, etc. are prohibited to use this device. 2. -
Page 10: Operation Method
Figure 6 Work Tip Figure 7 Installation of Work Tip open Figure 8 Installation of Work Tip Protector Figure 9 Error code 4.3 Installation and replacement of battery When replacing the battery, as shown in Figure 10, first rotate the battery barrel counterclockwise to remove the battery tube, then take the old battery out of the battery tube, replace it with a new one, and finally tighten the battery tube clockwise according to the corresponding thread. -
Page 11: Charging Instruction
3. According to the actual situation, lightly press the temperature setting button, and select suitable preheating temperature as per the instruction on display screen. 4. During operation, lightly press the heating button so as to heat up to the preset temperature, soften and pressurizing the gutta-percha with careful, continuous and stable motion with the help of vertical pressurizer. -
Page 12: Cleaning, Disinfection, Sterilization And Maintenance
8. Do not install, remove, or replace the Work Tip under heating state. Please power off before replace the Work Tip. 9. The Work Tip must be correctly installed to prevent it from falling off. 10. When the Work Tip is bent or worn, it will cause uneven heating. The operator should replace the Work Tip in time according to the clinical conditions;... - Page 13 used for cleaning/disinfection and sterilization, and that the validated parameters are adhered to during every cycle. Please also observe the applicable legal requirements in your country as well as the hygiene regulations of the hospital or clinic, especially with regard to the additional requirements for the inactivation of prions.
- Page 14 EN ISO 15883. For the specific procedure, please refer to the automated disinfection section in the next section “Disinfection”. Notes: a) The cleaning agent does not have to be pure water. It can be distilled water, deionized water or multi-enzyme. But please ensure that the selected cleaning agent is compatible with the product.
- Page 15 product to be treated. The flushing period should be sufficient (5-10 minutes). Pre-wash for 3 minutes, wash for another 5 minutes, and rinse it for twice with each rinse lasting for 1 minute. (c2) In the washing stage, the water temperature should not exceed 45 °C, otherwise the protein will solidify and it is difficult to remove.
- Page 16 inspection, ensure that there is no problem. 8.6.1 Check the product. If there is still visible stain on the product after cleaning/ disinfection, the entire cleaning/disinfection process must be repeated. 8.6.2 Check the product. If it is obviously damaged, smashed, detached, corroded or bent, it must be scrapped and not allowed to continue to be used.
- Page 17 b) Before using the sterilizer for sterilization, read the Instruction Manual provided by the equipment manufacturer and follow the instructions. c) Do not use hot air sterilization and radiation sterilization as this may result in damage to the product; d) Other sterilization procedures (e.g., ethylene oxide, formaldehyde and bottom temperature plasma sterilization) may be used other than those recommended above.
-
Page 18: Troubleshooting
the wipe for at least 3 times. • After each use, wipe the surface of the main unit and charging base with a soft cloth soaked in clean water (distilled or deionized water) or a clean disposable wipe. Repeat the wipe for at least 3 times. 8.12 Daily maintenance 1. -
Page 19: After-Sales Service
Automatic If there is no operation for Reboot shutdown 10 minutes, the device will automatic powers off. Work Tip 1. The Work Tip is damaged. 1. Replace the Work Tip works 2. Malfunction of main unit 2. Send it to the repair abnormally center. -
Page 20: Emc-Declaration Of Comformity
modification of device may result in the electromagnetic compatibility problem of that device or other devices. 2) The design and test of Heating and Packing Instrument complies with the related operation regulations of electromagnetic compatibility. 12 EMC-Declaration of comformity The device has been tested and homologated in accordance with EN 60601-1-2 for EMC. - Page 21 Immunity test IEC 60601 Compliance level Electromagnetic test level environment - guidance Electrostatic ±8kV contact ±8kV contact Floors should be wood, discharge (ESD) ±2, ±4, ±8, ±2, ±4, ±8, ±15kV concrete or ceramic tile. lEC 61000-4-2 ±15kV air If floors are covered with synthetic material, the relative humidity should be at least 30 %.
- Page 22 Guidance & Declaration - Electromagnetic immunity The model Fi-P is intended for use in.the electromagnetic environment specified below. The customer or the user of the models Fi-P should assure that it is used in such an environment. Immunity test IEC 60601 Compliance Electromagnetic environment - test level...
- Page 23 a Field strengths from fixed transmitters, such as base stations for radio (cellular/ cordless) telephones and land mobile radios, amateur radio, AM and FM radio broadcast and TV broadcast cannot be predicted theoretically with accuracy. To assess the electromagnetic environment due to fixed RF transmitters, an electromagnetic site survey should be considered.
-
Page 24: Statement
For transmitters rated at a maximum output power not listed above, the recommended separation distance d in meters (m) can be estimated using the equation applicable to the frequency of the transmitter, where P is the maximum output power rating of the transmitter in watts (W) accordable to the transmitter manufacturer. - Page 25 ZMN/WI-09-459 V1.1- 20200102...
Need help?
Do you have a question about the Fi-P WP4004 and is the answer not in the manual?
Questions and answers