
Subscribe to Our Youtube Channel
Related Manuals for King Industrial KC-3105C


Summary of Contents for King Industrial KC-3105C
- Page 1 1200 CFM DUST COLLECTOR MODEL: KC-3105C INSTRUCTION MANUAL COPYRIGHT © 2012 ALL RIGHTS RESERVED BY KING CANADA TOOLS INC.
-
Page 2: Warranty Information
WARRANTY INFORMATION 2-YEAR KING CANADA TOOLS LIMITED WARRANTY OFFERS A 2-YEAR LIMITED WARRANTY FOR COMMERCIAL USE. FOR THIS 1200 CFM DUST COLLECTOR PROOF OF PURCHASE Please keep your dated proof of purchase for warranty and servicing purposes. REPLACEMENT PARTS Replacement parts for this product are available at our authorized King Canada service centers across Canada. LIMITED TOOL WARRANTY King Canada makes every effort to ensure that this product meets high quality and durability standards. -
Page 3: General Safety Instructions For Power Tools
GENERAL SAFETY INSTRUCTIONS FOR POWER TOOLS 1. KNOW YOUR TOOL 12. ALWAYS WEAR SAFETY GLASSES. Read and understand the owners manual and labels affixed to Always wear safety glasses (ANSI Z87.1). Everyday the tool. Learn its application and limitations as well as its eyeglasses only have impact resistant lenses, thet are NOT specific potential hazards. -
Page 4: Specifications
SPECIFIC SAFETY INSTRUCTIONS FOR YOUR DUST COLLECTOR 11) Use extra care when collecting dust on stairs. COMPLETED: 12) To avoid injury from accidental starting, unplug power cord before 1) Assembly, mounting and alignment. changing or cleaning the filter/dust bag or the chip bag. 2) Learn the function and proper use of the ‘’ON/OFF’’... -
Page 5: Electrical Information
ELECTRICAL INFORMATION WARNING! ALL ADJUSTMENTS OR REPAIRS MUST BE DONE WITH THE DUST COLLECTOR DISCONNECTED FROM THE POWER SOURCE. FAILURE TO COMPLY MAY RESULT IN SERIOUS INJURY! THIS DUST COLLECTOR IS RATED 120V/240V AND COMES FROM THE FACTORY PREWIRED AT 120V. Before plugging in power cord to the power source, make sure that the switch is in the ‘’OFF’’... - Page 6 ELECTRICAL INFORMATION GROUNDING continued... Cord Size in A.W.G. Tool’s Amperage Cord Length in Feet WARNING: TO MAINTAIN PROPER GROUNDING OF YOUR DUST Rating 100 150 COLLECTOR, DO NOT REMOVE OR ALTER THE GROUNDING PRONG (120V) IN ANY MANNER. WARNING: IF NOT PROPERLY GROUNDED, THIS DUST COLLECTOR CAN CAUSE ELECTRICAL SHOCK, PARTICULARLY WHEN USED IN 8-10 DAMP LOCATIONS.
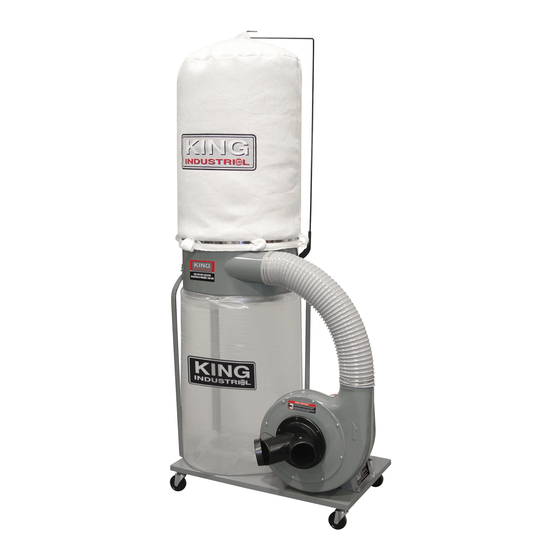
- Page 7 GETTING TO KNOW YOUR DUST COLLECTOR 1. Bottom dust collection bag 2. Housing 3. Dust bag strap 4. Top cloth filter bag (KC-3105C only) 5. Base plate 6. Inlet cover 7. Caster 8. Ventilation housing 9. Hose 10. Motor 11. On/Off switch UNPACKING 1.
- Page 8 ASSEMBLY 1. Install the four casters (A) Fig.5 to the under side of the base (B). Do not remove the lock washers and nuts from caster roller shafts; these act as spacers. Insert caster shaft into threaded hole on the underside of the base, turn until it is snug, then tighten nut with wrench.
- Page 9 (D). Before attaching the third support bracket, place hanger bracket (E) between the support bracket and the housing as shown (KC-3105C only). Tighten all bracket nuts and bolts at this time. FIGURE 9 7. Slide hose clamps (A) Fig.10 onto each end of the hose (B). Attach hose between the fan housing (C) and the main housing (D).
-
Page 10: Maintenance And Troubleshooting
MAINTENANCE & TROUBLESHOOTING MOTOR some dust to escape. This is normal and will stop after a short period Excessive dust in the motor could cause excessive heat. Every effort of time. should be made to prevent foreign material from entering the motor. A visual inspection should be made at frequent intervals.
Need help?
Do you have a question about the KC-3105C and is the answer not in the manual?
Questions and answers