Table of Contents
Advertisement
Quick Links
Advertisement
Table of Contents

Summary of Contents for NutriMill SMART AIR
- Page 1 ® SMART AIR ™ User Manual...
-
Page 2: Important Safeguards
Return the Air Fryer Oven to the store or retailer where purchased for examination, repair, or adjustment. 7. The use of attachments not sold by or recommended by NutriMill may cause fire, electrical shock or other injury. 8. Do not use outdoors. -
Page 3: Care And Cleaning
SAVE THESE INSTRUCTIONS Please read and keep these instructions handy. These instructions will help you use your Air Fryer Oven to its fullest so that you will achieve consistent, professional results. SPECIAL CORD SET INSTRUCTIONS A short power-supply cord is provided to reduce the risks resulting from becoming entangled in or tripping over a longer cord. -
Page 4: Parts And Accessories
Parts & Accessories A. Rotisserie Spit Assembly B. Rotisserie Removal Tool C. Wire Rack D. Baking Pan E. Air Fryer Basket F. Removable Crumb Tray G. Air Fryer Oven A: Rotisserie Shaft, Forks & Set Screws Use for roasts and whole chicken. B: Rotisserie Removal Tool The Rotisserie Removal Tool is used to remove the roasted meat. C: Wire Rack The Wire Rack can be used in three rack positions, bottom, middle, and top. -
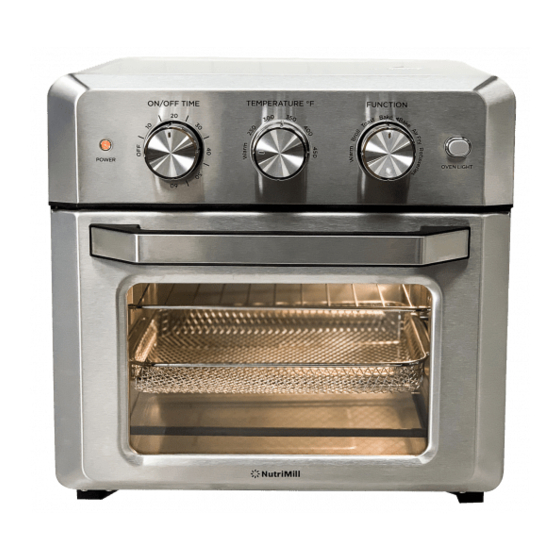
Page 5: Function Dial
Oven Rack The oven has 3 rack positions, top, middle and bottom. OVEN LIGHT 1. Top position 2. Middle position 3. Bottom position Do not rest anything on the glass door. Features OVEN LIGHT 1. POWER ON LIGHT Indicator light will turn on and remain lit when oven is in use. 2. -
Page 6: Before Using
Before Using Unpack the Air Fryer Oven and remove all packaging materials. Clean the Air Fryer Oven according to the Care & Cleaning section on page 3. Place the Air Fryer Oven, on a flat, stable, level surface. Keep oven 2-4 inches away from the wall or any other objects. We recommend performing a trial run of your Air Fryer Oven to eliminate any protective substance from the heating elements. - Page 7 Broil Set the Function Dial to Broil. Set Temperature Dial to 450°F. Then turn the On/Off Timer Dial to the desired cooking time to turn on the oven and begin broiling. The power light will illuminate. The timer will ring once when the cycle is complete and the oven will power off when the time expires.
-
Page 8: Frozen Foods
Air Fry Place the Air Fryer Basket onto the Baking Pan or Oven Rack. Air Fry in rack Position 2. Set the Function Dial to Air Fry. Set Temperature Dial to desired temperature. Then turn the On/Off Timer Dial to the desired cooking time to turn on the oven and begin Air Frying. - Page 9 TYPE SIZE TEMP TIME/MIN VEGETABLES Asparagus 1-inch sliced 400°F Broccoli Flore es 400°F Brussel Sprouts Cut in half 380°F Carrots 1-inch sliced 380°F Cauliflower Flore es 400°F Corn on the cob 390°F Green Beans 400°F Mushrooms Sliced 400°F Onions Sliced 400°F Parsnips 1/2-inch chunks...
- Page 10 Bake or Bake Place the pan in Position 2 for baking. For chicken or other large items, the pan can be in Position 1. Set the function to Bake or Bake. Set the Temperature Dial to desired tem- perature. Turn the On/Off Timer Dial to the desired cooking time to start the oven and begin baking.
-
Page 11: Rotisserie Instructions
Rotisserie Instructions Loosen the set screws, and remove the forks from the spit. Push the food item onto the spit, keeping the food centered. Slide the forks onto the spit, inserting the prongs into the food. The forks must be inserted past the notches on the spit. Tighten the set screws. - Page 12 With the oven door open, slide the longer end of the rotisserie spit into the rotisserie mount, on the right hand side of the oven. Rest the other end of the spit into the groove of the rotisserie notch on the left side of the oven. Insert the longer notched end into the rotisserie mount.
- Page 13 Rotisserie Removal Tool. Use the Rotisserie Removal Tool to remove the hot cooked food and Rotisserie Spit Assembly. Have a platter placed nearby to receive the food. Always use cau- tion when working with a hot oven. Hot pads are recommended. Use care when opening the oven door, oven, accessory, and food will be hot.
-
Page 14: Specifications
Simple Rotisserie Chicken 1. Truss and skewer (3 lb.) whole chicken. 2. Coat generously with preferred dry rub. 3. Cook on the rotisserie setting at 350°F for 18-22 minutes per pound (approximately 1 hr). The chicken should reach an internal temperature of 165°F. 4. - Page 15 The NutriMill Smart Air Fryer has a 1 year limited warranty for warranty claim visit www.nutrimill.com/warranty/...
- Page 16 Contact us at: service@lchef.com with any questions or concerns you may have with your product. 4196 South 950 East St. George, Utah 84790 Visit WWW.NUTRIMILL.COM to find recipes, grain mills and much more.
Need help?
Do you have a question about the SMART AIR and is the answer not in the manual?
Questions and answers