Advertisement
Quick Links
Advertisement

Related Manuals for BOHLT EKICK10 PRO


Summary of Contents for BOHLT EKICK10 PRO
- Page 1 BOHLT Electric scooter’s manual EKICK10 PRO User manual Keep this manual for future reference...
- Page 2 WARNING Wear helmets can save your life!!! Always wear a properly the helmet that complies with CPSC or CE safety standards when you ride your bicycle. Correct Fitting: Make sure your helmet covers your forehead. Incorrect Fitting: Forehead is exposed and vulnerable to serious injury.
- Page 3 WARNING As with all mechanical components, the bicycle is subjected to wear and high stresses. Different materials and components may react to wear or fatigue in different ways. If the design life of a component has been exceeded,it may suddenly fail possibly causing injuries to the rider.Any form of crack, scratch or change of coloring in highly stressed areas indicate that the life of the component has been reached and it should be replaced.
- Page 4 INTRODUCTIONN This manual is intended to provide you with all the necessary information for the safe use and maintenance of the eKick 10 PRO. Please read this manual carefully before using eKick 10 PRO. WARNING Be sure to read this manual carefully before using the step. Failure to do this can lead to serious bodily injury and even death.
- Page 5 If the supplier agrees to perform a repair that is not covered by the warranty, the customer will be billed for all repair and shipping costs. The supplier will not accept packages that do not have an RMA number. Contact us at: Bohlt BV Vareseweg 44 3047 AV Rotterdam The Netherlands We offer a guarantee on all our products under the following conditions: 1.
- Page 6 parts that are fragile like glass or plastic or defects due to normal wear and tear. We do not have a warranty obligation in case of minor variations in appearance and performance, unless they adversely affect normal use in case of damage caused by chemical or electrochemistry influence due to water or other abnormal conditions.
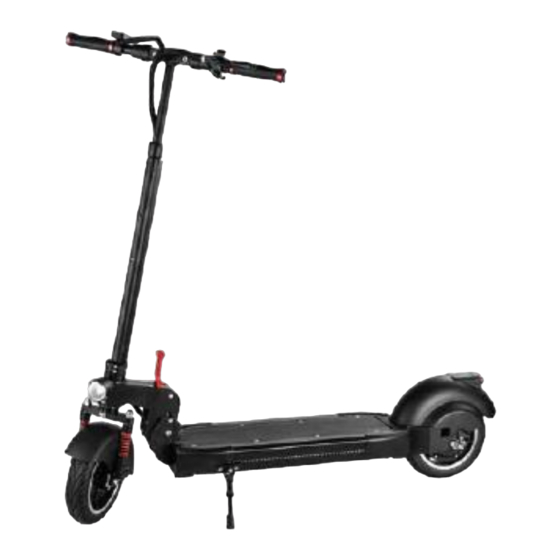
- Page 7 Product diagram 1. Folding handle Steering column 2. LCD display Steering column lock 3. Fold up switch Frame folding switch 4. Switch ON / OFF switch Head light 5. Brake Front damper 6. Handlebar height adjustment Kick stand Warranty This product is shipped with a 30 day warranty for replacement for defects by the manufacturer.
- Page 8 This product comes with a 120 day warranty on parts and labor costs. Transport and handling fees are not included. The terms of this warranty and our responsibilities under this warranty are as follows: The supplier's warranty is not transferable. This warranty applies only to the original buyer.
- Page 9 Warning Any step that does not work properly can make you lose or lose control. Every time you drive, you must fully check the step and correct any defects.
- Page 10 13. Charge port 14. Optional seat 15. Rear brake light 16. Rear brake Handlebar diagram...
- Page 11 1. Brake 2. Handlebar folding switch 3. Head light ON/OFF switch 4. Horn 5. LCD Display 6. Power button 7. Throttle 8. LCD brake light Ensure your bike is fully unfolded and fully charged. Review all safety precautions before riding. Find a at surface with no obstacles.
- Page 12 Release the Throttle to slow down. •Never carry other riders or packages as they may obstruct vision or proper control of your Essential. •Do not ride while intoxicated or while taking medications which can make you drowsy. •When approaching a descent, decrease your speed. •Do not abuse your e-scooter.
-
Page 13: Specifications
Always look ahead to avoid and anticipate any upcoming obstacles. The distance of any upcoming obstacles will vary according to your speed. Use caution when you encounter road obstacles. If you are going fast, even as mall obstacle can create a sign can’t impact to both you and your bike. If you are unsure about your ability to safely ride over an obstacle, it is best to either ride around ti, or stop your bike, dismount, and walk your bike around the obstacle. - Page 14 Your new e-scooter was assembled and tuned in the factory and then partially disassembled for shipping. You may have purchased the e-scooter already fully assembled and ready to ride, or in the shipping carton in the partially disassembled form. If you have questions or concerns about any of these steps, please feel free to contact our Customer Service Team.Someone will be in touch to walk you through these steps.
- Page 15 Twist the Steering Column Height Adjuster counterclockwise to loosen it. Lift the Steering Column and tighten the Adjuster when adjusted to your desired height. 4.Unfold the Handlebars until they click open and lock in place. Your eKick 10 Pro should be fully unfolded and ready to ride.
- Page 16 Your e-scooter is not equipped with re ectors. It is not recommended that you ride your e-scooter in conditions of low visibility. If you are riding your e-scooter in low-visibility conditions, ensure your headlight is turned on, and that you are wearing bright, reflective clothing. Warning When you ride in low-visibility conditions such as fog, dusk, or night, you might be di icult to see, which could lead to a collision.In addition to keeping...
- Page 17 Warning Proper use of your brake is vital to ensure safe, effective stopping. To avoid misuse and potential injury, do not apply sudden or excessive force to your brakes. Apply your brakes gradually and give yourself enough room to come to a complete stop safely.
- Page 18 1. Put the handlebar folding switch outward and fold your handlebar down. Twist the Steering Column Height Adjuster counterclockwise to loosen it. Locate the Steering Column Lock and press down to loosen it. With the Steering Column Lock pushed down, push the Steering Column down to its lowest height.
- Page 19 Fold the Steering column backwards towards the base of your Essential. Your Essential should appear folded as shown below. Safety instructions The first rule in safe riding is to use common sense. A eKick 10 Pro is vulnerable; it cannot protect you in a crash, against impact, or lose of control the way driving a car can.
- Page 20 •Give pedestrians the right-of-way. •Do not ride too close to pedestrians and alert them if you intend to pass them from behind. •Slow down at all street intersections and look to the left and right before crossing. •Always use proper hand signals for turning and stopping. Give signals 100ft before stopping or turning and always return both hands to the handle bars before stopping or turning.
- Page 21 CAUTION Disc brakes and discs get very hot during use and could burn skin. The disc edges can also be very sharp and cut skin. Do not touch the disc or disc brake directly after riding your Essential. SEAT OPTIONAL This eKick 10 Pro model comes with an optional seat.
- Page 22 3.Align the four (4) slots on the base of the optional seat with the same four (4) screw holes from the Essential’s platform in the previous step. Place the four (4) screws through the slots on the base of the optional seat and into the screw holes of the Essential’s platform 5.
- Page 23 Before riding, check that the saddle is firmly mounted. Dismantle the optional saddle 1. Screw the four (4) screws from the base of the saddle, using the hex wrench. 2.Remove the optional saddle of the footplate. 3. Replace the four (4) screws in the footplate holes. 4.
- Page 24 * Always check that the battery is fully charged before driving. * If the step will not be used for a long period of time, you should charge the battery every 2 months for a longer life. * Check every time you drive, or tighten the screws on the front and rear wheels.
- Page 25 Attach the Optional Seat to ride your eKick 10 Pro while sitting in comfort! Please refer to the Optional Seat section for installation instructions. Battery Care The lithium-ion battery is built into the device. Do not disassemble the device to remove the battery or attempt to separate it from the device. •When charging the device, please use the enclosed 3-pin charging cable or otherwise ensure that the battery charging conditions are met.
- Page 26 Warning Failure to follow the safety precautions listed below could lead to serious bodily injury and/or death. •Do not attempt to modify, change, or replace your battery. • Do not use your device if the battery begins to emit odor, overheats, or begins to leak.
- Page 27 Pinch Points Some parts of your eKick 10 Pro can injure you if mishandled. Moving and folding parts can cut skin. Clamps and pivoting parts such as brake levers can pinch. When folding and unfolding your eKick 10 Pro, Please watch for pinch points where possible injury may be sustained.
- Page 28 The Tripometer and Timer will reset itself each time the eKick 10 Pro is turned o and turned back on. Powering your eKick 10 Pro Locate the charging Port Flap on the bottom of your eKick 10 Pro. Rotate the ap to reveal the charging port.
- Page 29 Using the enclosed cable, attach the charging cable to your eKick 10 pro by aligning the cable pins. Plug the other end into a grounded wall outlet. The red LED light will turn on and remain lit while your eKick 10 Pro is charging.
Need help?
Do you have a question about the EKICK10 PRO and is the answer not in the manual?
Questions and answers