SIRETTA SNYPER-3G Quick Start Manual
Cellular signal and network analyser
Hide thumbs
Also See for SNYPER-3G:
- Quick start manual (20 pages) ,
- Quick start manual (17 pages) ,
- User manual (37 pages)
Table of Contents
Advertisement
Quick Links
Advertisement
Table of Contents

Related Manuals for SIRETTA SNYPER-3G


Summary of Contents for SIRETTA SNYPER-3G
- Page 1 SNYPER-3G Cellular Signal and Network Analyser Quick Start Guide Rev 1.6...
- Page 3 As standard, the SNYPER-3G comes with the following:* SNYPER-3G signal and network analyser » Multi region power supply » Antenna » Hard carrying case » » Quick start guide *For replacement parts, please contact your Siretta representative or call us on +44 (0)118 976 9000...
-
Page 4: General Description
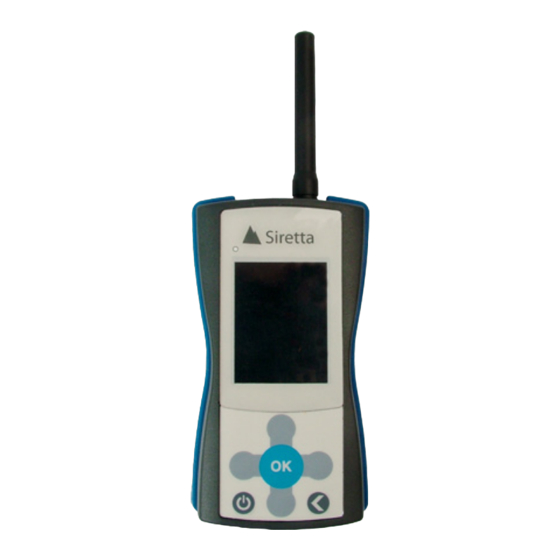
The SNYPER-3G has been designed to be as logical and intuitive as possible, with a simple to use menu and operation system. Provided with a large high contrast LCD display, the SNYPER-3G ensures that all information is clearly visible, and allows for the presentation of considerable data at the same time. - Page 5 OK Button LEFT Button ON/OFF Button Slot* The SNYPER-3G SIM slot located in the enclosure base is used for debugging and enhanced network services. It is not required for the standard SNYPER-3G functionality and can be ignored for normal operation.
- Page 6 Power On » The SNYPER-3G needs to be charged using the mains adaptor for at least 2 hours before use. The SNYPER-3G does not need a SIM card to perform network and signal tests. » Ensure the antenna is screwed firmly into place on the SNYPER-3G and isn’t loose.
-
Page 7: Charging And Battery Status
During use, the bar will decrease and turn from green, to yellow, to red. Recharging is recommended once the red bar is displayed on the SNYPER-3G battery status bar. If the SNYPER-3G drops below allowable low battery usage the unit will switch off and charging will be required. - Page 8 Main Menu The SNYPER-3G main menu has 7 menus (as shown below in figure 5), these can be selected using the UP/DOWN buttons. Once the chosen menu is highlighted, click OK. Press the BACK button to return to the main menu.
-
Page 9: Survey Menu
Survey Menu Performing a Survey Step 1. Select ‘Survey’ from the main menu and press OK. Step 2. Select ‘GSM\UMTS Survey’ and press OK. The survey will begin. ‘Survey’ screen Figure 6. GSM\UMTS Survey: Performs a survey for the GSM\UMTS network. Step 2. - Page 10 Step 1. Select the results that you require to be displayed by highlighting ‘View GSM\ UMTS’, ‘View UMTS’ or ‘View GSM’, press OK. The SNYPER-3G will display all results with numbered cells from strongest to weakest. To switch between all signals found in the survey, use the LEFT/RIGHT buttons.
-
Page 11: Summary Menu
Summary Menu Highlight ‘Show Summary’ and press OK. The SNYPER will display the number of cells by each network in frequency bands. Use the LEFT/RIGHT buttons to switch between signal strengths received on the device. NOTE - Two listings may be shown for one network operator. This listing is created by the MNC and is two different MNC’s both associated with the same network operator. -
Page 12: Save Results
SNYPER-3G.* Once the survey has been stored, the SNYPER-3G will return to the main menu. NOTE - The SNYPER-3G can only store results from 1 survey. Therefore when saving a survey, the last saved survey will be overwritten. *The SNYPER-3G doesn’t automatically save survey results, if you wish to save results from a survey follow the steps above. -
Page 13: Downloading Data
Downloading Data Step 1. To download data from the SNYPER-3G Spectrum, connect the USB cable supplied to the SNYPER-3G Spectrum and PC. Step 2. From the SNYPER-3G Spectrum ‘Main Menu’ select ‘PC Connect’ and ‘Enable’. From the PC select ‘Open Folder to View Files’ and open saved files as required. -
Page 14: Power Off
Power Off After use, remember to power off the SNYPER-3G. The SNYPER-3G can be powered off in the following 2 ways: » Selecting the ‘Power Off’ option from the main menu. The SNYPER-3G will display a power off message as shown below in figure 13. - Page 16 +44 (0)118 976 9000 sales +44 (0)118 976 9020 email sales@siretta.com www.siretta.com Siretta Ltd Basingstoke Road Spencers Wood Reading Berkshire RG7 1PW United Kingdom Company No. 08405712 VAT Registration No. GB163 04 0349 Rev 1.6...
Need help?
Do you have a question about the SNYPER-3G and is the answer not in the manual?
Questions and answers