
Related Manuals for Panametrics C-ET


Summary of Contents for Panametrics C-ET
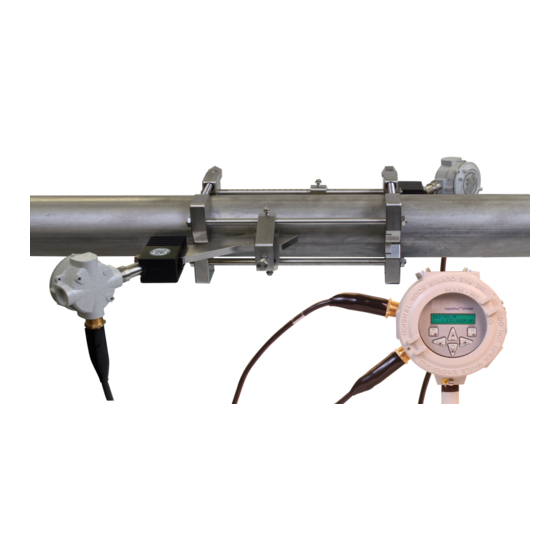
- Page 1 Flow Model C-ET Ultrasonic Flow Transducer System Installation Guide 916-083 B panametrics.com August 2021...
- Page 3 Flow Model C-ET Ultrasonic Flow Transducer System Installation Guide 916-083 Rev. B August 2021 panametrics.com Copyright 2021 Baker Hughes company. This material contains one or more registered trademarks of Baker Hughes Company and its subsidiaries in one or more countries. All third-party product and company names are trademarks of their respective...
- Page 4 [no content intended for this page]...
-
Page 5: Table Of Contents
Specifications ....................38 Model C-ET Installation Guide... - Page 6 Contents Model C-ET Installation Guide...
- Page 7 Make sure that operators and maintenance personnel have all safety equipment applicable to the auxiliary equipment. Examples include safety glasses, protective headgear, safety shoes, etc. Unauthorized Operation Make sure that unauthorized personnel cannot gain access to the operation of the equipment. Model C-ET Installation Guide...
- Page 8 The crossed-out wheeled bin symbol invites you to use those systems. If you need more information on the collection, reuse and recycling systems, please contact your local or regional waste administration. Visit www.bakerhughesds.com/health-safetyand-environment-hse for take-back instructions and more information about this initiative. viii Model C-ET Installation Guide...
-
Page 9: Introduction
20 years of experience from the OKS transducer system. The C-ET system is designed to isolate the transducer from the extreme process conditions, enabling it to measure high temperature hydrocarbon liquids, superheated water, heat transfer oils and cryogenic liquids. In addition, the C-ET system retains all of the characteristics that make ultrasonic technology best for critical process measurements under harsh conditions. - Page 10 Panametrics provides a variety of solid sheet couplants for extremely high- and low-temperature applications. Standard Panametrics couplants are listed in Table 0. Part No. Type Temp. Range CPL-12 Standard –20° to +400°C (-4° to +752°F) Permanent CPL-13 Cryogenics –250° to 100°C (-418° to +212°F)
-
Page 11: Installing The C-Et Transducer System
Installing the C-ET Transducer System Panametrics offers the following fixtures to suit your applications needs: • V clamping fixture • PI clamping fixture Figure 2 shows the V and PI fixture assemblies (less solid couplant). Complete the steps in the following sections to position and install the transducers and fixtures. -
Page 12: Choosing An Installation Location
Figure 3: Transducer Locations The following is a guide for the recommended wall thickness in which to install the C-ET transducers. The C-ET transducer cannot be installed on wall thicknesses between 0.27 in (6.86 mm) and 0.33 in (8.38 mm). On page 5 and page 6 are two charts showing typical pipe sizes. -
Page 13: Application Guide - Wall Thickness (In Inches)
0.250 0.375 0.50 0.375 0.875 0.500 1.125 1.375 1.625 1.875 2.125 24.00 0.250 0.375 0.562 0.375 0.688 0.989 0.500 1.219 1.531 1.812 2.062 2.344 Note: Pipe sizes not suitable for C-ET installations are highlighted in red. Model C-ET Installation Guide... -
Page 14: Application Guide - Wall Thickness (In Millimeters)
6.35 9.53 12.70 9.53 22.23 12.70 28.58 34.93 41.28 47.63 53.98 609.60 6.35 9.53 14.27 9.53 17.48 25.12 12.70 30.96 38.89 46.02 52.37 59.54 Note: Pipe sizes not suitable for C-ET installations are highlighted in red. Model C-ET Installation Guide... -
Page 15: Application Guide - Cryo Calculations
144.7 57.3 10,023. 3,055. 150.4 147.2 56.5 10,06 3,068 147.9 144.8 57.4 10,019. 3,053. 150.5 147.4 56.6 10,06 3,068 148.0 144.9 57.4 10,014. 3,052. 150.7 147.5 148.1 145.0 57.4 10,010. 3,051.3 150.8 147.6 56.6 10,06 3,068 Model C-ET Installation Guide... - Page 16 Ambient 20°C, 68°F Increase wedge angle 0.5 degrees for every 10°C, 18°F increase in ambient temperature Decrease Tw 1.5 microseconds for every 10°C, 18°F increase in ambient temperature Model C-ET Installation Guide...
-
Page 17: Obtaining The Transducer Spacing
The C-ET transducers must be programmed in the flowmeters as special transducers. As specials, four parameters are required: Frequency, Tw, Wedge Angle, and Wedge Soundspeed. Frequency: Frequency is determined based on the part number of the C-ET transducer, and it can be found on the C-ET label. - Page 18 Figure 5: Graph #1: Tw (0.5 MHz Transducer) Model C-ET Installation Guide...
- Page 19 Figure 6: Graph #2: Tw (1.0 MHZ Transducer) Model C-ET Installation Guide...
- Page 20 Figure 7: Graph #3: Wedge Angle Model C-ET Installation Guide...
-
Page 21: Pipe Survey To Determine Od And Wall Thickness
- - - - - - - - - - - - - - - - - - - - - - - - - - - - - - - - - - - - - - - - - - - - - - - - - - for non-concentric pipe ID at transducer location Model C-ET Installation Guide... -
Page 22: Fluid Soundspeed
Tape measure • Thread sealant (for junction boxes only) • 7/16 in. crescent/box wrench or 4 in. adjustable wrench • 1 in. crescent/box wrench or 10 in. adjustable wrench • Other safety equipment suitable for your application Model C-ET Installation Guide... -
Page 23: Setting The Transducer Spacing
Use the edge of the block shown below as the setting point. Zero Point on Measuring Scales Set Screw Mounting Block Set at 2 in. (5 cm) using Set at 2 in. (5 cm) this edge of block Top View Model C-ET Installation Guide... - Page 24 The overall spacing between blocks should be left edge to left edge, or right edge to right edge. Note: If possible, the second block should also be set at least 2 in. (5 cm) from the edge of the fixture. Model C-ET Installation Guide...
-
Page 25: Installing The Fixture
Disassemble the fixture by removing the four nuts from the threaded rods and pulling apart the two halves of the fixture. Note: Make note of the assembled fixture to make sure you reassemble it the same way. Otherwise, the transducer spacing will be incorrect. Model C-ET Installation Guide... - Page 26 Make sure you reassemble the fixture properly to ensure the correct transducer spacing. If the fixture has rulers on the rails, make sure the zero points on each ruler are at the same end of the fixture as shown below. Model C-ET Installation Guide...
- Page 27 Install the four nuts onto the threaded rods with the convex side of the nut facing the fixture. Hand tighten each nut evenly as shown below. DO NOT use a cross-tightening pattern. Nuts (2 places) Top View Tightening Pattern of Bolts Tighten equally first Tighten equally second Front View Model C-ET Installation Guide...
-
Page 28: Preparing The Pipe
Using a permanent marker (or other means based on the temperature of the pipe), mark the inside edges of the fixture. These lines indicate where to clean the pipe. Make sure you mark both sides of the fixture. Remove the fixture. Marks Top View Model C-ET Installation Guide... - Page 29 If you are concerned about removing the reference lines during cleaning, use a tape measure and measure 2 ft (60 cm) from one of the reference lines and mark another line (temporary or permanent). This line can be used as a reference point later. Model C-ET Installation Guide...
-
Page 30: Mounting The Transducers
Apply a bead of couplant 0.25 in. (6 mm) wide along the entire length of each transducer face. The purpose of the couplant is to expel the air gap between the transducer and the pipe. Air will cause the transducer signal to attenuate. Model C-ET Installation Guide... - Page 31 0.25%. Replace the RTV couplant every time the sensor spacing is changed. Repeat the procedure (steps 5 and 6), if necessary, until the soundspeeds are within 0.25%. Remove the CPL-16 and prepare the transducer for solid couplant. Model C-ET Installation Guide...
- Page 32 Mounting the Transducers (cont.) Before the C-ET transducer can be permanently inserted into the clamp, solid sheet couplant must be applied. To do this, lay the solid sheet couplant over the transducer face and bend the ends over the transducer’s heel and toe.
-
Page 33: Installing The Pi Fixture And Transducers
Sandpaper • • File • Ultrasonic thickness gage • Permanent marker • Thread sealant (for junction boxes only) • 7/16 in. crescent/box wrench or 4 in. adjustable wrench • Other safety equipment suitable for your application Model C-ET Installation Guide... -
Page 34: Preparing The Pipe
1.3.4.3 Surveying the Pipe Measure the pipe circumference. IMPORTANT: Do not use a calculated value or a nominal value for the circumference. Mark a line around the entire circumference of the pipe. Circumferential Line Side View Model C-ET Installation Guide... - Page 35 (on a horizontal pipe) to ensure reciprocity of the installation. Mark a small scribe line at the 180 point. and C/2 and C/2 Model C-ET Installation Guide...
- Page 36 1.3.4.3 Surveying the Pipe (cont.) Mark another origin line at the 180 point at least 12 in. (30 cm) long. Model C-ET Installation Guide...
-
Page 37: Installing The First Mounting Block
Circumferential Line Origin Line Front Edge of Mounting Block Carefully wrap the chain around the pipe, taking care not to twist it. Hook the chain into the J-hook. Model C-ET Installation Guide... - Page 38 Installing the First Mounting Block (cont.) Tighten the chain around the pipe so the mounting block can be moved for adjustments. Insert the C-ET transducer without couplant into the mounting block. Confirm that the C-ET mounts into the slider properly.
-
Page 39: Installing The Second Mounting Block
(obtained as described on page 9) on the origin line. Measure from the zero point. Mark the spacing point with a crosshair. Make a second circumferential line at the transducer spacing mark around the entire pipe circumference. Model C-ET Installation Guide... - Page 40 Carefully wrap the chain around the pipe, taking care not to twist it. Hook the chain into the J-hook. Tighten the chain around the pipe so the mounting block can be moved for adjustments, but not so loose that it will move without being touched. Model C-ET Installation Guide...
- Page 41 Adjust the mounting block so the center of the waveguide lines up with the origin line on the pipe. Also, make sure the front edge of the mounting block is still lined up with the circumferential line. When the mounting block is properly aligned, tighten the chain to secure it. Remove the transducer from the mounting block. Model C-ET Installation Guide...
-
Page 42: Mounting The Transducers
Apply a bead of couplant 0.25 in. (6 mm) wide along the entire length of each transducer face. The purpose of the couplant is to expel the air gap between the transducer and the pipe. Air will cause the transducer signal to attenuate. Model C-ET Installation Guide... - Page 43 0.25%. Replace the RTV couplant every time the sensor spacing is changed. Repeat the procedure (steps 5 and 6), if necessary, until the soundspeeds are within 0.25%. Remove the CPL-16 and prepare the transducer for solid couplant. Model C-ET Installation Guide...
- Page 44 Mounting the Transducers (cont.) Before the C-ET transducer can be permanently inserted into the clamp, solid sheet couplant must be applied. To do this, lay the solid sheet couplant over the transducer face and bend the ends over the transducer’s heel and toe.
-
Page 45: Maintenance
Maintenance Transducers, couplant, and the clamping fixture are provided by Panametrics. Once you have completed installation, little maintenance is required. Refer to Table 1 for maintenance information. Table 1: Maintenance Checks... -
Page 46: Specifications
IP 66 European Certification - Weatherproof IMPORTANT: The transducer is protected by a suitable fuse located in the flowmeter electronics. The fuse has a breaking capacity in accordance with the short circuit current of the supply. Model C-ET Installation Guide... - Page 47 RETURN AUTHORIZATION NUMBER (RAN), and shipping instructions for the return of the instrument to a service center will be provided. If Panametrics Sensing instructs you to send your instrument to a service center, it must be shipped prepaid to the authorized repair station indicated in the shipping instructions.
- Page 48 Warranty [no content intended for this page] Model C-ET Installation Guide...
- Page 50 Customer Support Centers U.S.A. The Boston Center 1100 Technology Park Drive Billerica, MA 01821 U.S.A. Tel: 800 833 9438 (toll-free) 978 437 1000 E-mail: mstechsupport@bakerhughes.com Ireland Sensing House Shannon Free Zone East Shannon, County Clare Ireland Tel: +353 (0)61 470291 E-mail: mstechsupport@bakerhughes.com Copyright 2021 Baker Hughes company.
Need help?
Do you have a question about the C-ET and is the answer not in the manual?
Questions and answers