Table of Contents
Advertisement
Quick Links
Advertisement
Table of Contents

Subscribe to Our Youtube Channel
Related Manuals for Security Tronix ST-EZ4


Summary of Contents for Security Tronix ST-EZ4
- Page 1 ST-EZ4 QUICK START GUIDE www.nacebrands.com www.securitytronix.com...
-
Page 2: Table Of Contents
ST-EZ4 QUICK START GUIDE TABLE OF CONTENTS NVR Installation .............................. 6 Hard Disk Installation ............................. 6 Front Panel ............................... 8 Rear Panel ................................ 9 Specifications ..............................10 Specifications ............................10 Specifications ............................11 HDD Storage Calculation Chart ........................12 Menu Operation ............................. 13 Menu Structure ............................ - Page 3 ST-EZ4 QUICK START GUIDE Quick Start Guide About this Manual This Manual is applicable to Securitytronix EZII Network Video Recorders (NVR). The Manual includes instructions for using and managing the product. Pictures, charts, images and all other information hereinafter are for description and explanation only. The information contained in the Manual is subject to change, without notice, due to firmware updates or other reasons.
- Page 4 ST-EZ4 QUICK START GUIDE Regulatory Information FCC Information FCC compliance: This equipment has been tested and found to comply with the limits for a digital device, pursuant to part 15 of the FCC Rules. These limits are designed to provide reasonable protection against harmful interference when the equipment is operated in a commercial environment.
- Page 5 ST-EZ4 QUICK START GUIDE Safety Instruction These instructions are intended to ensure that user can use the product correctly to avoid danger or property loss. The precaution measure is divided into “Warnings” and “Cautions” Warnings: Serious injury or death may occur if any of the warnings are neglected.
- Page 6 ST-EZ4 QUICK START GUIDE Preventive and Cautionary Tips Before connecting and operating your device, please be advised of the following tips: • Ensure unit is installed in a well-ventilated, dust-free environment. • Unit is designed for indoor use only. •...
-
Page 7: Nvr Installation
ST-EZ4 QUICK START GUIDE Thank you for purchasing our product. If there is any question or request, please do not hesitate to contact dealer. NVR Installation During the installation of the NVR: 1. Use brackets for rack mounting. 2. Ensure there is ample room for audio and video cables. - Page 8 ST-EZ4 QUICK START GUIDE 4. Place the HDD on the bottom of the device and then fasten the screws on the bottom to fix the HDD. 5. Re-install the cover of the NVR and fasten screws.
-
Page 9: Front Panel
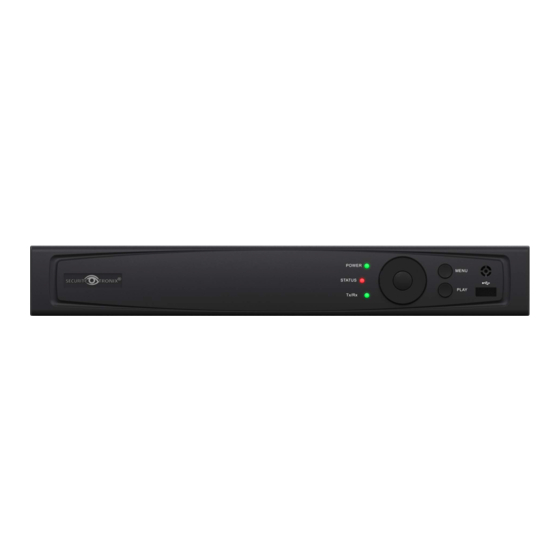
ST-EZ4 QUICK START GUIDE Front Panel Name Function Description POWER POWER indicator turns green when NVR is powered up. STATUS indicator lights in red when data is being read from or written to STATUS HDD. Tx/Rx Tx/Rx indictor blinks green when network connection is functioning properly. -
Page 10: Rear Panel
ST-EZ4 QUICK START GUIDE Rear Panel The rear panel vaires according to different models. Item Description Power Supply 48V DC power supply for 4ch model and AC 100~240V for 8ch and 16ch models. Audio In RCA connector for audio input. -
Page 11: Specifications
ST-EZ4 QUICK START GUIDE Specifications Specifications Model ST-EZ4 ST-EZ8 IP video input 4-ch 8-ch Video/Audio Two-way audio input 1-ch, RCA (2.0 Vp-p, 1kΩ) input Incoming bandwidth 40Mbps 80Mbps Network Outgoing bandwidth 80Mbps Remote connection Recording resolution 6MP/5MP/3MP/1080P/UXGA/720P/VGA/4CIF/DCIF/2CIF/CIF/QCIF Main stream: 50 fps (P) / 60 fps (N) -
Page 12: Specifications
ST-EZ4 QUICK START GUIDE Specifications Model ST-EZ16/8 ST-EZ16 IP video input 16-ch 16-ch Video/Audio Two-way audio input 1-ch, RCA (2.0 Vp-p, 1kΩ) input Incoming bandwidth 160Mbps Network Outgoing bandwidth 80Mbps Remote connection Recording resolution 6MP/5MP/3MP/1080P/UXGA/720P/VGA/4CIF/DCIF/2CIF/CIF/QCIF Main stream: 50 fps (P) / 60 fps (N) -
Page 13: Hdd Storage Calculation Chart
ST-EZ4 QUICK START GUIDE HDD Storage Calculation Chart The following chart shows an estimation of storage space used based on recording at one channel for an hour at a fixed bit rate. Bit Rate Storage Used 128K 160K 192K 224K... -
Page 14: Menu Operation
ST-EZ4 QUICK START GUIDE Menu Operation Menu Structure The menu structure is shown as follows. It vaires according to different models. Menu Playback Maintenance Shutdown Export VCA Search Record Camera Configuration Manual Behavior Normal Normal Schedule Camera General System Info... -
Page 15: Setting The Admin Password
ST-EZ4 QUICK START GUIDE Select the Shutdown button. Click the Yes button. Turn off the power switch on the rear panel when the notice pops up. Setting the Admin Password Purpose: For first-time access, you need to activate the device by setting an admin password. No operation is allowed before activation. -
Page 16: Login And Logout
ST-EZ4 QUICK START GUIDE Login and Logout User Login Purpose: If the NVR has logged out, you must login the device before operating the menu and other functions. Steps: Select the User Name in the dropdown list. Input Password. Click OK to log in. -
Page 17: Live View
ST-EZ4 QUICK START GUIDE Click Logout. After you have logged out the system, menu operation on the screen is invalid. It is required to input a user name and password to unlock the system. Live View Some icons are provided on screen in Live View mode to indicate different camera status. These icons... - Page 18 ST-EZ4 QUICK START GUIDE Select the detected IP camera and click the Add button to add it directly, and you can click the Search button to refresh the online IP camera list manually. Or you can choose to custom add the IP camera by editing the parameters in the corresponding text field and then click the Add button to add it.
- Page 19 ST-EZ4 QUICK START GUIDE 2) You can edit the IP address, protocol, management port, and other information of the IP camera to be added. 3) Click Add to add the camera. For the successfully added IP cameras(s), the Security status shows the security level of the password of each camera: strong password, weak password and risky password.
-
Page 20: Recording
ST-EZ4 QUICK START GUIDE Recording Before you start: Make sure that the HDD has already been installed. If not, please install a HDD and initialize it. You can refer to the user manual for detailed information. Purpose: Two kinds of record types are introduced in the following section, including Instant Record and All-day Record. - Page 21 ST-EZ4 QUICK START GUIDE Option 2: Steps: Enter the Playback menu. Mouse: right click a channel in live view mode and select Playback from the menu. Under multi-screen live view, record files of the selected channel will be played back.
-
Page 22: Backup
ST-EZ4 QUICK START GUIDE Just check the channel or channels if you want to switch playback to another channel or execute simultaneous playback of multiple channels. Backup Recorded files can be backed up to various devices, such as USB flash drives, USB HDDs or a DVD writer. -
Page 23: Vca Detection
ST-EZ4 QUICK START GUIDE VCA Detection Purpose: The NVR supports the VCA detection alarm (face detection, vehicle detection, line crossing detection and intrusion detection, region entrance detection, region exiting detection, loitering detection, people gathering detection, fast moving detection, parking detection, unattended baggage detection, object removal detection, audio loss exception detection, sudden change of sound intensity detection, and defocus detection) sent by IP camera. - Page 24 ST-EZ4 QUICK START GUIDE graphical representation of data represented by colors.
-
Page 25: Accessing By Web Browser
ST-EZ4 QUICK START GUIDE Accessing by Web Browser You shall acknowledge that the use of the product with Internet access might be under network security risks. To mitigate network attacks and information leakage, please strengthen your own protection. If the product does not work properly, please contact with your dealer or the nearest service center. -
Page 26: Live View
ST-EZ4 QUICK START GUIDE prompts to install the plug-in. You may have to close the web browser to finish the installation of the plug-in. Live View The live view interface appears by default when you log into the device. The live view interface may differ according to different models. -
Page 27: Recording
ST-EZ4 QUICK START GUIDE Icon Description Icon Description Select the window-division mode Open/Close audio Start/Stop all live view Start/Stop two-way Audio Capture pictures in the live view Adjust volume mode Start/Stop all recording Enable/Disable digital zoom Previous/Next page Full screen... - Page 28 ST-EZ4 QUICK START GUIDE Select the Record Type for the period. The record type can be Schedule, Motion, Alarm, Motion & Alarm, Motion | Alarm and Event. Click Save to save the settings. icon of the day to copy the settings of the current day to other days of the week if Click the required.
-
Page 29: Playback
ST-EZ4 QUICK START GUIDE Playback The playback interface may differ according to different models. Interface Introduction Name Description Channel List Displays the list of channels and the playing status of each channel. Playback Displays the image of channel. Window Play Control Bar Play control operations are supported. -
Page 30: Mobile Device Access
ST-EZ4 QUICK START GUIDE Button Description Button Description Stop all playback Download Start/Stop video clipping Open/Close audio Full screen Reverse playback You can drag the progress bar with the mouse to locate the exact playback point. You can also input the... - Page 31 ST-EZ4 QUICK START GUIDE Figure 4.3 Registration Figure 4.4 Verification Accept the terms of service, and select a registration method. Verify the account using the code sent to either the email address or phone number used. Figure 4.5 QR Scan Figure 4.4 Add Device...
- Page 32 ST-EZ4 QUICK START GUIDE SECURITYTRONIX 2-Year Limited Stand Alone Digital Video Recorder Warranty Securitytronix. (the "Company") warrants to the Original Purchaser that the Stand Alone Digital Video Recorder is free from defects in workmanship or material under normal use. This warranty starts on the date of shipment of the hardware to the Original Purchaser.
Need help?
Do you have a question about the ST-EZ4 and is the answer not in the manual?
Questions and answers