Advertisement
Quick Links
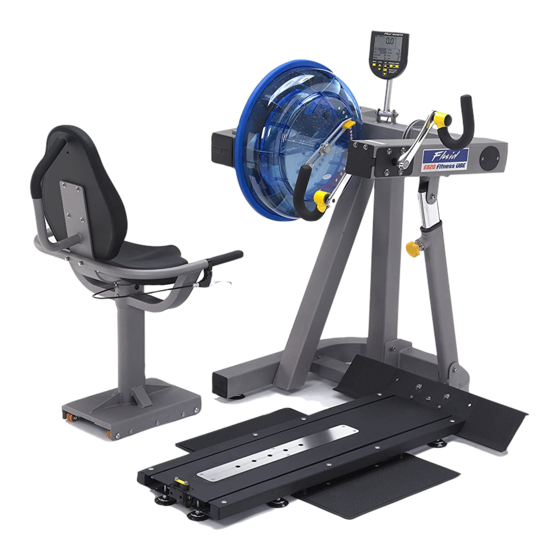
Training with E820/E920
2
As with any piece of fitness equipment, consult a physician before be-
ginning your E820/E920 exercise program.
CAUTION
Use two hands and follow all safety instructions whenever raising
or lowering the E820/E920 control arm.
Warning
Do not remove hands while crank is in motion. The crank will continue
to rotate and could cause injury.
Contents
1. Contents of E820/920 Box.
3. E820/E920 Control arm.
8. Maintenance/Troubleshooting.
9. Tank belt drive adjustment.
10. Parts list and Warranty.
Advertisement

Subscribe to Our Youtube Channel
Related Manuals for Fluid E820


Summary of Contents for Fluid E820
-
Page 1: Table Of Contents
8. Maintenance/Troubleshooting. Use two hands and follow all safety instructions whenever raising 9. Tank belt drive adjustment. or lowering the E820/E920 control arm. 10. Parts list and Warranty. Warning Do not remove hands while crank is in motion. The crank will continue... - Page 2 Box Contents E820/E920 E820 fixed crank arm 1x Seat and base E-920 Adjustable crank arm kit 1x Right crank pedal (E-920 only) Adjustable crank arm kit in- cludes 2x 300mm aluminum crank arms, 3x Frame levelers 2x 10mm L-pins, and separately installed 1x Main frame w/ left/right pedals.
-
Page 3: E820/E920 Assembly Instructions
E820/E920 Assembly Instructions Step 1: Remove contents from box. At- tach telescoping tube to the underside of the control arm using 4x M8x15mm bolts and 4x M8 spring washers. The control arm is heavy and may swing freely during this stage of assembly. - Page 4 E820/E920 Assembly instructions Step 2: Attach base plate to lower mainframe using 2x M10x25mm bolts, 2x M10 Nylock nuts and 4x 21*11*2 washers. M10x25mm bolt Step 3: Tilt the seat rearward until transport wheel is engaged. Secure the seat in any of...
- Page 5 E820(only) Assembly Instructions Note: Allow 15 minutes for the thread locker to activate before first time use. Check pedal tightness periodically thereafter with a 15mm wrench. Step 4: Secure right pedal onto Crank arm. The pedal threads have a green coating which will feel very tight when threaded onto the crank arm.
-
Page 6: E920 Adjustable Crank Arms
E920 (only) Adjustable Crank Arm Kit Installation Instructions Step 4: Secure both left and right crank arms onto the crank axle with M10 L-Pins. Note Left and Right crank arms are marked as such on the rear. (E-920 only) Adjustable crank arm kit includes 2x 300mm aluminum crank arms, 2x 10mm L-pins, and pre-installed left/right pedals. - Page 7 The E820 Control Arm Chain tensioning bolts: Al- lows for tightening the chain or adjustment from side to side. Make sure when tightening only to adjust the same amount for both bolts, otherwise the sprocket will be misaligned. Note: Tightening the right bolt...
- Page 8 The E920 Control Arm Chain tensioning bolts: Al- lows for tightening the chain or adjustment from side to side. Make sure when tight- ening only to adjust the same Crank arm bolts: Loosen amount for both bolts, other- all 8 bolts slightly before wise the sprocket will be mis- adjusting/tightening aligned.
-
Page 9: Tank Filling And Water Treatment
Tank Filling and Water Treatment Note: A large bucket is required for filling (Not included) Open the rear upper yellow tank plug and insert hose into tank (rotating the impeller slightly may be necessary to allow the Filling hose and hose to pass), move the tank adjuster handle to level 20 and funnel begin filling. -
Page 10: Long Term Water Treatment And Basic Operation
First Degree Fitness distributor. Water treatment schedules for the E820/E920 will vary accord- ing to the fluid tanks exposure to sunlight, but expect 8-12 months near a bright, sunlit window and 2 years or more for a darker location. At the point of finding the water slightly cloudy, add a Chlorine tablet. -
Page 11: The E820/E920 Ergometer
E820/E920 Ergometer. Quick start provides instant workout information. Just start training to activate. You can choose to change UNITS dis- played. Note: For complete oper- ational instruc- tions, please refer to the UNITS displays computer man- ual, which is in-... - Page 12 Tighten as required using chain tensioning bolts located at the end of the control arm. E820/E920 pedals. Tighten weekly using 15mm box The pedals should be checked on a regu- wrench (supplied) lar basis.
- Page 13 Contact your local service center if ratic computer display). this fails to address the problem. The E820/E920 computer does not illu- Batteries installed incorrectly Reinstall batteries in correct position and try again. If the LCD minate after battery installation.
- Page 14 Tank Belt Adjustment Rubber belt cover Step 1 Step 2 End Cap Step 1: Remove large metal inspec- tion plate as shown above right. Tip: Twist the belt by hand to gauge tightness. Correct Step 2: Using a long tool, push out tension should be obtained when no longer able to twist the rear end cap as pictured above more than 60 degrees.
- Page 15 Exploded Diagrams/Parts Lists Description Main Frame Assembly 33100 Mainshaft Assembly 20103 20008 End Cap 75x75 Bolt M12x140 10040 10063 Bolt M12x30 Washer M12 10043 Nut M12 Nylon 10042 10066 End Cap 100mm 10067 Rubber Cover for Large PK Pulley Large Steel Side Cover 276mm 10068 10072 Small Steel Side Cover 100mm...
- Page 16 Seat Assembly Description 23501 Seat Frame Seat LS-622 20115 20117 Seat Back LS-622 10080 Bolt M6x20 for Seat 10081 Washer M6 Washer M10 10082 Nut M10 Nylock 10041 10069 End Cap 75x50mm 20008 End Cap 75x75 10101 Rubber Bumper 20186 Seat Frame Bump Stop 20187 Bolt M6x25...
- Page 17 E820 Crank Arm Assembly Description Left Handle Complete 20690 20691 Right Handle Complete 20694 E820 Axle and Cog Side Bearing Cover 20052 20020 Bolt M10x35 10082 Washer M10 20134 Crank-Left Crank-Right 20135 French Screw M8x20xP1.0 20132 20133 Crank End Cap...
- Page 18 Item Description Main Drive Assembly 20157 Shaft+Sprocket 10146 Ball Bearing NSK6006ZZ 10011 Bearing Housing 10012 NSK 6005ZZ Bearing 150mm Large PK Transmission 10015 Pulley 10017 Key way 7x7x32 10052 Grub Screw M4x6 10138 Shaft washer 10139 Spring Washer Flywheel shaft 10109 Belt 7PK 926mm HUTCHINSON 10083...
- Page 19 FDF-9B Tank Assembly 20301 Tank Back Assem- 13205 Tank Cover Assem- 70321...
- Page 20 Flywheel Assembly...
- Page 21 13205 Tank Cover Assembly 13045 13045...
- Page 22 20301 Tank Back Assembly...
- Page 23 Metal Frame – 10 Year Limited Warranty First Degree Fitness will repair or replace the metal Main Frame of the E820/E920 should it fail due to any defect in materials or workmanship within 10 years of the original purchase. Warranty does not apply to frame coating.
Need help?
Do you have a question about the E820 and is the answer not in the manual?
Questions and answers