
Subscribe to Our Youtube Channel
Related Manuals for Russell Hobbs RH12WC3


Summary of Contents for Russell Hobbs RH12WC3
- Page 1 12 Bottle Drinks Cooler User Guide RH12WC3 For Customer Services & Spare Parts please call 0345 208 8750 or visit us at https://mda.russellhobbs.com IMPORTANT: RETAIN FOR FUTURE REFERENCE...
-
Page 2: Table Of Contents
Contents Safety Instructions ………………………………………. Electrical Safety ………………………………………. Transportation and Handling ………………………………………. Installing and Switching on Your Appliance ………………………………………. Before Switching On ………………………………………. Your Appliance and the Compartments …………………………….………… Unit & Spare Parts ………………………………………. Where to Put Your Appliance ………………………………………. Installation ………………………………………. -
Page 3: Safety Instructions
Safety Instructions This appliance is a Semi-conductor electric refrigerating appliance, which is a Category 10 other appliance, according to ErP 643/2009. Its design temperature is 17°C. Important note: Please read this booklet before installing and switching on this appliance. The manufacturer assumes no responsibility for incorrect installation and usage as described in this booklet. - Page 4 • Do not plug-in or un-plug the appliance with wet hands to prevent electrical shock. • This appliance can be used by children aged from 8 years and above and persons with reduced physical, sensory or mental capabilities or lack of experience and knowledge if they have been given supervision or instruction concerning use of the appliance in a safe way and understand the hazards involved.
-
Page 5: Electrical Safety
• One-, two- and three -star compartments (if they are presented in the appliance) are not suitable for the freezing of fresh food. • If the appliance is left empty for long periods, switch off, defrost, clean, dry and leave the door open to prevent mount developing within the appliance. -
Page 6: Installing And Switching On Your Appliance
Installing and Switching on Your Appliance • Operating voltage for your appliance is 220-240V at 50Hz. • Before plugging in the power supply, ensure that the voltage on the rating label corresponds to the working voltage of your electrical system in your home. •... -
Page 7: Before Switching On
Before Switching On • Before using your appliance, add a teaspoon of bicarbonate of soda to warm water and with a damp cloth wipe down all parts of the new appliance, then repeat the process with a clean damp cloth and dry. (ensure the appliance is not connected to the power when performing this task). -
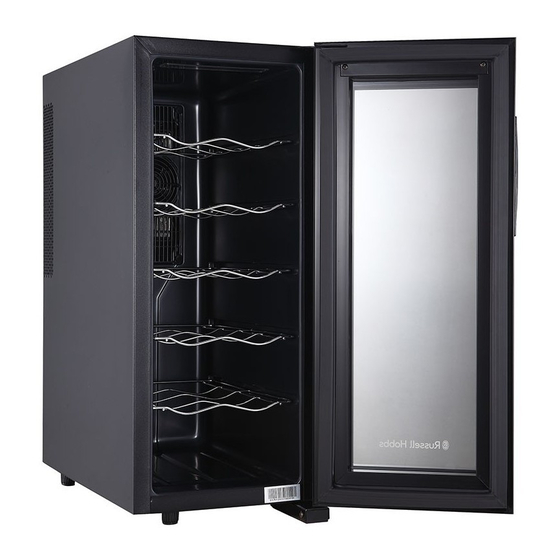
Page 8: Your Appliance And The Compartments
Your Appliance and the Compartments Light switch Feet Temperature adjustment Water box buttons Seal LED display 10. Door frame Light 11. Door window Shelves Parts may vary according to the appliance model. Spare Parts For spare parts please contact customer services or your retailer. Item Quantity Shelf... -
Page 9: Where To Put Your Appliance
Where to put your appliance This appliance should only be placed on a flat, solid surface. Do not place your appliance on a carpeted surface as this will prevent adequate ventilation. Choose a dry and well-ventilated space. No less than 50mm (5cms) must be left around the sides and 100mm (10cms) around the back of the appliance to allow sufficient cooling. -
Page 10: Installation
Installation • The unit should be kept away from direct sunlight. • Remove all transport tapes and foam protection pieces. Clean the interior of the appliance with a cloth dampened in lukewarm soap and water. Wipe with clear water and wipe dry. •... -
Page 11: Usage Information
Usage Information Thermostat Setting Note: The temperature of the freshly stored bottles and how often the door is opened affects the temperature in the compartment. If required, change the temperature setting. • When you first switch on the appliance, to enable suitable cooling, the appliance should work 24 hours continuously until it cools down to sufficient temperature. - Page 12 Usage Information Interior light • The appliance has an interior light and this can be switched on and off, by pressing the light switch that is located next to the temperature adjustment buttons. Shelves • Any of the shelves can be removed, to accommodate larger bottles. •...
-
Page 13: Cleaning And Maintenance
Cleaning and Maintenance • Disconnect the appliance from the power supply before cleaning. • Do not pour water directly over or on the appliance. • The compartment should be cleaned periodically using a solution of bicarbonate of soda and lukewarm water. •... -
Page 14: Reversing The Door
Reversing the Door The doors cannot be reversed... -
Page 15: Troubleshooting
Troubleshooting Problem Solution Check that the appliance is switched on. Check that there has not been a power cut. The appliance doesn't work Check that the plug is not faulty. Check that the fuse has not blown. Check that the voltage is correct for the appliance. Check that there are not too many bottles in the appliance. - Page 16 Troubleshooting Problem Solution Check that no bottles have leaked or any stagnant liquid Smell/odour is at the bottom of the appliance. Clean if required.
-
Page 17: Guarantee
Guarantee This product is guaranteed for 12 months from the date of the original purchase. If any defect arises due to faulty materials or workmanship you must contact customer service or your retailer with the original proof of purchase so a replacement or refund can be arranged. Refund or replacement is at the discretion of manufacturer or retailer. -
Page 18: Technical Specification
Technical Specification Model number RH12WC3 Rated Voltage 220-240V/50Hz Capacity (litres) 12 bottles (75cl)/33 litres Dimensions (CMs): (H)61.6 x (W)25.2 x (D)51.5... -
Page 19: Notes
Notes:... - Page 20 For Customer Services & Spare Parts please call 0345 208 8750 or visit us at https://mda.russellhobbs.com This symbol is known as the 'Crossed-out wheelie bin Symbol'. When this symbol is marked on a product/batteries, it means that the product/batteries should not be disposed of with your general household waste.
Need help?
Do you have a question about the RH12WC3 and is the answer not in the manual?
Questions and answers
Hi, My 4 year old Russell Hobbs RH12WC3 slimline 12 bottle cooler has a fault. Switch it on and temp goes down to 17 / 18c and stays around there, no matter what you choose on digital display. Internal temp, (checked with two manual 'fridge thermometers), shows 0-1c !!! The compressor (???) Is running non-stop. I've cleaned / vacuumed all parts of dust, the 3× fans (blades manually cleaned), and they're running OK, checked door seals (OK), done the 'reset' method several times but to no avail. There are no visual coolant leaks, and no 'strange noises'. It runs quietly, but constantly, but way too cold. I've checked the plug, plus used several different power sockets. Can you advise please what's gone wrong, (I think it might be the digital control panel ?), and if it's repairable ? Thank you in advance.