
Related Manuals for Altimium AMP250


Summary of Contents for Altimium AMP250
- Page 1 User Manual AMP250 Mini Audio Amplifier All Rights Reserved Version: AMP250_2016V1.1...
- Page 2 Any changes or modifications not expressly approved by the manufacture would void the user’s authority to operate the equipment. Altimium www.altimium.com...
- Page 3 Unplug the power cord when left unused for a long period of time. Information on disposal for scrapped devices: do not burn or mix with general household waste, please treat them as normal electrical wastes. Altimium www.altimium.com...
-
Page 4: Table Of Contents
Mini Audio Amplifier Contents 1. Introduction ......................... 1 1.1 Introduction to AMP250 ..................1 1.2 Features ......................1 1.3 Package List ...................... 1 2. Panel Description ......................2 2.1 Front Panel ......................2 2.2 Rear Panel ......................3 3. System Connection ..................... 4 3.1 Usage Precautions .................... -
Page 5: Introduction
1. Introduction 1.1 Introduction to AMP250 AMP250 is a compact-size digital amplifier (Class-D) with 3 inputs (1 L+R stereo audio, 1 analog audio, 1 optical fiber audio). It features switchable stereo or mono output, and boasts complete EQ adjustment and intuitive work status display, making it an ideal addition to a classroom or conference room application. -
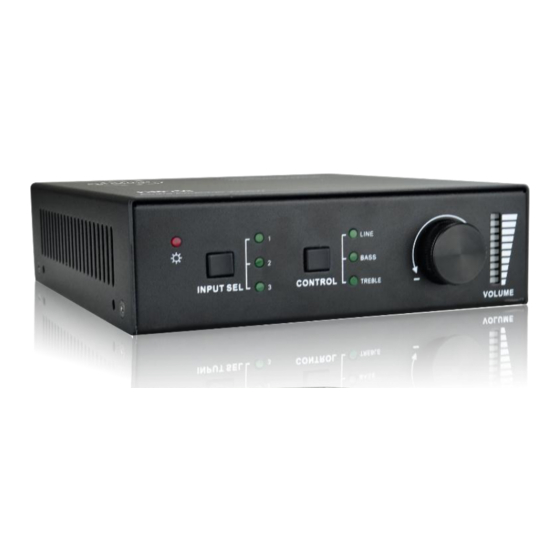
Page 6: Panel Description
Volume Bars bar will be lighted when the audio is muted Operation Format: “INPUT SEL” + “CONTROL” + “Volume Knob” Example: To adjust bass audio of input 3, select input 3 -> choose bass -> adjust the volume knob. Altimium www.altimium.com... -
Page 7: Rear Panel
④ DC 36V Insert DC 36V 2.66A power adapter here ⑤ Connect to grounding Dial the Channel Switcher to demand status before connecting output device. Once connected, do not try to change the status while it’s working. Altimium www.altimium.com... -
Page 8: System Connection
(such as speakers) to audio output port accordingly (Specified in 3.4 Audio Output Connection). Step3. (optional) Insert an IR receiver (5V, without carrier) to IR IN to enable IR control. Step4. (optional) Connect a control device (e.g. a PC) to RS232 port to enable serial control. Altimium www.altimium.com... -
Page 9: Audio Output Connection
Step5. (optional) Connect a control device (e.g. a PC) to TCP/IP port to enable IP control. Step6. Plug DC 36V power adaptor to the power port of AMP250. 3.4 Audio Output Connection 3.4.1 Stereo output (default): 2x50Watt@8Ohm Dial the switcher to STEREO to enable 2 50Watt@8Ohm stereo output mode. Connect... -
Page 10: Loop Connection
Mini Audio Amplifier 3.5 Loop Connection AMP250 boasts a LOOP port for audio signal loop output, max 255 units can be looped within the same operation system. Connect AMP250 like this: Audio Amplifier Audio Amplifier Speaker Speaker Speaker Laptop Figure 3- 4 Loop Connection Then audio signal sent to the first AMP250 is cascaded to other connected AMP250, which enables multiple AMP250 share the same audio source. -
Page 11: System Control
In different EQ control, volume bar tend to act differently: LINE: Line volume can be 0~60, one more volume bar will light when the volume is turned up by 6. BASS: bass volume can be 0~10 Altimium www.altimium.com... -
Page 12: Ir Control
Connect an IR receiver (5V, without carrier) to IR IN port on the rear panel, users are able to control the amplifier by the included IR remote (see as below): Input Selection Mute Unmute Volume Control Including LINE, BASS and TREBLE volume adjustment Figure 4- 2 IR Remote Altimium www.altimium.com... -
Page 13: Rs232 Control
Unused Unused Unused Connect AMP250 to the control device (e.g. a PC) with RS232 cable and set the parameters in the right manner, the control device is capable to control AMP250 via designed software. 4.3.1 Installation/uninstallation of RS232 Control Software Installation: Copy the control software file to the computer connected with AMP250. - Page 14 Command Sending area Command Sending area Please set the parameters of COM number, bound rate, data bit, stop bit and the parity bit correctly, only then will you be able to send command in Command Sending Area. Altimium www.altimium.com...
-
Page 15: Rs232 Communication Commands
Turn down Line volume by X Volume of LINE: 54 Preset line volume, [xx] can be 00~60, 61 7[x][x]% Volume of LINE: 50 degrees in total. Preset the bass level, [xx] can be 00~10, 8[x][x]% Bass of LINE: 7 11 degrees in total. Altimium www.altimium.com... -
Page 16: Tcp/Ip Control
AMP250 can be controlled by PC without Ethernet access or PC(s) within a LAN. Controlled by PC without Ethernet access Connect a computer to the TCP/IP port of the AMP250, and set its network segment to the same as the AMP250’s. -
Page 17: Control Via Tcp/Ip Communication Software
Step3. Set the AMP250’s network segment to the same as the router. Step4. Set the PC’s network segment to the original ones. Step5. Connect the AMP250 and PC(s) to the router. PC(s) within the LAN is able to control the AMP250 asynchronously. -
Page 18: Control Via Web-Based Gui
4.4.3 Control via web-based GUI AMP250 provides with built-in GUI for convenient TCP/IP control. GUI allows users to interact with AMP250 through graphical icons and visual indicators. Type 192.168.0.178 (default IP, changeable via GUI) in your browser, it will enter the... - Page 19 Mute/ Unmute LINE/ BASS/ TREBLE control: drag the volume dot to turn down/ up the corresponding volume Switch to network configuration interface by clicking NETWORK Network Configuration: Figure 4- 5 Audio Selection In this interface, you can: Altimium www.altimium.com...
-
Page 20: Port Management
In this interface, you can: Change website display language Modify network settings: Go to Internet Settings -> WAN Upgrade TCP/IP module: Go to Administration -> Upload Program -> Select program file -> Start upgrading Reboot the device after upgrading. Altimium www.altimium.com... -
Page 21: Specification
75dB 20Hz~20KHz coefficient Voltage Gain 32dB Output Power 1×100W@4Ω/2×50W@8Ω Power Power Supply DC 36V 2.66A 1.48W Consumption Work Reference 0~50℃ 10%~90% Temperature Humility Dimensions 148 x44 x165 mm Weight 0.72kg (W*H*D) NOTE: All nominal levels are at ± 10%. Altimium www.altimium.com... -
Page 22: Panel Drawing
Mini Audio Amplifier 6. Panel Drawing 148.00 mm 13.50 mm Altimium www.altimium.com... -
Page 23: Troubleshooting & Maintenance
Set the network segment of Control device and AMP250 are control device to the same on different network segment with AMP250’s. Fail in TCP/IP control Set the network segment of Network segment of AMP250 is AMP250 to the same with different with LAN’s. -
Page 24: After-Sales Service
Product version and name. Detailed failure situations. The formation of the cases. Remarks: For any questions or problems, please try to get help from your local distributor. Altimium www.altimium.com... - Page 28 ALTIMIUM 587 Avenue Blaise Pascal 77550 MOISSY-CRAMAYEL Tél : 01.64.13.31.00 Fax: 01.60.29.62.70 Mail: contact@tesca-audio.com Web: www.altimium.com...
Need help?
Do you have a question about the AMP250 and is the answer not in the manual?
Questions and answers