Table of Contents
Advertisement
Quick Links
Advertisement
Table of Contents

Related Manuals for Samsung SCH-E159


Summary of Contents for Samsung SCH-E159
- Page 1 9. Users Manual...
- Page 2 * Some of the contents in this manual may differ from your phone, depending on the software installed or your service provider. Depending on your country, your phone and accessories may appear different from the illustrations in this manual. ELECTRONICS Printed in China Code No.
- Page 3 PORTABLE CELLULAR TELEPHONE SCH-E159 User’s Manual...
-
Page 5: Table Of Contents
Table of contents Important safety precautions......7 Unpacking ............9 Your phone............. 10 Phone layout ............10 Display..............13 Backlight ..............17 Camera ..............17 Getting started ..........18 Using a UIM card ............. 18 Using a battery............19 Switching the phone on or off........23 Using the PIN code .......... - Page 6 Entering text ..........40 Changing the text input mode ........41 Using Chinese Pinyin mode ........42 Using Chinese Stroke mode........46 Using 123 mode ............49 Using Symbol mode ..........49 Using ABC mode ............49 Using T9 Word mode..........51 Using the menus ..........
- Page 7 Entertainment ..........132 3D game ..........132 (Menu 7-1) ............132 (Menu 7-2) ............. 137 (Menu 7-3) Melody composer ........139 (Menu 7-4) Karaoke ..........143 (Menu 7-5) Fun club ..........144 (Menu 7-6) Samsung messenger ......144 (Menu 7-7)
- Page 8 Utilities............150 Calendar ..........150 (Menu 8-1) Alarm ........... 153 (Menu 8-2) User memory ........154 (Menu 8-3) I.Beam ..........157 (Menu 8-4) Mini dictionary ........161 (Menu 8-5) Calculator ..........162 (Menu 8-6) Today ........... 162 (Menu 8-7) To do list ..........
-
Page 9: Important Safety Precautions
Important safety precautions Read these guidelines before using your wireless phone. Failure to comply with them may be dangerous or illegal. Road safety at all times Do not use a hand-held phone while driving; park the vehicle first. Switching off when refuelling Do not use the phone at a refuelling point (service station) or near fuels or chemicals. - Page 10 Keep the phone and all its parts including accessories out of the reach of small children. Accessories and batteries Use only Samsung-approved accessories and batteries. Use of any unauthorised accessories could damage your phone and may be dangerous. Qualified service Only qualified service personnel may repair your phone.
-
Page 11: Unpacking
Unpacking Your package contains the following items: Handset Travel adapter User’s manual Batteries Note: The illustrations above may look different from your phone and accessories. -
Page 12: Your Phone
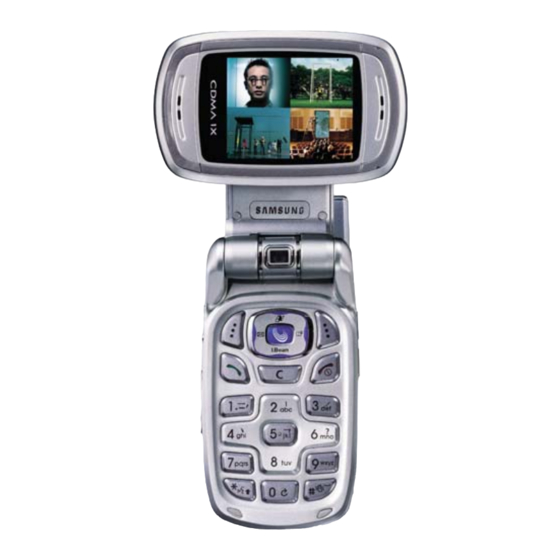
Your phone Phone layout The following illustrations show the main elements of your phone: With the phone open Earpiece Display Navigation (right/left/up/ Down) keys uni key Soft key (left) Soft key (right) Headset jack Power on/off/ Menu exit key Dial/Menu confirm key Alphanumeric keys... - Page 13 Your phone With the phone closed Antenna Infrared port Camera Camera/Voice External display memo key MP3 key Key(s) Description Performs the functions indicated by the text on the bottom line of the display. (soft keys) In Standby mode; quickly enters the following menus respectively: •...
- Page 14 Your phone Key(s) Description (continued) Ends a call. Also switches the phone on and off when pressed and held. In Menu mode, cancels your input and returns the phone to Standby mode. Deletes characters from the display. In Menu mode, returns you to the previous menu level.
-
Page 15: Display
Your phone Key(s) Description (continued) (on the right side of the phone) In Standby mode, enters the MP3 menu. During a call, activates or deactivates the noise cancellation feature. (on the left side of the phone) In Standby mode, with the phone open, adjusts the key tone volume. - Page 16 Your phone Icons Icon Description Signal strength: Shows the received signal strength. The greater the number of bars, the better the signal. Service: Appears when a call is in progress. No service: Appears when you are outside a service area. When it displays, you cannot make or receive calls.
- Page 17 (continued) Urgent SMS: Indicates that there is an urgent message waiting to be viewed. Samsung messenger invite message: Indicates that there is a new Samsung messenger invite message waiting to be viewed. Alarm mode: Appears when you set an alarm to ring at a specified time.
- Page 18 Your phone Icon Description (continued) Ringer then vibration: Appears when the ringer type for calls is set to Ringer then vib. Silent mode: Appears when your phone is in Silent mode. Battery status: Shows the level of your battery. The more bars you see, the more power you have remaining.
-
Page 19: Backlight
Your phone Backlight The backlight illuminates the display and the keypad. When you press any key or open the phone, the backlight comes on. It goes off when no keys have been pressed within a given period of time, depending on the setting in the Backlight menu (Menu 4-3). -
Page 20: Getting Started
Getting started Using a UIM card The UIM (User Identification Module) card contains chips with all the information required to operate your phone. Note the following: • Keep all UIM cards out of the reach of small children. • The UIM card and its contact can be easily damaged by scratching or bending, so be careful when handling, inserting, or removing the card. -
Page 21: Using A Battery
Your phone is powered by a rechargeable Li-ion battery. Use only approved batteries and chargers. Ask your local Samsung dealer for further details. Note: You must fully charge the battery before using your phone for the first time. A discharged battery recharges fully in approximately 200 minutes for a standard battery. - Page 22 Getting started 2. Press the battery until it clicks into place. Make sure that the battery is properly installed before switching on the phone. Removing the battery 1. If necessary, switch off the phone by pressing and holding the key down until the power-off image displays.
- Page 23 Getting started Charging the battery A travel adapter and a battery charger are provided for charging your batteries. Using the travel adapter The travel adapter allows you to use the phone while the battery is charging, but this will cause the battery to charge more slowly.
- Page 24 Getting started 3. When charging is finished, unplug the adapter from both the power outlet and the phone by pressing the buttons on both sides of the connector and pulling out the connector. Note: You must unplug the adapter before removing the battery from the phone during charging;...
-
Page 25: Switching The Phone On Or Off
Getting started Switching the phone on or off 1. Open the phone. 2. Press and hold the key for more than one second to switch on the phone. 3. If the phone asks for a Personal Identification Number (PIN), enter the PIN code supplied with the card. -
Page 26: Using The Pin Code
Getting started WARNING! Do not switch on the phone when mobile phone use is prohibited or when it may cause interference or danger. Note: Do not touch the antenna on the phone unnecessarily when the phone is switched on. Contact with the antenna affects the call quality and may cause the phone to operate at a higher power level than otherwise needed. -
Page 27: Using The Soft Keys
Getting started Using the soft keys Your phone offers a set of functions that allows you to use and customise it. These functions are arranged in menus and submenus, accessed using the two soft keys, . Each menu and the submenu allow you to view and alter the settings of a particular function. -
Page 28: Your Phone's Modes
Getting started Your phone’s modes Standby mode Standby mode is the most basic state of your phone. The phone goes into Standby mode soon after you turn it on, or whenever you briefly press key. When your phone is in Standby mode, you will typically see the current time and date. - Page 29 Getting started Lock mode When you lock your phone using the Phone lock menu (Menu 9-3-1), you can receive messages and calls, but you cannot place calls until you unlock the phone. For further details about locking and unlocking the phone, see page 173.
-
Page 30: Call Functions
Call functions Making a call To make a call: 1. In Standby mode, enter the area code, and phone number. While entering a phone number, press the Pause soft key to insert a hard pause. For more information on pause dialling, see page 32. Note: If you enter four digits, the phone will display those numbers stored in the call log or Phonebook that contain those digits. -
Page 31: Ending A Call
Call functions Ending a call When you want to finish your call, press the key. The call time, the length of the call, displays along with the phone number of the called person. If the number is stored in your Phonebook, the name displays. -
Page 32: Using The Recent Calls List
Call functions Using the Recent calls list The phone stores the most recent calls you have dialled, received, or missed chronologically. The last call is saved in the first position. To recall any of these numbers: 1. If there are any characters on the display, return to Standby mode by pressing the key. -
Page 33: Speed Dialling
Call functions Speed dialling You can assign your most frequently used numbers from Phonebook to one- or two-digit speed dial keys in the Speed dial menu (Menu 2-4). For details, see page 91. Then you can dial one of the speed dial entries by pressing and holding the number keys. -
Page 34: Pause Dialling
Call functions 3. When you set the phone to display one best result for your voice command in the Result display menu, skip to step 4. If you set the phone to display three best results, say “No” until you hear the name you want, or select the name you want from the display and press the Select soft key. - Page 35 Call functions 3. Enter the digits that need to follow the pause, such as your account number. 4. Repeat steps 2 and 3 to add more pauses and numbers, if necessary. 5. Store the number in your Phonebook as you normally would by pressing the Save soft key and following the procedure on page 88.
-
Page 36: Adjusting The Volume During A Call
Call functions 4. Repeat steps 2 and 3 to add more pauses and numbers, if necessary. 5. Press the key. 6. After connecting, wait for the prompt from teleservice. Press the key again after the prompt to send the additional number(s). Adjusting the volume during a call During a call, if you want to adjust the voice volume, use the Volume keys on the left side of the... -
Page 37: Answering A Call
Call functions Answering a call When somebody calls you, the phone rings and displays an incoming call image. If the caller can be identified, the caller’s phone number or name, if stored in Phonebook, displays. There are many ways to answer a call, depending on your setting in the Answer mode menu (Menu 9-1). -
Page 38: Rejecting A Call
Call functions Rejecting a call To reject an incoming call, press the Reject soft key or the key. Press and hold either of the Volume keys on the left side of the phone. Note: You can set up the list of numbers from which you want to reject calls automatically in the Call reject menu (Menu 1-8). -
Page 39: Options During A Call
Call functions Options during a call Your phone provides a number of functions that you can use during a call. Using the In-call options Press the Menu soft key during a call to access the following options: Mute/Quit: allows you to switch off your phone’s microphone, so that the other person cannot hear you. -
Page 40: Recording Your Call Conversation
Call functions Recording your call conversation You can record your conversation during a call. Press and hold the Camera/Voice memo key to start recording. You can access the recorded conversation in the Voice memo menu (Menu 8- 9-2). Call forwarding When you enable the Call forward menu (Menu 1-5), your phone forwards incoming calls to another phone number, even when your phone is... -
Page 41: Three-Way Calling
Call functions 2. Press the key again to switch between the two calls. 3. To end the call, press the key or close the phone. All of the calls are disconnected. Three-way calling This feature enables you to conduct conference calls with two separate people at the same time. -
Page 42: Entering Text
Entering text At many times when using your phone, you will need to enter text; for example, when storing a name in Phonebook, writing a text message, or scheduling events in your calendar. You can enter alphanumeric characters into your phone by using your phone’s keypad. -
Page 43: Changing The Text Input Mode
Entering text Changing the text input mode Example: Writing a text message 1. In the text entry screen, press the Mode soft key. 2. Scroll to the mode you want by pressing the Navigation keys. Note: If you want to exit the Mode list without changing to a new mode, press the C key. -
Page 44: Using Chinese Pinyin Mode
Entering text Using Chinese Pinyin mode Pinyin is a system to write the pronunciation of a Chinese word using the Latin alphabet. With the Pinyin input method, you can enter Chinese characters by keying in the Pinyin string using the phone’s keypad. - Page 45 Entering text 2. If you cannot find the character you want from the display, press the Up or Down key to scroll through the choices in the character selection field. When the character you are typing appears, you may select it, without completing the Pinyin spelling.
- Page 46 Entering text Using the tones You can enter another character assigning a tone for the selected Pinyin. Entering a tone for a character is optional, but it is especially useful if the Pinyin spelling is similar for several characters. 1. Press the keys corresponding to the letter you need.
- Page 47 Entering text 3. If you cannot find the character you want from the display, press the Up or Down key to scroll through choices in the character selection field. 4. When you find the character you want to enter, press a key from the 1 to 6 keys, corresponding to the character.
-
Page 48: Using Chinese Stroke Mode
Entering text Clearing strokes and characters Press the C key once or repeatedly to remove strokes one by one to the left. Once the Pinyin input field is empty, pressing the C key removes a letter from the text area. To clear all of the strokes and characters on the display, press and hold the C key. - Page 49 Entering text Typing strokes and characters in Stroke mode 1. To type a character, press the keys corresponding to its component strokes. Press keys in the order that you would write the strokes, using one press per stroke. Example: Typing “ ”...
- Page 50 Entering text 3. When the character you are typing appears in the character selection field, you may select it without finishing the stroke sequence for the character. Characters displayed correspond to keys from the 7 to key on the keypad. To select a character and add it to your message, press the corresponding key from the 7 to key.
-
Page 51: Using 123 Mode
Entering text Using 123 mode 123 mode enables you to enter numbers. Press the keys corresponding to the digits you want. Using Symbol mode Symbol mode enables you to enter symbols. Press the Left or Right key to display more symbols. Press the keys corresponding to the symbol you want. - Page 52 Entering text Refer to the table below for the list of characters assigned to each key. Characters in the order displayed . @ – _ / : ~ ? , 1 ; ' ( ) ! # % & * < > + = " \ { } $ [ ] (Caps Lock mode) Changing the letter-case To shift the case of the next letter(s) that you type,...
-
Page 53: Using T9 Word Mode
Entering text Scrolling To move the cursor to the left or right through your text message, press the Navigation keys. Clearing letters and words Press the C key once or repeatedly to clear letters one by one to the left. Press and hold the C key to erase all of the letters on the display. - Page 54 Entering text 4. Insert a space between words by pressing the key. To type words not found in T9 Word mode, you need to change the text input mode to ABC mode. Changing the letter-case To shift the case of the next letter(s) that you type, press the key.
-
Page 55: Using The Menus
Using the menus The phone offers a range of functions that allows you to tailor it to your needs. These functions are arranged in menus and submenus. They can be accessed by scrolling or using the shortcuts. You can set up a menu of your favourite features so that you can quickly access the menus you use frequently. -
Page 56: Using Shortcuts
Using the menus Using shortcuts The menu items, such as menus, submenus, and setting options, are numbered and can be accessed quickly by using their shortcut numbers. Note: The numbers assigned to each menu function are indicated on the list on page 56. 1. - Page 57 Using the menus Setting up favourite item access 1. In Standby mode, press and hold the Menu soft key. 2. Select a location and press the Menu soft key. 3. Select Register and press the Select soft key. 4. Scroll to the menu you want and press the Regist soft key.
-
Page 58: List Of Menu Functions
Using the menus List of menu functions The following list shows the menu structure and indicates the number assigned to each option. 1. Calls (see page 79) 1.1 Missed 1.2 Incoming 1.3 Outgoing 1.4 Air time 1.4.1 Last call 1.4.2 Total 1.4.3 Erase total 1.4.4 Life time 1.5 Call forward... - Page 59 Using the menus 3. Camera (see page 98) 3.1 Take photo 3.2 My album 3.3 Photo studio 3.3.1 Wizard effect 3.3.2 Basic effect 3.3.3 Decoration 3.3.4 Photo sticker 3.3.5 Video capture 3.3.6 Composition 3.3.7 Revision 3.3.8 Flip 3.3.9 Text composition 3.4 Settings 3.4.1 Sound 3.4.2 Long camera key...
- Page 60 Using the menus 5. Message (see page 119) 5.1 New message 5.2 Inbox 5.2.1 Phone 5.2.2 Card 5.2.3 Voice mail 5.2.4 Web alert 5.3 Outbox 5.3.1 Phone 5.3.2 Card 5.4 Msg setup 5.4.1 Scroll timer 5.4.2 Msg. reminder 5.4.3 Alert on call 5.4.4 Canned msg.
- Page 61 7.3.1 VOD files 7.3.2 Connect to server 7.3.3 Settings 7.4 Melody composer 7.4.1 Compose melody 7.4.2 My melodies 7.5 Karaoke 7.6 Fun club 7.7 Samsung messenger 7.7.1 Messenger 7.7.2 History 7.7.3 Settings 8. Utilities (see page 150) 8.1 Calendar 8.2 Alarm 8.3 User memory...
- Page 62 Using the menus 9. Settings (see page 171) 9.1 Answer mode 9.2 Roam option 9.3 Security 9.3.1 Phone lock 9.3.2 Change lock 9.3.3 Emergency # 9.3.4 Voice privacy 9.3.5 Restriction 9.3.6 GPS settings 9.3.7 Clear memory 9.3.8 Reset phone 9.3.9 Card setup 9.4 Entry method 9.5 Data option 9.6 Domains preset...
-
Page 63: Uni
This menu is supplied by your service provider. The contents available in each menu option may be different depending on the service provided. For further details, contact your service provider. Note: You can quickly access this menu by pressing key in Standby mode. Your phone comes equipped with a WAP (Wireless Application Protocol) browser which makes it possible for you to access the Wireless Web. - Page 64 Entering text in the WAP browser You can enter text in the WAP browser as you would in normal phone mode. For details about entering text in each mode, see page 40. Using the browser menu options While navigating the web sites, you can use various options.
- Page 65 Show URL: displays the URL address of the site where you are currently connected. Exit: exits the WAP browser and returns to Standby mode. Advanced...: provides you with the further options. Restart Browser: restarts the WAP browser without exiting it. Delete Cookies: deletes all of cookies and files.
-
Page 66: Mail
Security: displays all security-related information, such as Secure Prompt, Authentication, and Current Certificate. Restore default value: allows you to restore the default settings for the advanced feature. Send Link: allows you to send the URL address of the current web page as a new e-mail. Clear Memory: clears information stored in the History list, the cache, and Auto Fill form, and cookies. - Page 67 2. Press the Edit soft key ( ) again. 3. Enter a destination and press the Ok soft key. 4. If you want to send the e-mail to more than one person, repeat steps 2 and 3. Alternatively, on the Recipient List screen, you can press the Menu soft key to access the following options: •...
- Page 68 5. Press the OK soft key to return to the New Mail screen. 6. Press the Down key to access the subject line and press the Edit soft key ( ). 7. Enter the subject of your e-mail and press the Ok soft key.
- Page 69 Inbox This mail box is used to store e-mails that you have received. Received e-mails are saved in the Folder0 folder by default. If you set filters (see page 68), a new e- mail will be saved in the folder containing the filter that corresponds the sender’s address.
- Page 70 Forward: allows you to forward the e-mail to other destinations. Protect: locks the e-mail to keep it from being deleted. Delete: allows you to delete the e-mail. Move to Folder: allows you to move the e-mail to another folder. Show Full Addr: shows the addresses of all recipients of the e-mail.
- Page 71 Send Box This mail box is used to store e-mails that you have sent or tried to send. When you enter this menu, a list of e-mails in the box displays, along with the time and date the e-mails were sent, the recipients’ e-mail addresses, and the subjects of the e-mails.
- Page 72 Sort: allows you to change the sort order of the e-mail list. Show Full Addr: shows the addresses of all recipients of the e-mail. Copy Mail Body: copies the selected text of the e-mail. You can paste the copied text when writing a new e-mail.
- Page 73 Erase: erases the currently selected item. Erase all: erases all of the items stored in the selected folder. • Press the Play soft key to view the selected item. SMIL Editor In this menu, you can create a new SMIL file, which is a combination of an image, text, and a sound clip, and then send it to other people by attaching it to an e-mail.
- Page 74 10. Press the OK soft key. 11. To add more slides, repeat steps 2 to 10. You can add up to 5 slides for an SMIL file. 12. When you have finished, press the OK soft key to save the SMIL file. Using SMIL slide options You can use the following options by pressing the Menu soft key in the Image, Text, or Audio field on...
- Page 75 SLIDE Move: allows you to move the selected slide to the position you want. SLIDE Delete: allows you to delete the selected slide. Editing SMIL files 1. Select Open SMIL from the SMIL Editor screen, and press the OK soft key ( ). 2.
- Page 76 Receive Atchmnt: you can set whether or not the phone retrieves e-mails with their attachments. Play Atchmnt: you can set whether or not the phone first displays attached files in an e-mail and then shows you the body of the e-mail, or shows the body first.
-
Page 77: Magic
View Mail Settings: shows you the current mail settings. About: shows you the software version and copyright information of your uni-Mail service. Magic In this menu, you can use various Brew applications. On the main screen of the menu, there are 4 default applications available: •... - Page 78 2. Press the key when the Catalog option is selected. You are accessed to the associated web site preset by your service provider and you can browse the available applications. 3. Select the application you want to download and follow the instructions on the screen. Downloaded applications will display on the main screen of the uni-Magic menu.
-
Page 79: Channel
• Main Menu View: allows you to change the view mode of the main menu screen. • Screen Savers: allows you to activate the Screen Saver application, if downloaded. • View Log: shows the records of your browsing. 3. When you are finished, press the C key or the key. -
Page 80: Map
In this menu, you can use a location service based on GPS positioning technology. With this service, you can easily find friends, gas stations, restaurants, and other locations. For further details, contact your service provider. Info This menu is available only when you use a UTK UIM card that provides additional services. -
Page 81: Calls
Calls You can use the Calls menu to: • view and dial the most recent missed, incoming, or outgoing numbers. • view the duration of calls. • set the phone to receive the second call or to forward incoming calls to a preset number. •... -
Page 82: Incoming (Menu 1-2)
Calls Press the place a call key. view other calls Navigation keys. When viewing an entry, press the Menu soft key to access the following options: Talk: dials the currently selected number. Save: allows you to save the number in Phonebook. -
Page 83: Outgoing (Menu 1-3)
Calls Outgoing (Menu 1-3) The phone stores the most recent calls you have dialled. When you access this menu, a list of the outgoing calls displays. For further details, see “Missed” on page 79. Air time (Menu 1-4) Your phone records the amount of air time, or talk time, used. -
Page 84: Call Forward (Menu 1-5)
Calls Call forward (Menu 1-5) This network service allows incoming calls to be forwarded to another number. To set your forwarding options: 1. Select the type of call forwarding and press the Select soft key. The following options are available: •... -
Page 85: Call Waiting (Menu 1-6)
Calls Call waiting (Menu 1-6) The call waiting feature alerts you of incoming calls while you are on a call. To enable the feature, select Enable by using the Navigation keys and press the Save soft key. When this feature is enabled, you can respond to an incoming call by pressing the key while you are on a call. -
Page 86: Call Reject (Menu 1-8)
Calls 4. If you have selected a country or province, select one of the cities that belong to the selected area and press the Dial soft key. If you have selected a city, skip this step. 5. When the area code of the selected city appears on the Dialling mode screen, enter the rest of the phone number you want to dial. -
Page 87: Phonebook
Phonebook You can store phone numbers and their corresponding names in the memories of your card and the phone. The card and phone’s memories, although physically separate, are used as if they were a single entity, called Phonebook. Find (Menu 2-1) This menu allows you to find an entry using a person’s name, group name, or memory location. - Page 88 Phonebook 4. When the entry you want highlights, choose one of the following options: • Press the key to place a call to the entry’s primary number. When the entry has more than one number, the default is the Mobile number or the first saved number.
- Page 89 Phonebook Copy: allows you to copy the number to another memory location. Speed dial: allows you to set the currently selected number as a speed dial entry. For further details, see page 91. Edit: allows you to change the selected item. Erase: erases the entry.
-
Page 90: Add (Menu 2-2)
Phonebook 3. Press the Left or Right key to select a memory, Card or Phone. Each time you select a memory, a list of the associated entries displays. 4. Follows from step 3 in “Finding an entry by name” on page 85. (Menu 2-2) This menu allows you to add a new entry to your Phonebook. - Page 91 Phonebook • Image: Press the Edit soft key to assign one of the photos you took using the camera or the default icons as a caller ID image to be displayed when you receive a call from the selected number. •...
-
Page 92: Group Setting (Menu 2-3)
Phonebook Group setting (Menu 2-3) This menu allows you to add a new relation group or change the name of a group. You can also delete a group. Adding a new group 1. When is highlighted, press the Add soft key. -
Page 93: Speed Dial (Menu 2-4)
Phonebook 4. Enter a new group name and press the OK soft key. 5. Press the Down key and select a ringer category you want using the Left or Right key. 6. Press the Down key and select a ringer melody for the group. - Page 94 Phonebook 2. Enter the location number you want or scroll to the number you want using the Up or Down key. Note: Entering a number lists all of the location number containing the entered number. 3. When the location number you want highlights, press the Add soft key.
-
Page 95: Name Card (Menu 2-5)
Phonebook Name card (Menu 2-5) In this menu, you can create your name card and send it to other phones using the Mail service. You can also send a Phonebook entry as a name card format. Send a card (Menu 2-5-1) You can send a name card from the Name card book, which stores your name card and the name cards you have saved, or an entry from Phonebook... - Page 96 Phonebook • Addr Book: allows you to find an e-mail address stored in your Phonebook. • Sent History: allows you to find an e-mail address in the list of the e-mail messages to which you have sent e-mails. • Addr Group: allows you to bring up a list of your caller groups.
- Page 97 Phonebook 12. Choose Select Attach and press the OK soft key. In each folder, select items by pressing the Select soft key, press the Menu soft key, and then select Add. After selecting items, press the Attach soft key to attach them to your e- mail.
- Page 98 Phonebook Note: After sending, the phone automatically saves the sent name card to the Name card book as Send a card.vcf. Name card book (Menu 2-5-2) In this menu, you can create and edit your name card. You can also access the name cards you have saved and the last name card you sent.
-
Page 99: My Phone # (Menu 2-6)
Phonebook Add to phonebook: saves the name card as a Phonebook entry. Erase: allows you to erase the currently selected name card. This option is only shown for the name cards you have sent. My phone # (Menu 2-6) This menu shows your phone number. To change the phone number: 1. -
Page 100: Camera
Camera Using the camera module built into your phone, you can take photos of people or events while on the move. You can send photos to other people using a message or set photos as a wallpaper image, or an opening or closing image. - Page 101 Camera You can rotate the display to view a wider image, as shown below. Note: Depending on the setting in the Rotation mode menu (Menu 9-8), rotating the display will turn on the camera from any screen. For details, see page 180. Taking a photo 1.
- Page 102 Camera 4. Press the Save soft key to save the photo(s). To discard the photo(s) and go back to Capture mode, press the Cancel soft key or the C key. The phone saves the photo(s) in the My album folder (Menu 3-2) and returns to Capture mode. Using camera options in Capture mode When you press the left soft key in Capture mode, you can access the following options for the current...
- Page 103 Camera Frame: allows you to use a decorated frame. Preview layout: allows you to select a display style in Capture mode. Icons ( ): allows you to view the full screen with the available option icons. No icons ( ): allows you to view the full screen without icons.
- Page 104 Camera Recording a video 1. On the Capture screen, press the 1 key repeatedly until the icon appears to switch to Record mode. The image to be captured appears on the display. 2. Adjust the image by rotating the camera and aiming it at the subject.
- Page 105 Camera 3. Press the right soft key or the Camera/Voice memo key to start recording. 4. When you are finished, press the right soft key or the Camera/Voice memo key again. Otherwise, the phone will automatically stop when the recording time expires. 5.
- Page 106 Camera Size/Quality: allows you to select an image size and quality. White balance: allows you to adjust the colour balance of the video to remove the current lighting conditions add. With the setting, you can make your video clip appears warmer or cooler. Self timer: allows you to set a time delay before the camera records a video.
-
Page 107: My Album (Menu 3-2)
Camera My album (Menu 3-2) In this menu, you can review the photos you have taken and the videos you have recorded. Viewing a photo 1. Select Single or Multi by pressing the Left or Right key. 2. Enter the name of the photo or scroll to the photo you want to view using the Up or Down key. - Page 108 Camera 3. Press the Select soft key to play the video you selected. You can also press the Option soft key. For further details, see the next sections. Press the pause or resume key. stop STOP soft key. skip forward Right key.
-
Page 109: Photo Studio (Menu 3-3)
Camera Set phonebook: allows you to set the file as a caller ID image for a Phonebook entry. This option is only available for photos. Rename: allows you to change the file name. Note: When you change a file name, do not use the special characters, such as /, \, ?, <, >, and so File info: allows you to view information about the file. - Page 110 Camera 2. Press the Left or Right key to select a effect. You can compare the changed photo with the original by pressing the Compare soft key. 3. Press the Save soft key. 4. Enter a name for the photo and press the OK soft key.
- Page 111 Camera 2. Press the Option soft key to access the following editing options: • Fun frame: allows you to select a decorative frame using the Navigation keys. • Clip: allows you to select a clip and move it to the position you want by pressing the Navigation keys.
- Page 112 Camera Photo sticker (Menu 3-3-4) You can cut a part of a photo and save the copy of the photo as a sticker. 1. Select Saved photo and select a photo from the My album folder, or select New photo and take a new photo.
- Page 113 Camera Composition (Menu 3-3-6) You can combine one photo with another photo so that you can make a new photo. 1. Press the Open soft key on the Main field. 2. Select Saved photo and select a photo from the My album folder, or select New photo and take a new photo.
- Page 114 Camera • Sharpness: allows you to adjust the image sharpness. Increasing the sharpness makes the image appear more focus. • Brightness: allows you to adjust the brightness of the image. • Hue: allows you to change the colour tone of the image.
- Page 115 Camera Text composition (Menu 3-3-9) You can extract text from a photo and add it to another photo. Note: It may not be possible to extract text from non- mono colour background photo. 1. Press the Open soft key on the Main field. 2.
-
Page 116: Settings (Menu 3-4)
Camera Settings (Menu 3-4) This menu allows you to change the default settings for the options when using the camera. The following options are available: Sound: allows you to select a sound when you press the shutter, the right soft key or the Camera/ Voice memo key. -
Page 117: Display
Display The display feature enables you to customise various settings for the display and the backlight. Image box (Menu 4-1) This menu allows you to change the background image to be displayed in Standby mode or when the phone is turned on or off. You can also select an image when you have incoming calls. -
Page 118: Banner (Menu 4-2)
Display Banner (Menu 4-2) This menu allows you to set a banner message to be displayed at the bottom of the display in Standby mode. To change the banner: 1. If necessary, press and hold the C key to clear the old message. -
Page 119: Set Time (Menu 4-5)
Display Set time (Menu 4-5) This menu allows you to set the current time and date or set up the time zones for the Dual Clock wallpaper. The following options are available: Main clock (Menu 4-5-1) You can set the current time and date. When you select this menu, the current settings, if set, displays. -
Page 120: External Clock (Menu 4-6)
Display 2. Select the time zone for the bottom clock by pressing the Left or Right key. 3. Press the Save soft key. Note: You can apply the daylight savings time for each clock. When a clock highlights, press the DST off soft key. -
Page 121: Message
Message Your phone can receive voice mail messages, SMS (Short Message Service) messages, and web messages from your web server. Your phone can also send text messages if your system supplier provides this service. Incoming messages are received even when your phone is in Lock mode. - Page 122 Message • Ack: allows you to activate or deactivate the delivery acknowledgement feature. When this feature is activated, the network informs you when your message is delivered to the recipient. • Save: allows you to select one of the following saving options: Save &...
-
Page 123: Inbox (Menu 5-2)
Message Inbox (Menu 5-2) Your phone can store SMS messages and their corresponding caller ID in your card and phone’s memories. If your memory is full, the screen displays a text notification and rejects additional incoming messages until you erase the obsolete ones. - Page 124 Message Erase: erases the currently selected message from your Inbox. Reply: allows you to send a reply message to the sender. Forward: allows you to send the message to other people. Call/Save: shows the sender’s number of the message. Press the key to make a call to the sender’s phone number.
-
Page 125: Outbox (Menu 5-3)
Message Web alert messages When you select the Web alert menu (Menu 5-2- 4), the phone accesses your Alert Inbox on the WAP browser, so that you can view a web message from your web server. For details about reading a web message, see “Text messages”... -
Page 126: Msg Setup (Menu 5-4)
Message Edit: allows you to edit the message. Call/Save: shows the recipient’s number of the message. Press the key to make a call to the recipient’s phone number. Press the Save soft key to save it. Move to phone (card): allows you to move the message to the card or phone’s memory. - Page 127 Message Msg. reminder (Menu 5-4-2) When a message is received, your phone alerts you by sounding a specified ringer. If you don’t check the message, the phone will remind you of it. You can set how often this will happen. Off: The phone does not remind you.
-
Page 128: Msg Wallpaper (Menu 5-5)
Message New message (Menu 5-4-5) You can set up the following options as default settings for sending a new message: Priority: allows you to set the priority level of messages from Normal, Interactive, Urgent, or Emergency. Delivery ack: allows you to activate or deactivate the delivery acknowledgement feature. -
Page 129: Sounds
Sounds You can use this menu to customise various sound settings, such as the ringers, key tones, and alert sounds. Ringer (Menu 6-1) In this menu, you can set the unique ringer melodies for calls, messages, and alarms. To select a ringer melody: 1. -
Page 130: Ringer Vol./Type (Menu 6-2)
Sounds 4. Select a melody and press the Play soft key to listen to the selected melody. Note: You can listen to the selected melody in Silent mode. 5. When you select the ringer melody you want, press the Save soft key. You can erase downloaded items by pressing the Menu soft key and selecting Erase. -
Page 131: Key Tone (Menu 6-3)
Sounds • Ringer then vib.: The phone rings and then vibrates. Note: Depending on the selected ringer item, available options may differ. 3. When you are finished, press the Save soft key to save the selected ringer type. For a volume level, press the Play soft key to listen to the selected volume and press the OK soft key. - Page 132 Sounds The following options are available: Themes: allows you to select a alert tone. Press the Play soft key to listen to the highlighted key tone and press the Save soft key. Alert on/off: You can turn each alert on or off. To use an alert, press the Check soft key to place a check mark.
- Page 133 Sounds To remove the check mark, press the Uncheck soft key. 3. To select more alerts, repeat steps 1 and 2. 4. When you finished, press the Save soft key. Hour alert (Menu 6-4-2) You can set your phone to sound an alert every hour on the hour.
-
Page 134: Entertainment
Entertainment Using the Entertainment menu, you can enjoy using your phone. You can also watch VOD, listen to MP3 music, and sing along with the files downloaded. 3D game (Menu 7-1) In this menu, you can enjoy 3D games using your phone. - Page 135 Entertainment MP3 player (Menu 7-2-1) You can play MP3 music files stored in your phone. Notes: • You can play MP3 files by connecting a headset to the phone in Silent mode. • While playing MP3 files, the phone informs you of incomming messages by vibrating, regardless of the ringer type setting.
- Page 136 Entertainment Playing MP3 music files When you access the MP3 player menu, MP3 music files play if the play list has been created. You can access the following keys during playback: Function Plays or pauses a music file. changes the repeat mode. •...
- Page 137 Entertainment Visual effect: allows you to change the equalizer image on the MP3 player screen. File info: shows you information about the music file. Using the play list If you want to alter the play list, you can open the list by pressing the Down key on the MP3 player screen.
- Page 138 Entertainment Add to play list: allows you to add the selected music file to the play list. Rename: allows you change the name of the selected music file. Note: When you change a file name, do not use the special characters, such as /, \, ?, <, >, and so on. Sort: allows you to change the order in which the files are sorted.
-
Page 139: Vod (Menu 7-3)
Entertainment (Menu 7-3) In the VOD (Video on demand) menu, you can download video clips from the wireless web and play them. Note: You can quickly access this menu by pressing the Up key in Standby mode. VOD files (Menu 7-3-1) When you access this menu, the list of downloaded video files displays. - Page 140 Entertainment You can access media player options by pressing the Menu soft key on the media player screen. The following options are available: Set to wallpaper: allows you to set the file as your wallpaper for the idle screen. This option is available for video clips.
-
Page 141: Melody Composer (Menu 7-4)
Entertainment Connect to server (Menu 7-3-2) Selecting this menu loads the web site preset by your service provider for viewing and downloading video files. Settings (Menu 7-3-3) In this menu, you can set the time increments by which each press of the Backward and Forward keys moves through a file. - Page 142 Entertainment 3. Scroll to a note or rest and press the Select soft key or press the corresponding number key to insert it. The note or rest is inserted onto the stave and the selection point moves to the right on the same line as the entered note or rest.
- Page 143 Entertainment BGM: allows you to use the background melody. You can choose one of a variety of music genres, such as Dance, Jazz, Latin, Pop, or Reggae. Add note: allows you to add notes in different chord. Tempo: allows you to change the tempo for the melody.
- Page 144 Entertainment • Change: allows you to change the type of the currently selected note or rest. • Delete: deletes the selected note or rest. • Play: plays back the current melody. 3. After editing, press the Right key until the selection point moves to an input position.
-
Page 145: Karaoke (Menu 7-5)
Entertainment Karaoke (Menu 7-5) You can download karaoke files from the wireless web and play and sing along with your files. Note: While playing files, the phone informs you of incomming messages by vibrating, regardless of the ringer type setting. To play a song: 1. -
Page 146: Fun Club (Menu 7-6)
Entertainment Fun club (Menu 7-6) You can access the Samsung Fun Club on the Wireless Web and download various media items, such as melodies and images. Samsung Fun Club is the preset web site providing Samsung phone users with attractive download services. - Page 147 Entertainment To add a contact to the buddy list: 1. On the Messenger screen, select press the Select soft key. 2. Press the Add soft key. 3. When a confirmation message appears, press the Yes or No soft key. 4. If you press the Yes soft key, scroll to the entry you want using the Up or Down key and press the Select soft key.
- Page 148 Entertainment On the Messenger screen, select one of the groups you have created and press the Menu soft key to access the following options: Add: allows you to add a new messenger group. Edit: allows you to change the name of the messenger group.
- Page 149 Entertainment 6. To send the message, press the Send soft key ( ). While entering a message, you can access the following options by pressing the Option soft key: • Invite: allows you to send an invitation to an entry. •...
- Page 150 Entertainment View: shows information about the entry. Edit: allows you to edit the entry. Add: allows you to add a new entry. Erase: allows you to erase the selected entry. Move: allows you to move the member to one of the groups stored in the buddy list.
- Page 151 Entertainment Settings (Menu 7-7-3) In this menu, you can change the setting options for using the messenger feature. The following options are available: Canned msg.: allows you to add a new canned message to use when creating an instant message to converse with other people.
-
Page 152: Utilities
Utilities The Utilities menu provides you various convenient features such as a calendar, calculator, remote control, to do list, D-day counter, and memo pad. Note: When you are out of your service area, you cannot use some of the features in this menu. Calendar (Menu 8-1) This menu allows you to view the current month, as... - Page 153 Utilities On the calendar, press the Option soft key to access the following options: View: shows you the memo stored on that day. Add new: allows you to add a new event on the selected day. Erase events: allows you to erase scheduled events for a specified period.
- Page 154 Utilities 4. Enter the date using the numeric keys and press the Down key. 5. Select when an alarm will inform you of your event by pressing the Left or Right key. If you select No alarm, the phone will not alert you.
-
Page 155: Alarm (Menu 8-2)
Utilities Alarm (Menu 8-2) This menu allows you to set an alarm to ring at a specific time. To set an alarm: 1. Select Alarm 1 or Alarm 2 and press the Select soft key. 2. Select the alarm frequency option on the Set field by pressing the Left or Right key. -
Page 156: User Memory (Menu 8-3)
Utilities 9. Press the Save soft key to save the alarm set. To stop the alarm when it rings, simply open and close the phone or press any key. To deactivate the alarm, select the alarm set you want, select Off from the Set field and press the Save soft key. - Page 157 Utilities Notes: • When the phone is serving as a memory disk, all calls and messages are blocked. • Do not change the name of the Camera folder. If you change the name, all data in the Camera folder will be deleted. File manager (Menu 8-3-2) You can access the folders of your phone’s memory...
- Page 158 Utilities Create folder: allows you to add a new folder. Erase all: allows you to erase all files in the current folder. File info: shows information about the file. Assign: allows you to assign the file as the power on/off image or the wallpaper image for the idle screen.
-
Page 159: I.beam (Menu 8-4)
Utilities I.Beam (Menu 8-4) This feature allows you to use the phone as a remote controller for various devices, such as a television, DVD player, or setup box. You can also send or receive data to or from IrDA-compatible phones or other devices via the infrared port. Note: You can quickly access this menu by pressing the Down key in Standby mode. - Page 160 Utilities • Do not use your phone as a remote controller in public places where it can interfere with others. • If you cannot find the manufacturer or model number matching your device, you can update the remote controller data base from the WAP browser.
- Page 161 Utilities 3. Press the number key corresponding to the device you are controlling. 4. While using the remote controller, you can control another device by pressing the Mode soft key or Volume keys. 5. Use the keys to control the device, referring to the image on the display.
- Page 162 Utilities File transfer (Menu 8-4-2) Using this menu, you can send or receive Phonebook entries or name cards. Notes: • For optimal communication, the IrDA ports between the 2 phones should be within close range of each other. • If the phones use conflicting IrDA protocol types, the IrDA ports may not work properly.
-
Page 163: Mini Dictionary (Menu 8-5)
Utilities The received data is automatically saved in the corresponding directory of your phone’s memory. Sending data You can transmit data to another phone. You can select the following options to send data on your phone in the File transfer menu: Send name card: sends name cards. -
Page 164: Calculator (Menu 8-6)
Utilities Calculator (Menu 8-6) Using this feature, you can use the phone as a calculator. The calculator provides the basic arithmetic functions: addition, subtraction, multiplication, and division. To perform a calculation: 1. Enter the first number using the numeric keys. Note: Use the key to insert a decimal point and key to change the sign of a number... -
Page 165: To Do List (Menu 8-8)
Utilities To do list (Menu 8-8) This feature allows you to enter up a list of tasks you need to do and assign both a priority and a deadline to them. Creating a to do item 1. Enter the task contents and press the OK soft key. -
Page 166: Voice Tools (Menu 8-9)
Utilities On the to do list or details view, press the Menu soft key to access the following options: Add new: allows you to add a new task. Edit: allows you to edit the selected task. Erase: allows you to erase the selected task. Erase all: allows you to erase all tasks. - Page 167 Utilities Auto: The phone automatically switches to Voice dialling mode when you open the phone. Manual: You need to press and hold the key to dial a number by your voice command. Select sex: allows you to select a sex to the phone to recognise your voice.
- Page 168 Utilities 1. From the Voice dial screen, scroll to Edit name and press the Select soft key. 2. When the list of the selectable entries in the default memory appears, press the Up or Down key or the key to scroll to the name you want. 3.
- Page 169 Utilities • Re-record: allows you to discard the current memo and record another one. • Review: allows you to review the voice memo. The screen displays the length of the memo. 3. When you are satisfied, select Save and press the Select soft key.
-
Page 170: World Time (Menu 8-0)
Utilities Erase: allows you to erase the selected voice memo. Erase all: allows you to erase all voice memos. Send: allows you to record a voice memo then send it as an e-mail. This option is not available when the display is rotated. World time (Menu 8-0) You can use this menu to find out what time it is in... - Page 171 Utilities 2. Enter the time from which you want to count down and press the Down key. Note: You need to enter the time in 24-hour format. 3. Enter the date from which you want to count down. Note: You can enter between 1981 and 2099 for the year.
-
Page 172: Memo Pad (Menu 8-)
Utilities Memo pad (Menu 8- ) This feature allows you to make memos of important things you need to remember. Writing a new memo 1. Enter what you need to remember. For further details on how to enter characters, see page 40. 2. -
Page 173: Settings
Settings Many different features of your phone can be customised to suit your preferences. Answer mode (Menu 9-1) This menu allows you to select how to answer an incoming call. The following options are available: By send key: The phone answers only when you press the key. -
Page 174: Roam Option (Menu 9-2)
Settings Roam option (Menu 9-2) Roaming is a feature which is only relevant in areas where there are at least two cellular service providers having valid roaming agreements. Roaming allows you to register your phone on one of the networks, but use the facilities of the other if your own network is not available. -
Page 175: Security (Menu 9-3)
Settings Security (Menu 9-3) Your phone provides you with various security options, including a user-programmable lock code and emergency numbers. To access the Security menu, you must enter the 4- to 8-digit lock code. It is preset to “00000000” at the factory. - Page 176 Settings Change lock (Menu 9-3-2) This feature allows you to change your current lock code to a new one. The lock code is preset to “00000000” at the factory. 1. Enter a new 4- to 8-digit lock code and press the OK soft key.
- Page 177 Settings To store an emergency number: 1. Press the Up or Down key to select a location and press the Select soft key. 2. Press the C key to clear the existing number. 3. Enter a number and press the Save soft key to save the number.
- Page 178 Settings Restriction (Menu 9-3-5) This feature allows you to restrict the use of your phone. The following options are available: Outgoing: restricts outgoing calls from your phone, except emergency calls by standard emergency numbers, such as 119, 110, and 120, or three programmed numbers in the Emergency # menu (Menu 9-3-3).
- Page 179 Settings Clear memory (Menu 9-3-7) This menu allows you to erase Phonebook entries or messages stored in the card and the phone’s memory. You can also erase all of the entries or messages at one time. To clear a memory for Phonebook or messages: 1.
- Page 180 Settings When a confirmation message displays, press the Yes soft key to confirm. The phone reboots, turning itself off and then back on, and returns to Standby mode. Press the No soft key to cancel your selection. Card setup (Menu 9-3-9) In these menus, you can use the security options for the UIM card.
-
Page 181: Entry Method (Menu 9-4)
Settings Entry method (Menu 9-4) This menu allows you to select the default text input mode. Select one of 4 input modes; Pinyin, Stroke, T9 word, and ABC. Data option (Menu 9-5) You may sometimes need to switch the data mode of the CDMA network to another, according to the service status in your area. -
Page 182: Contents Status (Menu 9-7)
Settings Contents status (Menu 9-7) In this menu, you can check the amount of the memory being used or memory remaining for downloaded contents. Total: shows the total space include the system, used, and free space. Program: shows the list of applications downloaded from the wireless web. -
Page 183: Health And Safety Information
Health and safety information Exposure to Radio Freqency (RF) Signals Your wireless phone is a radio transmitter and receiver.It is designed and manufactured not to exceed the emission limits for exposure to radio frequency (RF) energy set by the Federal Communications Commission (FCC) of the U.S. -
Page 184: For Body Operation
For Body Operation For body worn operation, this model phone has been tested and meets the FCC RF exposure guidelines when used with a Samsung-supplied or approved accessory designated for this product or when used with and accessory that contains no metal and that positions the handset a minimum from the body. -
Page 185: Battery Safety
Health and safety information For more information concerning exposure to radio frequency signals, see the following websites: Federal Communications Commission (FCC) http:// www.fcc.gov Cellular Telecommunications Industry Association (CTIA):http://www.wow-com.com U.S.Food and Drug Administration (FDA) http:// www.fda.gov/cdrh/consumer World Health Organization (WHO) http:// www.who.int/peh-emf/en Battery safety Information about batteries... - Page 186 • If left unused, a fully charged battery will discharge itself over time. • Use only Samsung-approved batteries and recharge your battery only with Samsung- approved chargers. When a charger is not in use,...
- Page 187 Health and safety information the battery connected to a charger for more than a week, since overcharging may shorten its life. • Extreme temperature will affect the charging capacity of your battery: it may require cooling or warming first.
-
Page 188: Road Safety
Health and safety information • Do not leave the battery in hot or cold places, such as in a car in summer or winter conditions, as you will reduce the capacity and lifetime of the battery. Always try to keep the battery at room temperature. -
Page 189: Operating Environment
Health and safety information Operating environment Remember to follow any special regulations in force in any area and always switch your phone off whenever it is forbidden to use it, or when it may cause interference or danger. When connecting the phone or any accessory to another device, read its user’s guide for detailed safety instructions. - Page 190 Health and safety information Persons with pacemakers: • Should always keep the phone more than 15 cm (6 inches) from their pacemaker when the phone is switched on • Should not carry the phone in a breast pocket • Should use the ear opposite the pacemaker to minimize potential interference If you have any reason to suspect that interference is taking place, switch your phone off immediately.
-
Page 191: Potentially Explosive Atmospheres
Health and safety information also consult the manufacturer of any equipment that has been added to your vehicle. Posted facilities Switch your phone off in any facility where posted notices require you to do so. Potentially explosive atmospheres Switch your phone off when in any area with a potentially explosive atmosphere and obey all signs and instructions. -
Page 192: Emergency Calls
Health and safety information Emergency calls This phone, like any wireless phone, operates using radio signals, wireless and landline networks as well as user-programmed functions, which cannot guarantee connection in all conditions. Therefore, you should never rely solely on any wireless phone for essential communications (medical emergencies, for example). -
Page 193: Fcc Notice And Cautions
Cautions • Changes or modifications made in the radio phone, not expressly approved by Samsung, will void the user’s authority to operate the equipment. Other important safety information • Only qualified personnel should service the phone or install the phone in a vehicle. -
Page 194: Care And Maintenance
Health and safety information • Switch your phone off before boarding an aircraft. The use of wireless phones in aircraft may be dangerous to the operation of the aircraft, and is illegal. • Failure to observe these instructions may lead to the suspension or denial of telephone services to the offender, or legal action, or both. - Page 195 Health and safety information • Do not drop, knock or shake the phone. Rough handling can break internal circuit boards. • Do not use harsh chemicals, cleaning solvents or strong detergents to clean the phone. Wipe it with a soft cloth slightly dampened in a mild soap-and-water solution.
-
Page 196: Glossary
Glossary Air time Actual time spent talking on the wireless phone. Most carriers bill customers based on how many minutes of airtime they use each month. Call waiting Informs you that you have an incoming call when you are engaged on another call. Caller Line Identification Services (Caller ID) Services allowing subscribers to view or block the telephone numbers of callers. - Page 197 Glossary Frequency A measure based on time, as one or more waves per second, in an electrical or light wave information signal. A signal’s frequency is stated in cycles-per-second or Hertz (Hz). (Liquid Crystal Display) Commonly used to refer to the screen display on the wireless phone.
-
Page 198: Acknowledging Special Precautions And The Fcc And Industry Canada Notice
Glossary Soft keys Two keys marked on the phone, the purpose of which: • varies according to the function that you are currently using. • is indicated on the bottom line of the display just above the corresponding key. Standby time The amount of time a fully charged wireless portable or transportable phone can be on and idle without being in use. -
Page 199: Certification Information (Sar)
Glossary Information to user This equipment has been tested and found to comply with the limits for a Class B digital device, pursuant to part 15 of the FCC Rules. These limits are designed to provide reasonable protection against harmful interference in a residential installation. - Page 200 The highest SAR values for this model phone as reported to the FCC are Head: 0.748W/Kg, Body-worn: 1.08W/Kg. Body-worn operations are restricted to Samsung-supplied, approved or none Samsung designated accessories that have no metal and must provide at least 1.5cm separation between the device, including its antenna whether extended or retracted, and the user’s body.
-
Page 201: Quick Reference Card
Quick reference card SCH-E159 SCH-X839 Quick Reference Card Internal Phonebook Basic operation Make a call Phone number + Store a new • On the UIM card number in Enter a phone number + Save + End a call Standby mode...
Need help?
Do you have a question about the SCH-E159 and is the answer not in the manual?
Questions and answers