Advertisement
Available languages
Available languages
Quick Links
Advertisement

Subscribe to Our Youtube Channel
Related Manuals for Levenhuk MED PRO 600 Fluo


Summary of Contents for Levenhuk MED PRO 600 Fluo
- Page 1 Levenhuk MED PRO 600 Fluo Microscope User Manual Инструкция по эксплуатации...
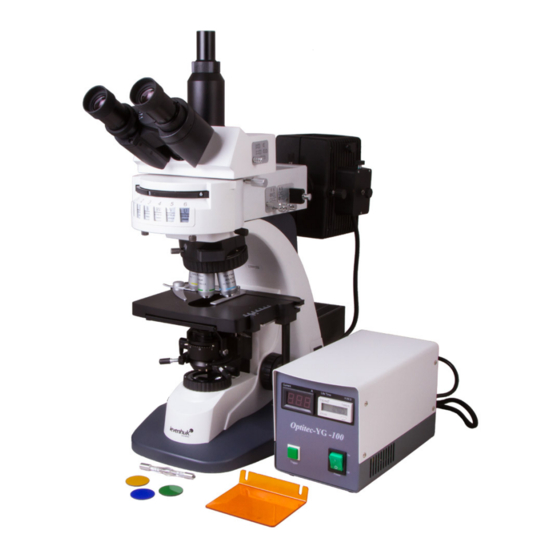
- Page 2 15 14 1 Trinocular head 15 Knob to adjust halogen lamp position in vertical direction 2 Luminous flux switch (splitter) 16 Collector adjustment knob 3 Trinocular head lock knob 17 Lamp filament adjustment knob 4 Field diaphragm alignment knob 18 Power on/off button 5 Field diaphragm opening adjustment knob 19 Fine focusing knob 6 Aperture diaphragm opening adjustment knob...
- Page 3 1 Тринокулярная насадка 15 Рукоятка регулировки положения галогенной лампы в вертикальном направлении 2 Переключатель (делитель) светового потока 16 Рукоятка регулировки коллектора 3 Фиксатор тринокулярной насадки 17 Рукоятка регулировки накала лампы 4 Рукоятка центрировки полевой диафрагмы 18 Кнопка вкл/выкл питания 5 Рукоятка регулировки раскрытия полевой диафрагмы 19 Рукоятка...
- Page 4 1 Shutter engagement knob 9 Clamp 2 Field diaphragm alignment knob 10 Stage 3 Vertical tube 11 Decorative base 4 Diopter adjustment ring 12 Fine focusing knob 5 Eyepieces 13 Coarse focusing knob 6 Corrugated revolver switching ring 14 Ring to adjust coarse focusing ease of movement 7 Objective lens 15 Fluorescent illuminator 8 Slide holder...
- Page 5 Levenhuk MED PRO 600 Fluo Microscope Microscope description and operation Application The microscope is designed for diagnostic testing, including by immunofluorescence method, in clinical, microbiological, pathoanatomical, and other laboratories in medical institutions. Besides, it may also be used in veterinary science, crop growing, bioengineering, pharmaceutical industry, for expertise in the sphere of criminalistics, state epidemiological surveillance, environmental protection.
- Page 6 Transmitted light illumination system The illumination system of the microscope is critical to obtain a contrast and evenly illuminated image of the objects under the microscope. The illumination system built into the microscope stand base (fig. 1, 12) is arranged according to the Köhler’s principle in its classic version.
- Page 7 Impinging light illumination system The impinging light illumination system is made in the form of a detachable module — a fluorescent illuminator (fig. 2, 15). The module is installed with a lower flange into the microscope stand seat and is fixed with a screw (fig. 4, 7). A mercury-filled lamp flashlight is fixed on the illuminator (fig.
- Page 8 1 Amperemeter 2 Lamp ignition button 00939 3 Mercury-filled lamp operation- time counter 4 Power on/off button Fig. 6: Mercury-filled lamp power supply unit Trinocular head The trinocular head (fig. 1, 1) is designed to work with objective lenses, the optical length of tubes in which is "infinity". The head enables binocular observation with eyepieces (fig.
- Page 9 Microscope unpacking Unpack the microscope carefully and install it on a smooth surface. Check the microscope package contents. Visually inspect all elements included in the scope of supply, identify their purpose, make sure there are no damages and start assembling. Microscope preparation for operation Installation of modular units •...
- Page 10 • open the field diaphragm with a ring (fig. 1, 23) along the eyepiece field diameter — so that edges of the iris diaphragm are slightly beyond the eyepiece field; • remove the eyepiece from the right eyepiece tube; • observing the exit pupil image in the right tube, open the aperture diaphragm of the condenser with the knob (fig.
- Page 11 Observation of objects in fluorescence light Mercury-filled lamp activation and illumination setup Connect the mercury-filled lamp power supply unit to the grid. Activate the mercury-filled lamp by putting the power switch in "I" position. It takes at least 10 minutes for the mercury-filled lamp to reach operating parameters. Normal mode of lamp operation means that amperemeter and voltmeter arrows are in the middle of the scale.
- Page 12 Possible faults of the microscope and methods of their elimination External manifestation of Probable cause Method of elimination the fault The revolving nosepiece is not in fixation Tighten the revolving nosepiece and put the position (the objective lens is not on the objective lens into the fixed position, i.e.
- Page 13 Power supply AC adapter 100—220V/50—60Hz Levenhuk reserves the right to make changes to the product range and specifications without prior notice. CAUTION! PLEASE REFER TO THE SPECIFICATIONS TABLE FOR THE CORRECT MAINS VOLTAGE AND NEVER ATTEMPT TO PLUG A 110V DEVICE INTO 220V OUTLET AND VICE VERSA WITHOUT USING A CONVERTER. REMEMBER THAT...
-
Page 14: Care And Maintenance
All Levenhuk accessories are warranted to be free of defects in materials and workmanship for six months from the purchase date. The warranty entitles you to the free repair or replacement of the Levenhuk product in any country where a Levenhuk office is located if all the warranty conditions are met. - Page 15 Микроскоп Levenhuk MED PRO 600 Fluo Описание и работа микроскопа Назначение Микроскоп предназначен для проведения диагностических исследований, в том числе иммунофлуоресцентным методом, в клинических, микробиологических, патологоанатомических и других лабораториях медицинских учреждений. Также может использоваться в ветеринарии, растениеводстве, биотехнологии, фармацевтической промышленности, при...
- Page 16 Предметный столик Предметный столик (рис. 2, 10) снабжен механизмом координатного перемещения объекта в горизонтальной плоскости в двух взаимно перпендикулярных направлениях. Конструкция столика и препаратодержателя (рис. 2, 8) обеспечивают возможность установки двух предметных стекол и перемещения их на 85 мм в поперечном направлении и на 50 мм в продольном...
- Page 17 1 Гнездо крепления крышки 2 Рукоятка крепления фонаря 3 Держатель галогенной лампы 4 Галогенная лампа 5 Съемная крышка фонаря 6 Фиксаторы 7 Винт крепления крышки Рис. 4: фонарь галогенной лампы Система освещения падающим светом Система освещения падающим светом выполнена в виде съемного модуля — флуоресцентного осветителя (рис. 2, 15). Модуль...
- Page 18 1 Съемная крышка фонаря ртутной лампы 2 Втулка 3 Винт 4 Ртутная лампа 5 Втулка 6 Винт 7 Установочное кольцо 8 Фиксатор Рис. 5: фонарь ртутной лампы 1 Амперметр 2 Кнопка поджига лампы 00939 3 Счетчик времени работы ртутной лампы 4 Кнопка...
- Page 19 Надпись на объективе «∞/–» означает, что объектив может работать с препаратами как с покровным стеклом, так и без него. Объективы с увеличением 40 и 100 крат снабжены пружинящими оправами, предохраняющими от повреждения объекты и фронтальные линзы объективов при фокусировании на поверхность объектов. ВНИМАНИЕ! В...
- Page 20 ВНИМАНИЕ! ЗАМЕНУ ЛАМП В ФОНАРЯХ ПРОИЗВОДИТЬ ПРИ ОТКЛЮЧЕННОМ ОТ СЕТИ МИКРОСКОПЕ И БЛОКЕ ПИТАНИЯ РТУТНОЙ ЛАМПЫ. ВО ИЗБЕЖАНИЕ ОЖОГА КОЖИ РУК О КОЛБУ ЛАМПЫ, ЗАМЕНУ ЛАМПЫ СЛЕДУЕТ ПРОИЗВОДИТЬ ЧЕРЕЗ 15—20 МИНУТ ПОСЛЕ ОТКЛЮЧЕНИЯ. При замене плавких вставок необходимо устанавливать новые плавкие вставки только тех номиналов, которые были установлены...
- Page 21 Работа с иммерсионным объективом Работать с иммерсионным объективом следует в помещении с температурой воздуха от +15 до +25 °С. Иммерсионное масло следует использовать с показателем преломления nD = 1,515. ВНИМАНИЕ! НЕЛЬЗЯ ПРИМЕНЯТЬ ВЗАМЕН ИММЕРСИОННОГО МАСЛА СУРРОГАТЫ, ТАК КАК ЭТО МОЖЕТ ЗНАЧИТЕЛЬНО...
- Page 22 • включить в ход лучей объектив с увеличением 10х (рекомендуется начинать процесс фокусировки с объективов малого или среднего увеличения, имеющих достаточно большие поля зрения и рабочие расстояния); • сфокусировать микроскоп вращением рукояток (рис. 2, 12 и 13) на резкое изображение объекта; •...
- Page 23 Возможные неисправности микроскопа и способы их устранения Внешнее проявление Вероятная причина Способ устранения неисправности Револьверное устройство не установлено Довернуть револьверное устройство и в положение фиксации (объектив не поставить объектив в фиксированное находится на оси микроскопа) положение, т. е. на оптическую ось Срезание...
-
Page 24: Технические Характеристики
радиационный экран Источник питания адаптер сети переменного тока 100—220 В / 50—60 Гц Компания Levenhuk оставляет за собой право вносить любые изменения или прекращать производство изделия без предварительного уведомления. ВНИМАНИЕ! ПОМНИТЕ, ЧТО НАПРЯЖЕНИЕ СЕТИ В РОССИИ И БОЛЬШИНСТВЕ ЕВРОПЕЙСКИХ СТРАН... -
Page 25: Уход И Хранение
при настройке фокуса. Не затягивайте стопорные и фиксирующие винты слишком туго. • Не касайтесь пальцами поверхностей линз. Для внешней очистки прибора используйте специальную салфетку и специальные чистящие средства Levenhuk для чистки оптики. Не используйте для чистки средства с абразивными или коррозионными свойствами и жидкости на основе ацетона. •... - Page 26 Does not damage optical coatings of the lenses Leaves no smudges or stains levenhuk.com Levenhuk Inc. (USA): 928 E 124th Ave. Ste D, Tampa, FL 33612, USA, +1 813 468-3001, contact_us@levenhuk.com Levenhuk Optics s.r.o. (Europe): V Chotejně 700/7, 102 00 Prague 102, Czech Republic, +420 737-004-919, sales-info@levenhuk.cz...
Need help?
Do you have a question about the MED PRO 600 Fluo and is the answer not in the manual?
Questions and answers