Table of Contents
Advertisement
Advertisement
Table of Contents

Related Manuals for HIKVISION DS-2CV2021G2-IDW


Summary of Contents for HIKVISION DS-2CV2021G2-IDW
- Page 1 DS-2CV2021G2-IDW Network Bullet Camera Quick Start Guide...
- Page 2 Network Bullet Camera·Quick Start Guide © 2019 Hangzhou Hikvision Digital Technology Co., Ltd. All rights reserved. About this Manual The Manual includes instructions for using and managing the Product. Pictures, charts, images and all other information hereinafter are for description and explanation only. The information contained in the Manual is subject to change, without notice, due to firmware updates or other reasons.
- Page 3 BREACH OF CONTRACT, TORT (INCLUDING NEGLIGENCE), PRODUCT LIABILITY, OR OTHERWISE, IN CONNECTION WITH THE USE OF THE PRODUCT, EVEN IF HIKVISION HAS BEEN ADVISED OF THE POSSIBILITY OF SUCH DAMAGES OR LOSS. YOU ACKNOWLEDGE THAT THE NATURE OF INTERNET PROVIDES FOR...
- Page 4 Network Bullet Camera·Quick Start Guide Regulatory Information FCC Information Please take attention that changes or modification not expressly approved by the party responsible for compliance could void the user's authority to operate the equipment. FCC compliance: This equipment has been tested and found to comply with the limits for a Class B digital device, pursuant to part 15 of the FCC Rules.
- Page 5 Network Bullet Camera·Quick Start Guide This device complies with part 15 of the FCC Rules. Operation is subject to the following two conditions: 1. This device may not cause harmful interference. 2. This device must accept any interference received, including interference that may cause undesired operation.
- Page 6 Network Bullet Camera·Quick Start Guide Industry Canada ICES-003 Compliance This device meets the CAN ICES-3 (B)/NMB-3(B) standards requirements. This device complies with Industry Canada licence-exempt RSS standard(s). Operation is subject to the following two conditions: (1) this device may not cause interference, and (2) this device must accept any interference, including interference that may cause undesired operation of the device.
- Page 7 Network Bullet Camera·Quick Start Guide de réduire les risques de brouillage radioélectrique à l'intention des autres utilisateurs, il faut choisir le type d'antenne et son gain de sorte que la puissance isotrope rayonnée équivalente (p.i.r.e.) ne dépasse pas l'intensité nécessaire à l'établissement d'une communication satisfaisante.
- Page 8 Network Bullet Camera·Quick Start Guide Warnings ● For device with this sticker, this device is intended for installation in a restricted access location, access can only be gained by service persons or by users who have been instructed about the reasons for the restrictions applied to the location and about any precautions that shall be taken.
- Page 9 Network Bullet Camera·Quick Start Guide Cautions ● Make sure the power supply voltage is correct before using the camera. ● Do not drop the camera or subject it to physical shock. ● Do not touch sensor modules with fingers. If cleaning is necessary, use clean cloth with a bit of ethanol and wipe it gently.
- Page 10 Network Bullet Camera·Quick Start Guide ● Regular part replacement: a few parts (e.g. electrolytic capacitor) of the equipment shall be replaced regularly according to their average enduring time. The average time varies because of differences between operating environment and using history, so regular checking is recommended for all the users.
-
Page 11: Table Of Contents
Network Bullet Camera·Quick Start Guide Table of Contents 1 Appearance Description ............... 11 2 Installation ..................13 Memory Card Installation ..........14 Ceiling Mounting ............14 Wall Mounting with Junction Box ........16 Waterproof Measures ........... 19 2.4.1 Install Network Cable Waterproof Jacket .... 19 2.4.2 Waterproof Other Cables ........ -
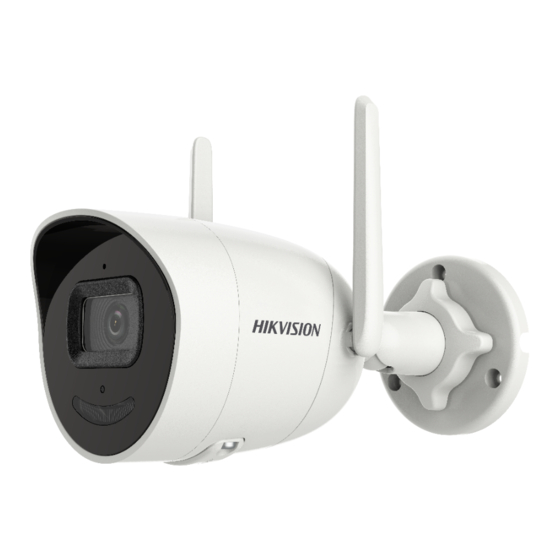
Page 12: Appearance Description
Network Bullet Camera·Quick Start Guide 1 Appearance Description Bullet Camera Overview... - Page 13 Network Bullet Camera·Quick Start Guide Description Description Description 3-Axis Adjustment Alarm Indicator Bracket Back Cover Power Interface Camera Body Network Interface Front Cover Reset Button IR Cover Memory Card Slot Microphone Wi-Fi Antenna Lens Speaker Status Indicator Note: Press and hold the reset button about 10s when the camera is powering on or rebooting to restore the default settings, including the user name, password, IP address, port No., etc.
-
Page 14: Installation
Network Bullet Camera·Quick Start Guide 2 Installation Before you start: ● Make sure the device in the package is in good condition and all the assembly parts are included. ● The standard power supply is 12VDC, please make sure your power supply matches with your camera. -
Page 15: Memory Card Installation
Network Bullet Camera·Quick Start Guide Memory Card Installation Follow the steps to mount and unmount the memory card. Steps: 1. Loosen the screws to remove the memory card slot cover. Unscrew the Cover and Insert Memory Card 2. Insert the memory card into the memory card slot. 3. - Page 16 Network Bullet Camera·Quick Start Guide 1. Paste the drill template (supplied) to the desired mounting position on the ceiling. 2. Drill the screw holes in the ceiling according to the supplied drill template. Figure 2-2 Drill Template 3. Fix the camera on the ceiling with supplied screws. Figure 2-3 Fix the Camera on the Ceiling...
-
Page 17: Wall Mounting With Junction Box
Network Bullet Camera·Quick Start Guide 4. Connect the cables and power on the camera to view live view image. 5. Adjust the angle. The adjusting range of the panning is from 0° to 360°, range of the tilting is from 0° to 90° and range of the rotation is 0° to 360°. The adjusting range of the Wi-Fi antenna is from 0°... - Page 18 Network Bullet Camera·Quick Start Guide The junction box is not included in the package. You need to prepare one for this mounting type Steps: 1. Paste the drill template (supplied) to the desired mounting position on the wall. 2. Drill the screw holes and the cable hole (optional) in the wall according to the drill template.
- Page 19 Network Bullet Camera·Quick Start Guide 5. Secure the junction box's body with supplied screws on the wall. Figure 2-7 Fix the Junction Box on the Wall 6. Combine the junction box cover with its body with screws on the junction box's cover. Figure 2-8 Combine Junction Box's Cover with its Body 7.
-
Page 20: Waterproof Measures
Network Bullet Camera·Quick Start Guide Waterproof Measures If the camera is installed outdoor, you should use the waterproof accessory or tapes to waterproof the cables. Otherwise the cables might get wet or a short circuit occurs. 2.4.1 Install Network Cable Waterproof Jacket Align Install Waterproof Jacket Figure 2-9... -
Page 21: Waterproof Other Cables
Network Bullet Camera·Quick Start Guide 2.4.2 Waterproof Other Cables After routing and connecting the cables, use the waterproof tapes to wrap up the cables. Connected cables and spare cables both should be wrapped up as the figures below. Waterproof Cables... -
Page 22: Activate And Access Network Camera
Network Bullet Camera·Quick Start Guide 3 Activate and Access Network Camera Scan the QR code to get Activate and Visit Network Camera. Note that mobile data charges may apply if Wi-Fi is unavailable. - Page 23 UD16786B-B...
Need help?
Do you have a question about the DS-2CV2021G2-IDW and is the answer not in the manual?
Questions and answers