
Subscribe to Our Youtube Channel
Related Manuals for RED SHIELD WS500


Summary of Contents for RED SHIELD WS500
-
Page 1: Table Of Contents
2.3 Understanding the battery and AC adaptor icon Section 3 – Using the Wire-free Home Protection System 3.1 Programming your 4-digit PIN WIRE-FREE HOME PROTECTION SYSTEM WS500 3.2 Transmitting an emergency (Panic) alarm 3.2.1 Using the Panic alarm 3.2.2 Using the Panic alarm without activating the siren 3.3 Operating different modes... -
Page 2: Section 1 - Getting Started
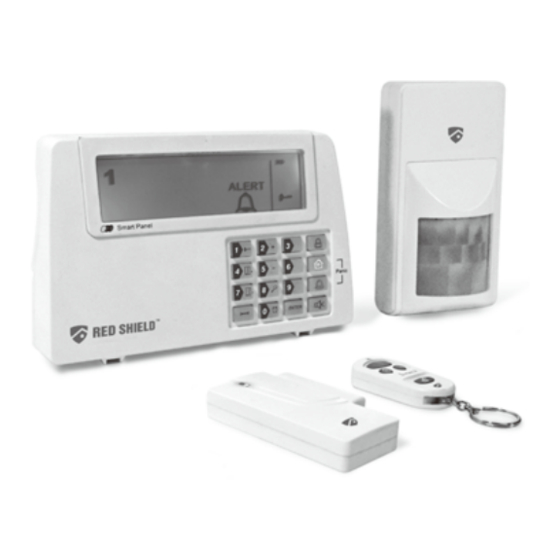
WARNING: Security system devices cannot compensate for loss of life or property. 1.2 Introduction to the system The Wire-free Home Protection System WS500 is a high quality security system combined with a range of user-friendly features. The system is controlled by a Smart Panel, which gathers information from wireless sensors placed inside and at the entry points of your home or office. -
Page 3: Introduction To The Smart Panel
Function Buttons: WARNING: The Red Shield Smart Panel has a built-in tamper-proof switch to prevent the system being disabled by an intruder. When fixing the Smart Panel to a wall, first ensure that it is in Standby mode to avoid the alarm sounding. -
Page 4: Powering Up The Smart Panel
• Tape the template onto the wall, in the position you wish to install the Smart Panel. Battery voltage low level The main power supply (with AC adaptor) must be • Mark on the wall the points for drilling holes for the wall plugs and mounting screws, and the position for Plug in AC adapter to the DC socket in the plugged in at all times, with the 9V battery mounting the tamperproof magnet... -
Page 5: Transmitting An Emergency (Panic) Alarm
New 4-digit Re-enter new PIN for - LCD display flashes with “2” Sensor Zone Status (MODE) PIN + followed by for final - Re-enter the new 4-digit PIN Door/Window Sensor confirmation - Press for final confirmation Motion Sensor (One beep indicates that you entered a valid PIN, two beeps indicate that an invalid operation was performed). -
Page 6: Adjusting The Alarm Duration
E. Arming the system (1234/ Enter the default PIN “ 1 2 The Smart Panel will display the below image: On the Key Fob Remote Control: Press to ARM the system. 4-digit PIN) 3 4 ” OR your new 4-digit On the Smart Panel: First make sure the Smart Panel is in STANDBY mode, and then ARM the system by PIN for setting followed by taking the following steps:... -
Page 7: Triggers In Arm Mode
• On the Smart Panel: First make sure the Smart Panel is in STANDBY mode, and then enter into ALERT 4-digit PIN Enter 4-digit PIN for setting The Smart Panel will display the below image: mode by taking the following steps: followed by Keys Description... -
Page 8: Home Mode
Press to complete the Confirm the setting and return the Smart Panel to STANDBY setting by pressing (One beep indicates that you entered a valid PIN three 3.3.4 HOME mode beeps indicate that an invalid operation was performed). There are default settings that allow the system to operate after opening the package. These settings can be adjusted to suit your individual requirements The HOME mode allows the system operate in both the Enter 4-digit PIN for setting The Smart Panel will display the below image:... -
Page 9: Powering Up The The Door/Window Sensor
- on a solid surface between 1.8m to 2.4m (6ft to 8ft) from the floor. The Red Shield Wire-free Home Protection System Remote Control allows you to operate the systems Smart - away from extreme temperature sources (radiators, ovens, stoves etc.) Panel remotely, from inside or outside the property. -
Page 10: Operating The Key Fob Remote Control
Keys Description Note Keys Description Note (1234/ You must be in STANDBY *To make sure you are in (1234/ You must be in STANDBY *To make sure you are in STANDBY mode: 4-digit PIN) mode before enrolling a STANDBY mode: 4-digit PIN) mode before deleting a - Enter the default PIN “... -
Page 11: House Security Code Settings
Zones 1 and the Motion Sensor to Zone 8. A.6. The Wire-free Home Protection System WS500 is completely portable. If you move, you can remove your To assign a Sensor to a different zone, the Zone Code on the Sensor needs to be changed. To change this Smart Panel and wireless accessories and re-install them in your new property. -
Page 12: Section 6 - General Information
5.2 Troubleshooting PIR detection range: “H”:< 15M(50ft); “M”:< 6M(20ft); “L”:< 4M(13ft); AC power failure: House Code: 4 Jumpers This may occur if your security system is accidentally unplugged or if there has been a mains power cut. If a Zone Code: Pin header: 8 pin Wireless range to Smart Panel: <150 meters (500ft,open area)
Need help?
Do you have a question about the WS500 and is the answer not in the manual?
Questions and answers
How do I remove the smart panel from the wall
To remove the RED SHIELD WS500 Smart Panel from the wall, ensure it is in Standby mode to prevent the alarm from sounding. Then, detach it carefully, considering that it has a built-in tamper-proof switch designed to prevent unauthorized removal. If relocating, the system and wireless accessories can be re-installed in a new location.
This answer is automatically generated