
Related Manuals for Omega VRT370 Series


Summary of Contents for Omega VRT370 Series
- Page 1 USER MANUAL VRT370 - VRT380 - Vertical Juicer L O W S P E E D M A S T I C A T I N G J U I C E R www.OmegaJuicers.com 2014 AUG...
- Page 2 We are driven by you, our brand supporters. Your enthusiasm helps us continue to reinvent and renew our line of juicers, high speed blenders and beverage equipment. Our team at Omega thanks you for supporting us for over 50 years! Join us on Twitter @OmegaAppliances &/or on Facebook @OmegaJuicers PROdUCT ReGISTRATION, vISIT: www.omegajuicers.com/omega-warranty-registration...
-
Page 3: Table Of Contents
TABLE OF CONTENTS 02 - 03 Safety First, Important Safeguards 04 - 05 Know Your Omega 06 - 07 Quick Start Assembly 08 - 09 How to Assemble 10 - 11 Operating Instructions 12 - 13 Spinning Brush Assembly, Disassembly and Washing... - Page 4 SAFETY FIRST...
- Page 5 SAFETY FIRST When using electrical appliances, basic safety precautions should always be followed including the following. READ ALL INSTRUCTIONS BEFORE USING. To protect against electrical shock, do not immerse cord, plug, or main body (motor) in water or other liquid. Close supervision is necessary when any appliance is used by or near children.
-
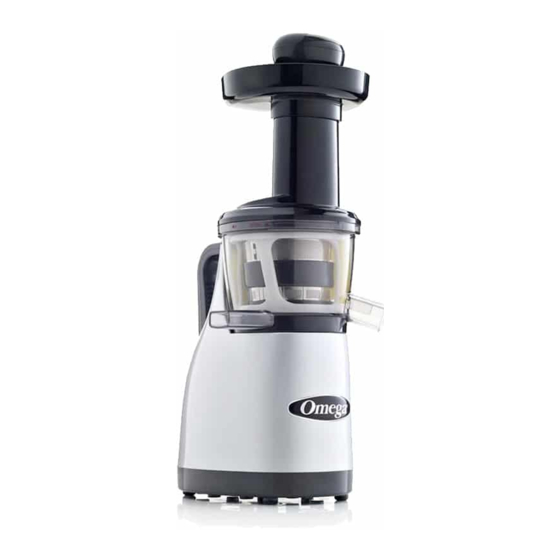
Page 6: Know Your Omega
KNOW YOUR OMEGA... - Page 7 KNOW YOUR OMEGA Pusher Hopper Feed Chute Safety Locking System Auto Cleaning System Pulp Outlet High Performance Motor Sturdy Nonslip Feet Juice Screen Juice Spout with Flap NOT SHOWN On/Off (In Rear) Juice Container Pulp Container Heavy Duty Ultem Auger...
-
Page 8: Quick Start Assembly
QUICK START ASSEMBLY... - Page 9 QUICK START ASSEMBLY Pusher Spinning Brush Pulp Container Hopper Silicon Brush Juice Cup Auger Juice Bowl Cleaning Brush Juice Screen Base Power Cord...
-
Page 10: How To Assemble
HOW TO ASSEMBLE... - Page 11 HOW TO ASSEMBLE Place the screen into the silicone brush. Place the assembled silicone brush and screen into the juice bowl. Move it left to right until it clicks into place. Next place the auger inside the screen. Place the hopper onto the juice bowl. Even if it is assembled Turn the hopper clockwise until it is locked in opposite direction, it...
-
Page 12: Operating Instructions
OPERATING INSTRUCTIONS... - Page 13 OPERATING INSTRUCTIONS ON/REV BUTTON Press [ON] button to start. [ON] On [REV] Reverse Gradually put the ingredients into the hopper and press down with the pusher. After the extraction is complete, place [ON] On the switch in stop position to stop. WARNINg When using [ON] or [Rev] Stop button, make sure that the auger stops...
-
Page 14: Spinning Brush Assembly, Disassembly And Washing
SPINNING BRUSH ASSEMBLY, DISASSEMBLY AND WASHING... - Page 15 SPINNING BRUSH ASSEMBLY, DISASSEMBLY AND WASHING SPINNING BRUSH ASSEMBLY Spinning Brush Check the groove of the spinning brush Silicone Brush and the direction of silicone brush. • As shown to the left, let groove inserts (Longer Part) face the spinning brush. Brush Grove Down...
-
Page 16: Bowl Packaging Assembly
BOWL PACKING ASSEMBLY... - Page 17 BOWL PACKING ASSEMBLY As shown to the left in the dotted circle, let the protrusion part on the bowl packing face upward and hold it, like pinching, with your thumb and index finger. Bowl Packing • Insert the bottom of the bowl packing into the bowl hole and fully press it down.
- Page 18 JUICE FLAP ASSEMBLY...
- Page 19 JUICE FLAP ASSEMBLY Hold juice flap packing as shown to the left. The hole must be visible. Juice Flap Packing Open the juice flap and insert the juice flap packing to the top. Be careful not to drop the bowl. Set the packing to seal off completely.
-
Page 20: Sterilization & Easy Cleaning
STERILIzATION & EASY CLEANING... - Page 21 You can thoroughly wash parts by immersing in warm water diluted with one or two drops of baking soda or dishwashing soap for about 30 minutes. When finished using the Omega® Nutrition System, simply put parts into dishwasher, on top rack. CLEANING BETWEEN RECIPES...
-
Page 22: Precautions For Safe Use
PRECAUTIONS FOR SAFE USE... - Page 23 PRECAUTIONS FOR SAFE USE All users of this appliance must read and understand these safety precautions before operating. SIGN SAMPLES This sign indicates contents that may cause risk of a fire or an electrical shock. Specific warnings are written in the sign. This sign indicates prohibited acts.
- Page 24 PRECAUTIONS FOR SAFE USE DO NOT MOISTEN THE BASE OR SPLASH WATER ON THE BASE. Be careful not to let any liquids or other substances get into the switch on the appliance. DO NOT OPERATE THE SWITCH WITH WET HANDS. It may cause electric shock or a fire.
- Page 25 PRECAUTIONS FOR SAFE USE DURING THE OPERATION, DO NOT ATTEMPT TO MOVE THE BASE, DISASSEMBLE THE BOWL SET OR PARTS AND TRY TO LOCK THEM. It may cause an injury or a failure. Any act of event needed, switch off first and unplug the power cord.
-
Page 26: If The Auger Stops Working
IF THE AUGER STOPS WORKING... - Page 27 IF THE AUGER STOPS WORKING Press [Rev] button for 3 to 5 seconds, then release. When the [Rev] button is released, the auger will stop rotating. Repeat this 2 to 3 times. The [Rev] button pushes the ingredients upward releasing the food clog. [Rev] Press [ON] button to start.
-
Page 28: Hints & Tips
HINTS & TIPS... - Page 29 HINTS & TIPS • Use caution when juicing the following ingredients: - Fruits with seeds that are hard to chew should be pitted before extraction. Fruits such as plums, peaches, and apricots. - Stalk vegetables with strong fiber should be cut into smaller sizes of 1 to 2 inches before placing in the hopper.
-
Page 30: Troubleshooting
TROUBLESHOOTING... - Page 31 • Make sure the appliance is assembled according to the instructions in this manual. Refer to the instructions. • If the appliance still does not work, please contact Omega Customer Service for additional support. The Hopper Does Not Open •...
-
Page 32: Product Specifications
PRODUCT SPECIFICATIONS... - Page 33 PRODUCT SPECIFICATIONS Product Name Omega Low Speed Squeezing Juicing System Model Name VRT370/VRT380 Series Rated Voltage 120 V Rated Frequency 60 Hz Rated Power Consumption 150 W 80 RPM Cord Length 55” (1.4 mm) Motor Single-phase induction motor Weight 22 lb (10 kg) Outward Dimension 7”...
- Page 34 RECIPES...
- Page 35 Clean Boost What You’ll Need: How To Prepare: ½ a beetroot Cut product to fit into hopper. 5 spinach leaves Juice in an Omega Juicer. ¼ cabbage 1 broccoli stick Pour over ice. ½ a grapefruit ½ a lemon Enjoy!
- Page 36 RECIPES Total Health Booster What You’ll Need: How To Prepare: 1 medium apple, cored and cubed In your Omega Juicer, juice apple, 2 medium soft pears, pears, and cherries. cored and cubed Before serving, garnish with ½ cup fresh cherries fresh cherries, if desired.
- Page 37 What You’ll Need: How To Prepare: 1 peach (remove pit) Cut produce to fit hopper. 1 mango (peeled and seed removed) In your Omega Juicer, juice peach, 1 orange (skin removed) mango and orange. ½ cup coconut water 1 teaspoon agave nectar Add remaining ingredients and stir.
- Page 38 Nourish Your Body Enrich Your Soul Discover the complete line of Omega brand professional products at www.OmegaJuicers.com 6291 Lyters Lane • Harrisburg, PA 17111, USA • T: 1.800.633.3401 • F: 717.561.1298...
Need help?
Do you have a question about the VRT370 Series and is the answer not in the manual?
Questions and answers