Table of Contents
Advertisement
Quick Links
Model/Modelo/Modéle
65340LF
Collection
Write purchased model number here.
Escriba aquí el número del modelo comprado.
Inscrivez le numéro de modèle ici.
T E FLO N
For easy installation of your Brizo
faucet you will need:
• To READ ALL the instructions completely
before beginning.
• To READ ALL warnings, care, and maintenance
information.
• To purchase the correct water supply hook-up.
Para instalación fácil de su llave
Brizo
usted necesitará:
®
• LEER TODAS las instrucciones completamente
antes de empezar.
• LEER TODOS los avisos, cuidados, e
información de mantenimiento.
• Comprar las conexiones correctas para el
suministro de agua.
Pour installer votre robinet Brizo
facilement, vous devez:
• LIRE TOUTES les instructions avant de débuter;
• LIRE TOUS les avertissements ainsi que toutes
les instructions de nettoyage et d'entretien;
• Acheter le bon nécessaire de raccordement.
www.brizo.com
You may need/Usted puede necesitar/
Articles dont vous pouvez avoir besoin:
®
®
1
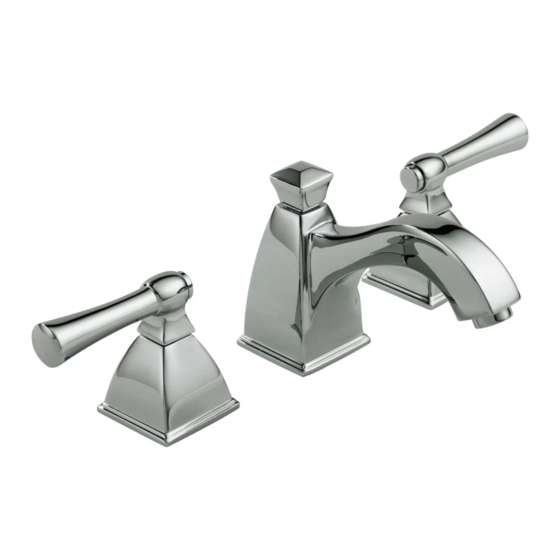
TWO HANDLE WIDESPREAD
LAVATORY FAUCETS
LLAVES DE LAVAMANOS EXTENDIDAS
DE DOS MANIJAS
ROBINETS À ENTRAXE LONG À DEUX
POIGNÉES POUR LAVABO
T E FLO N
2/2/12
Rev. D
Advertisement
Table of Contents

Subscribe to Our Youtube Channel
Related Manuals for Brizo VESI 65340LF


Summary of Contents for Brizo VESI 65340LF
- Page 1 Inscrivez le numéro de modèle ici. You may need/Usted puede necesitar/ Articles dont vous pouvez avoir besoin: T E FLO N T E FLO N For easy installation of your Brizo ® faucet you will need: • To READ ALL the instructions completely before beginning.
-
Page 2: Cleaning And Care
Toutes les autres conditions de la garantie de cinq ans sont identiques ou au Canada) et par écrit à l'une des adresses suivantes : à celle de la présente garantie. La présente garantie s'applique à tous les robinets Brizo ®... - Page 3 RP44521s Handle Accent Accesorio para la Manija RP42215s Élément Lift Rod décoratif de Barra de Alzar manette Tige de Manoeuvre RP44523s RP41923s RP44525 Handle Handle Assembly Installation Blade Ensamble de la manija Hardware Asa para Poignée la Manija Herramientas para la Lame de manette Instalación...
-
Page 4: Maintenance
RP28653s Metal Pop-Up Assembly Less Lift Rod Ensamble del Desagüe Automático de Metal Sin Barra de Alzar Renvoi Mécanique en Métal Sans la Tirette. RP5648s Stopper Tapón Bonde RP12516 Strap & Screw Barra Chata y Tornillo Feuillard et Vis RP23060s Flange Reborde Collerette... - Page 5 END VALVE INSTALLATION Note: When drilling mounting holes for widespread units, it is HANDLE INSTALLATION recommended that the hole size be a minimum of 1-1/8" (29 mm) and a maximum of 1-3/8" (35 mm). Thread the stem adapter (1) into the valve stem (2). Place handle shroud (3) over adapter (4) with the set screw (5) oriented toward the wall, away from Thread adapter nut (1) onto end valve body (2), making sure gasket (3) is the sink.
- Page 6 SPOUT INSTALLATION Place bushing (1) onto handle (2). Place the handle insert (3) into the handle (2). From above, install the spout (1) and gasket (2). Secure with washer (3) and nut (4) from below. Assemble gasket (5), coupling tee (6), O-ring (7) onto the Install the handle and insert (1) onto the valve stem (2).
- Page 7 1/2” (12.7mm) METAL POP-UP MAKE CONNECTIONS TO WATER LINES HOSE INSTALLATION Choose hook-ups for 1/2" I.P.S. connections: Remove stopper (1) and flange (2). Snap the Quick Connect hose assembly (1) onto the (1) Ball nose riser (3/8" O.D. copper tubing), or tee nipple (2) and end valve nipples (3).
- Page 8 Step 3e FLUSH & CHECK FOR LEAKS Step 3c Remove tailpiece (1) from Remove pivot nut (1). Install Pivot (1) must face faucet. Remove aerator (1) and turn faucet handles (2) all body (2), add plumber tape horizontal rod Pull assembly (2) down (2) and stopper (3) the way on.
Need help?
Do you have a question about the VESI 65340LF and is the answer not in the manual?
Questions and answers