Table of Contents
Advertisement
Available languages
Available languages
Quick Links
Quick Installation Guide
Vigilance Full HD Outdoor PoE Mini Bullet Camera
This document will guide you through the
basic installation process for your new
D-Link Network Camera.
DCS-4703E
Quick Installation Guide
Installationsanleitung
Guide d'installation
Guía de instalación
Guida di Installazione
Краткое руководство по установке
Guia de Instalação Rápida
快速安裝指南
Petunjuk Pemasangan Cepat
Documentation also available on
CD and via the D-Link Website
Advertisement
Table of Contents

Related Manuals for D-Link DCS-4703E


Summary of Contents for D-Link DCS-4703E
- Page 1 D-Link Network Camera. DCS-4703E Quick Installation Guide Installationsanleitung Guide d’installation Guía de instalación Guida di Installazione Краткое руководство по установке Guia de Instalação Rápida 快速安裝指南 Petunjuk Pemasangan Cepat Documentation also available on CD and via the D-Link Website...
-
Page 3: Package Contents
User Manual which is available on the CD included in this package or from the D-Link support website. Package Contents ƒ DCS-4703E Vigilance Full HD Outdoor PoE Mini Bullet Camera ƒ Cable Waterproofing Connector ƒ Rubber Power Connector Plug ƒ... -
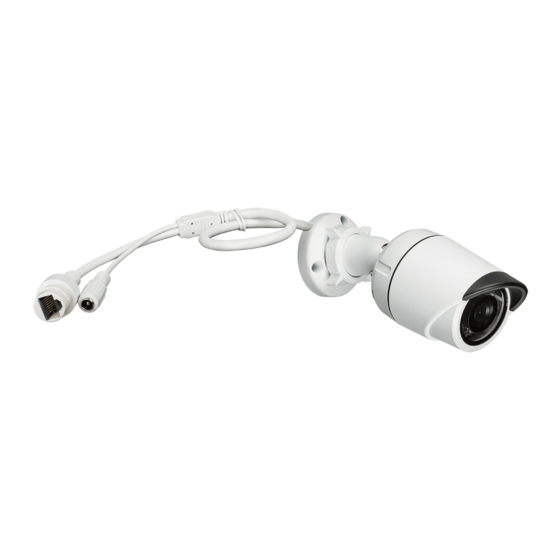
Page 4: Hardware Overview
Ethernet Jack Power Connector RJ-45 connector for Ethernet, can Connects to an optional 12 V / 1.5 A power also be used to power the camera adapter (not included) using Power over Ethernet (PoE) D-Link DCS-4703E Quick Installation Guide... -
Page 5: Configuring The Camera
Insert the DCS-4703E CD into your computer's CD-ROM drive to begin the installation. If the Autorun function on your computer is disabled, or if the D-Link Launcher fails to start automatically, click Start > Run. Type D:\ autorun.exe, where D: represents the drive letter of your CD-ROM drive. - Page 6 Take a moment to confirm your settings and click Restart. Viewing Your Camera via Web Browser Click on the D-Link Setup Wizard SE icon that was created in your Windows Start menu (Start > D-Link > Setup Wizard SE). Select the camera and click Link to access the web configuration.
-
Page 7: Mounting Instructions
When you are finished, turn the adjustment ring clockwise to tighten it. If you need to waterproof your installation, please continue to the next page. D-Link DCS-4703E Quick Installation Guide... -
Page 8: Waterproofing Your Installation
RJ-45 plug onto the cable. Connect the RJ-45 plug into the Ethernet connector, then screw the waterproof connector to the Ethernet connector by turning it about a half-turn clockwise. D-Link DCS-4703E Quick Installation Guide... -
Page 9: Additional Information
Additional Information Additional help and product information is available online at http://www.dlink.com. Warranty Information Please visit http://warranty.dlink.com/ for warranty information for your region. D-Link DCS-4703E Quick Installation Guide... - Page 10 Diese Installationsanleitung bietet Ihnen grundlegende Anleitungen zur Installation der Netzwerkkamera in Ihrem Netzwerk. Zusätzliche Informationen zur Verwendung der Kamera finden Sie im Benutzerhandbuch, das Ihnen auf der CD, die diesem Paket beiliegt, oder über die D-Link Support-Website zur Verfügung steht. Packungsinhalt ƒ...
- Page 11 Standardeinstellungen zurückzusetzen Ethernet-Anschluss Netzanschluss RJ-45-Anschluss für Ethernet, der Zum Anschluss an ein Netzteil (12 V / 1,5 auch für die Stromzufuhr (PoE) der A) (nicht im Lieferumfang enthalten) Kamera verwendet werden kann D-Link DCS-4703E Quick Installation Guide...
- Page 12 Legen Sie die DCS-4703E in das CD-ROM-Laufwerk Ihres Computers, um die Installation zu beginnen. Sollte die CD auf Ihrem Computer nicht automatisch ausgeführt werden oder der D-Link Launcher startet nicht automatisch, klicken Sie auf Start > Ausführen. Geben Sie D:\autorun.exe ein, wobei D: für den Laufwerkbuchstaben Ihres CD-ROM-Laufwerks steht.
- Page 13 Prüfen Sie Ihre Einstellungen und klicken Sie dann auf Restart (Neustart). Anzeige Ihrer Kamera über einen Webbrowser Klicken Sie auf das Symbol für den D-Link Setup- Assistenten SE, der in Ihrem Windows-Startmenü (Start > D-Link > Setup Wizard SE) erstellt wurde.
- Page 14 Position und den gewünschten Winkel ein. Ist die gewünschte Position eingestellt, drehen Sie den Anpassungsring im Uhrzeigersinn, um die Position zu fixieren. Soll Ihre Installation wasserdicht sein, fahren Sie bitte auf der nächsten Seite fort. D-Link DCS-4703E Quick Installation Guide...
- Page 15 Abbildung) und stecken Sie einen RJ-45 Stecker auf das gecrimpte Kabel. Stecken Sie den RJ-45 Stecker in den Ethernet- Steckverbinder und drehen Sie den wasserdichten Steckanschluss im Uhrzeigersinn etwa eine halbe Umdrehung auf den Ethernet-Steckverbinder. D-Link DCS-4703E Quick Installation Guide...
- Page 16 Ihrer Kamera nutzen, wickeln Sie wasserfestes Klebeband zur Abdeckung stufenweise überlappend um die Verbindung. Weitere Informationen Zusätzliche Hilfe und Produktinformationen stehen Ihnen online unter http://www.dlink.com zur Verfügung. Garantiebestimmungen Landesspezifische Informationen zu Gewährleistungen finden Sie unter http://warranty.dlink.com/. D-Link DCS-4703E Quick Installation Guide...
-
Page 17: Guide D'installation Rapide
Manuel d'utilisation, disponible sur le CD joint à ce coffret, ou sur le site Web d'assistance D-Link. Contenu de la boîte ƒ DCS-4703E Mini-caméra bullet extérieure de vigilance Full HD PoE ƒ Câble du connecteur étanche ƒ Bouchon en caoutchouc du connecteur d'alimentation ƒ... -
Page 18: Description Du Matériel
Connecteur RJ-45 pour Ethernet, Connecteur d’alimentation pouvant également servir à alimenter Se connecte à un adaptateur la caméra utilisant la fonction PoE d’alimentation de 12 V / 1,5 A optionnel (alimentation électrique par câble (non inclus) Ethernet) D-Link DCS-4703E Quick Installation Guide... -
Page 19: Configuration De La Caméra
Configuration de la caméra Insérez le CD de la DCS-4703E dans le lecteur de CD-ROM de l'ordinateur pour lancer l'installation. Si la fonction d'exécution automatique de votre ordinateur est désactivée ou si le dispositif de lancement D-Link ne parvient pas à démarrer automatiquement, cliquez sur Start >... - Page 20 Cliquez sur l'icône D-Link Setup Wizard SE (Assistant de configuration D-Link SE) créée dans votre menu Démarrer de Windows (Démarrer > D-Link > Setup Wizard SE (Assistant de configuration SE). La première fois que vous connectez la caméra, vous devez créer un mot de passe pour le compte administrateur.
-
Page 21: Instructions De Montage
Lorsque vous avez terminé, tournez la bague dans le sens horaire pour la serrer. Si vous devez imperméabiliser votre installation, veuillez continuer à la page suivante. D-Link DCS-4703E Quick Installation Guide... - Page 22 étanche comme illustré, puis sertissez une prise RJ-45 sur le câble. Branchez la prise RJ-45 dans le connecteur Ethernet, puis vissez le connecteur étanche dans le connecteur Ethernet en le tournant d'environ un demi-tour dans le sens horaire. D-Link DCS-4703E Quick Installation Guide...
-
Page 23: Informations Complémentaires
Informations complémentaires Vous trouverez une aide supplémentaire et des informations sur le produit en ligne à l'adresse http://www.dlink.com. Informations sur la garantie Consultez le site http://warranty.dlink.com/ pour prendre connaissance de la garantie appliquée dans votre région. D-Link DCS-4703E Quick Installation Guide... -
Page 24: Guía De Instalación Rápida
Para obtener información adicional acerca de cómo utilizar la cámara, consulte el Manual del usuario disponible en el CD incluido en el paquete o en el sitio web de asistencia de D-Link. ¿Qué contiene la caja? ƒ... -
Page 25: Descripción General Del Hardware
Conector RJ-45 para Ethernet que se Se conecta a un adaptador de puede utilizar también para alimentar la alimentación de 12 V / 1,5 A cámara usando alimentación a través de opcional (no incluido) Ethernet (PoE) D-Link DCS-4703E Quick Installation Guide... -
Page 26: Configuración De La Cámara
Configuración de la cámara Inserte el CD de la DCS-4703E en la unidad de CD-ROM del ordenador para comenzar la instalación. Si la función de ejecución automática del ordenador está desactivada o si el iniciador de D-Link no se inicia automáticamente, haga clic en Inicio > Ejecutar. - Page 27 Visualización de su cámara a través del explorador de web Haga clic en el icono Asistente de configuración SE D-Link que se creó en el menú de inicio de Windows (Inicio > D-Link > Asistente de configuración SE). La primera vez que se conecte a la cámara, se le pedirá...
-
Page 28: Instrucciones De Montaje
ángulo que desee. Cuando haya terminado, gire el anillo de ajuste hacia la derecha para apretarlo. Si necesita impermeabilizar la instalación, vaya a la página siguiente. D-Link DCS-4703E Quick Installation Guide... - Page 29 RJ-45 en el cable. Conecte la clavija RJ-45 en el conector Ethernet y, a continuación, atornille el conector impermeable al conector Ethernet girándolo aproximadamente medio giro hacia la derecha. D-Link DCS-4703E Quick Installation Guide...
- Page 30 Información adicional Existe ayuda e información del producto adicional en línea en http://www.dlink.com. Información acerca de la garantía Visite http://warranty.dlink.com/ para obtener información sobre la garantía en su región. D-Link DCS-4703E Quick Installation Guide...
-
Page 31: Guida Di Installazione Rapida
CD incluso nella confezione o scaricabile dal sito Web di supporto di D-Link. Contenuto della confezione ƒ DCS-4703E Videocamera Mini Bullet PoE Full HD per video- sorveglianza esterna ƒ Connettore impermeabile per cavo ƒ... -
Page 32: Panoramica Hardware
Connettore di alimentazione Questo connettore RJ-45 per Ethernet Viene connesso a un alimentatore può essere utilizzato anche per opzionale da 12 V/1,5 A (non incluso). alimentare la telecamera quando si utilizza PoE (Power over Ethernet). D-Link DCS-4703E Quick Installation Guide... -
Page 33: Configurazione Della Telecamera
Se la funzione di esecuzione automatica è disabilitata nel computer in uso o se l'utilità di avvio di D-Link non viene avviata automaticamente, fare clic su Start > Run (Start > Esegui). Digitare D:\autorun.exe, dove D: rappresenta la lettera dell'unità... - Page 34 Visualizzazione della telecamera tramite il browser Web Fare clic sull'icona D-Link Setup Wizard SE creata nel menu Start di Windows (Start > D-Link > Setup Wizard SE). Quando si collega la videocamera per la prima volta, è necessario creare una password per l'account amministratore.
-
Page 35: Istruzioni Per Il Montaggio
Al termine, ruotare la ghiera di regolazione in senso orario per stringerla. Per rendere impermeabile l'installazione, continuare con la pagina successiva. D-Link DCS-4703E Quick Installation Guide... - Page 36 Spellare a cavo Ethernet fino al connettore impermeabile, come illustrato in figura, quindi crimpare uno spinotto RJ-45 sul cavo. Collegare lo spinotto RJ-45 al connettore Ethernet, quindi avvitare il connettore impermeabile a quello Ethernet ruotandolo di mezzo giro in senso orario. D-Link DCS-4703E Quick Installation Guide...
-
Page 37: Ulteriori Informazioni
Ulteriori informazioni Per maggiori informazioni e dettagli sul prodotto, visitare il sito Web all'indirizzo http://www.dlink.com. Termini di garanzia Per informazioni sulla garanzia nel proprio paese, visitare il sito http://warranty.dlink.com/. D-Link DCS-4703E Quick Installation Guide... -
Page 38: Краткое Руководство По Установке
Краткое руководство по установке Данное руководство содержит основные инструкции по установке камеры DCS-4703E в сети. Для получения дополнительной информации по настройке камеры, пожалуйста, обратитесь к руководству пользователя на CD-диске из комплекта поставки или через Web-сайт D-Link. Комплект поставки ƒ 3 Мп внешняя сетевая Full HD-камера, день/ночь, с... - Page 39 Разъем питания Разъем RJ-45 для подключения Разъем для подключения 12 В / 1,5 А Ethernet-кабеля, а также для подачи адаптера питания (адаптер не входит питания камеры по технологии Power в комплект поставки) over Ethernet (PoE) D-Link DCS-4703E Quick Installation Guide...
- Page 40 Настройка с помощью Мастера установки Вставьте компакт-диск для DCS-4703E в привод CD-ROM, чтобы начать установку. Если на компьютере отключена функция автозапуска или запуск не произошел автоматически, нажмите Пуск > Выполнить. Введите D:\autorun.exe, где D: - имя привода CD-ROM. Нажмите Setup Wizard, чтобы начать установку.
- Page 41 Подождите несколько минут для сохранения настроек и нажмите кнопку Restart. Просмотр изображения камеры через Web-браузер Выберите ярлык D-Link Setup Wizard SE в стартовом меню Windows (Пуск > D-Link > Setup Wizard SE). При первом подключении камеры необходимо установить пароль для учетной записи...
-
Page 42: Монтаж Камеры
Чтобы отрегулировать положение камеры, ослабьте кольцо регулировки, повернув его против часовой стрелки. Затем задайте камере требуемое положение и поверните кольцо по часовой стрелке для фиксации. Если требуется обеспечить водонепроницаемость камеры, пожалуйста, перейдите на следующую страницу. D-Link DCS-4703E Quick Installation Guide... - Page 43 разъем RJ-45, как показано на рисунке. Протяните Ethernet-кабель через водонепроницаемый коннектор, как показано на рисунке. Далее вставьте кабель в коннектор RJ-45 и обожмите. Соедините коннектор с разъемом RJ-45. Закрутите водонепроницаемый коннектор, повернув его приблизительно на пол-оборота по часовой стрелке. D-Link DCS-4703E Quick Installation Guide...
- Page 44 используйте входящую в комплект поставки резиновую заглушку для разъема питания. Если подача питания на камеру осуществляется с помощью адаптера питания (не входит в комплект поставки), используйте специальную ленту для герметизации с целью предотвращения попадания влаги на соединение. D-Link DCS-4703E Quick Installation Guide...
- Page 45 UPnP port forwarding ICMP RTP / RTSP/ RTCP DHCP-клиент Фильтрация IP-адресов NTP-клиент (D-Link) DNS-клиент DDNS-клиент (D-Link) Multicast SMTP-клиент SNMP FTP-клиент Соответствие ONVIF Безопасность Защита учетной записи администратора и Шифрование HTTP и группы пользователей RTSP Аутентификация по паролю D-Link DCS-4703E Quick Installation Guide...
- Page 46 6,4 Вт ± 5% мощность Температура Рабочая: от -30° до 50°C Хранения: от -20° до 70°C При эксплуатации: от 20% При хранении: от 5% до Влажность до 80% (без конденсата) 95% (без конденсата) Сертификаты CE LVD C-Tick D-Link DCS-4703E Quick Installation Guide...
- Page 47 Размеры 98.1 66.6 164.7 D-Link DCS-4703E Quick Installation Guide...
- Page 48 Обновления программного обеспечения и документация доступны на Интернет-сайте D-Link. D-Link предоставляет бесплатную поддержку для клиентов в течение гарантийного срока. Клиенты могут обратиться в группу технической поддержки D-Link по телефону или через Интернет. Техническая поддержка компании D-Link работает в круглосуточном режиме ежедневно, кроме...
-
Page 49: Conteúdo Da Embalagem
Para obter informações adicionais sobre como usar a câmera, consulte o Manual do Usuário que está disponível no CD incluído neste pacote ou do site de suporte da D-Link. Conteúdo da embalagem ƒ Câmera de Segurança IP Full HD Outdoor PoE Mini Bullet DCS-4703E ƒ... -
Page 50: Visão Geral Do Hardware
Conector RJ-45 para rede Ethernet, também Conector de alimentação pode ser usado para alimentar a câmera Conecta-se a um adaptador de usando a tecnologia Power over Ethernet (PoE) energia opcional de 12 V / 1,5 A (não incluído) D-Link DCS-4703E Quick Installation Guide... - Page 51 CD-ROM. Clique em Assistente de Configuração e siga as instruções para instalar o seu produto. Clique no ícone Assistente de configuração D-Link SE que foi criado no seu menu Iniciar do Windows (Iniciar> D-Link> Assistente de configuração SE).
- Page 52 Espere um momento para confirmar as configurações e clique em Reiniciar. Como visualizar sua câmera através de um navegador Web Clique no ícone Assistente de configuração D-Link SE que foi criado no seu menu Iniciar do Windows (Iniciar> D-Link> Assistente de configuração SE).
- Page 53 Se é necessário impermeabilizar a sua câmera, por favor, passe para a próxima página. D-Link DCS-4703E Quick Installation Guide...
- Page 54 RJ45 no cabo. Conecte o plugue RJ45 no conector Ethernet, então o parafuso do conector à prova d'água para o conector Ethernet, rodando-o sobre uma meia-volta no sentido horário. D-Link DCS-4703E Quick Installation Guide...
-
Page 55: Informações Adicionais
Informações Adicionais Ajuda adicional e informações sobre o produto estão disponíveis online em http://www.dlink.com. Informações sobre garantia Por favor, visite http://warranty.dlink.com/ para informações de garantia para a sua região. D-Link DCS-4703E Quick Installation Guide... - Page 56 快速安裝指南 此安裝指南提供安裝DCS-4703E網路攝影機在您網路的基本操作。若 要取得更多關於使用此攝影機的方式,請參考光碟內附的使用手冊,或 至D-Link技術支援網站下載產品使用手冊。 包裝內容 ƒ DCS-4703E Full HD戶外槍型網路攝影機 ƒ ƒ 網路線防水連接器 ƒ ƒ 橡膠電源連接頭 ƒ ƒ 壁掛配件 ƒ ƒ 光碟(包含使用手冊及安裝程式) ƒ ƒ 快速安裝指南 若有缺少上述的任何物品,請聯絡您的經銷商。 安全須知: 此產品應該由具備相關證照的技術人員安裝,以符合當地的法規及避免 產品的保固失效。 中 文 D-Link DCS-4703E Quick Installation Guide...
- Page 57 硬體概觀 攝影機鏡頭 調整環 轉鬆可調整攝影機角度, IR指示燈 轉緊可鎖定攝影機角度 在低光源的環境下提供 照明 Reset孔 接地螺絲 若需要時可鎖上接 按壓約10秒可將攝影機 地線 的設定清空並回復至出 廠預設值 中 文 乙太網路接頭 電源接頭 供乙太網路使用的RJ-45連接頭,也 可使用PoE的方式來供電給攝影機 D-Link DCS-4703E Quick Installation Guide...
- Page 58 使用精靈來設定攝影機 請將包裝內附的光碟放入您電腦的光碟機並開始執行安裝。若您電腦的 Launcher無法自動執行時,請點選 自動執行功能已被停用,或D-Link 開始>執行後輸入「D:\autorun.exe」(D代表您光碟機的代號)。 在點選Setup Wizard來開始安裝。 請點選Windows開始選單中的D-Link Setup Wizard SE圖示(開始> D-Link > Setup Wizard SE)。 設定精靈中將會顯示您攝影機的MAC位址及IP 位址。若您的網路中有DHCP伺服器時,將會顯 示由DHCP派發的有效IP位址。若您的網路中沒 有DHCP伺服器,則將會顯示攝影機的預設IP位 址192.168.0.20。 請選擇您的攝影機,再點選「Wizard」的按鈕 來繼續。 請輸入管理者(Admin)的名稱和密碼。在首次登 入時,預設的管理者名稱為「admin」無密碼。 若您要更改攝影機的管理者(admin)名稱和密碼 時請勾選核取方塊,並輸入您要設定的新名稱 及密碼。 中 請點選「Next」來繼續。 文 若您要讓攝影機在開機後自動由DHCP伺服器( 例如路由器)取得IP位址時請選擇「DHCP」。 若您要讓攝影機每次皆使用相同的IP時請選擇 「Static IP」並輸入您要使用的IP位址。 請點選「Next」來繼續。 D-Link DCS-4703E Quick Installation Guide...
- Page 59 請確認您的設定是否正確並點選「Restart」來 重新啟動攝影機。 透過網頁瀏覽器來觀看攝影機影像 請點選Windows開始選單中的D-Link Setup Wizard SE圖示(開始> D-Link > Setup Wizard SE) 。 第一次使用攝影機時,您必須建立管理者帳號 的密碼,請輸入密碼後點擊儲存。 請輸入帳號名稱及您剛剛建立的密碼後點擊OK 繼續。 中 畫面中會顯示您攝影機的即時影像,您可以選 文 擇影像設定檔來觀看或調整設定。若要取得更 多關於設定網頁的資訊,請參考包裝內附的光 碟或D-Link網站上的使用手冊。 D-Link DCS-4703E Quick Installation Guide...
- Page 60 壁掛攝影機 建議您在壁掛攝影機前先完成所有設定並確認已可連通網路。 請將定位貼紙黏貼至您想要安裝攝影機的位置, 並確認攝影機底座的放置方向(線槽在底部)。 請依照牆面的材質以適當的工具,用6mm的鑽頭 鑽約25mm深的孔,然後放入壁虎以支撐螺絲。 若您要將攝影機的線材穿過牆壁,請在中央鑽 孔並拉線穿過牆壁。 請使用包裝內附的螺絲來將攝影機鎖上牆壁。 若您要將攝影機的線材放置在攝影機旁,請將 線材沿著底座的線槽放置。 連接電源線及乙太網路線,若您要使用PoE連 線時則僅需要連接乙太網路線。 中 文 您可將調整環以逆時針的方向轉鬆,再將攝影 機移動至您想要的位置及角度。在您完成調整 後,請將調整環以順時針方向轉緊來固定。 若您需要防水的安裝資訊,請繼續參考下一頁的說明。 D-Link DCS-4703E Quick Installation Guide...
- Page 61 防水安裝方式 請依照以下的指示來進行防水的安裝,此程序需要乙太網路線(圓線)、 壓線鉗及RJ-45接頭。 請依圖示將墊圈放置在乙太網路線接埠的底座 周圍。 請依圖示將乙太網路線穿過防水連接器,再使 用壓線鉗將RJ-45接頭壓至線材。 請將RJ-45的接頭插入至乙太網路連接埠,再 中 以順時針方向轉約半圈來將防水接頭鎖上乙太 文 網路連接埠。 D-Link DCS-4703E Quick Installation Guide...
- Page 62 請以順時針方向轉動防水連接器的後方直到緊 貼至乙太網路線。 若您要使用PoE來供電給攝影機,請使用包裝 內附的橡膠電源接頭插入至電源接孔。 若您要使用電源供應器(未附在包裝內)來供電給 攝影機,請用防水膠帶重疊纏繞在連接埠和接 頭的周圍。 中 其他資訊 請造訪官方網站http://www.dlink.com來取得更多產品的相關資訊與協助。 文 保固資訊ƒ 請造訪網站http://warranty.dlink.com/來查看在您地區的保固資訊。 D-Link DCS-4703E Quick Installation Guide...
-
Page 63: Isi Kemasan
Manual Pengguna yang tersedia di CD yang disertakan dalam paket ini atau dari situs web dukungan D-Link. Isi Kemasan ƒ DCS-4703E Kamera Full HD Outdoor PoE Mini Bullet ƒ Kabel Waterproofing Connector ƒ Karet Power Konektor Plug ƒ... - Page 64 Ethernet Jack Konektor listrik Konektor RJ-45 untuk Ethernet, juga dapat digunakan untuk menyalakan kamera Menghubungkan ke adaptor daya menggunakan Power over Ethernet (PoE) 12 V/1.5 A (tidak termasuk) D-Link DCS-4703E Quick Installation Guide...
- Page 65 Mengkonfigurasi Kamera Masukkan CD DCS-4703E ke CD-ROM drive komputer Anda untuk memulai instalasi. Jika fungsi Autorun pada komputer Anda dinonaktifkan, atau jika D-Link Launcher gagal untuk memulai secara otomatis, klik Start>Run. Ketikkan D:\autorun.exe, di mana D: mewakili huruf drive dari drive CD-ROM Anda.
- Page 66 Luangkan waktu sejenak untuk mengkonfirmasi pengaturan Anda dan klik Restart. Melihat Kamera Anda via Web Browser Klik pada ikon D-Link Setup Wizard SE pada menu Start Windows (Start> D-Link> Setup Wizard SE). Pertama kali Anda terhubung ke kamera, Anda perlu untuk membuat password account administrator.
- Page 67 Ketika Anda selesai, putar searah jarum jam cincin penyesuaian untuk mengencangkan kembali. Jika Anda perlu instalasi tahan air, silakan lanjutkan ke halaman berikutnya. D-Link DCS-4703E Quick Installation Guide...
- Page 68 Masukkan kabel Ethernet melalui konektor tahan air seperti yang ditunjukkan, kemudian krimp konektor RJ-45 ke kabel. Hubungkan RJ-45 ke konektor Ethernet, kemudian sekrup konektor tahan air ke konektor Ethernet dengan memutarnya searah jarum jam sekitar setengah-putaran. D-Link DCS-4703E Quick Installation Guide...
- Page 69 Informasi Tambahan Bantuan tambahan dan informasi produk tersedia secara online di http://www.dlink.com. Informasi garansi Silahkan kunjungi http://warranty.dlink.com/ untuk informasi garansi wilayah Anda. D-Link DCS-4703E Quick Installation Guide...
- Page 70 Cet appareil numérique de la classe A est conforme à la norme NMB-003 du Canada. 警告使用者: 此為甲類的資訊技術設備,在居住環境中使用時,可能會造成射頻擾動,在這種情況下, 使用者會被要求採取某些適當的對策。 CE EMI Class A Warning This equipment is compliant with Class A of CISPR 32. In a residential environment this equipment may cause radio interference. D-Link DCS-4703E Quick Installation Guide...
- Page 71 Innovation, Science and Economic Development Canada (ISED) Statement: This Class B digital apparatus complies with Canadian ICES-003. Cet appareil numérique de la classe B est conforme à la norme NMB-003 du Canada. D-Link DCS-4703E Quick Installation Guide...
-
Page 72: Safety Instructions
été spécifiquement conçu pour une application extérieure. • Éloignez le produit des radiateurs et autres sources de chaleur. • Débranchez toujours le produit de l’alimentation avant de le nettoyer et utilisez uniquement un chiffon sec non pelucheux. D-Link DCS-4703E Quick Installation Guide... -
Page 73: Instrucciones De Seguridad
• Houd het product uit de buurt van radiators en andere warmtebronnen. • U dient het product steeds los te koppelen van de stroom voordat u het reinigt en gebruik uitsluitend een droge pluisvrije doek D-Link DCS-4703E Quick Installation Guide... -
Page 74: Disposing And Recycling Your Product
D-Link recommends that you always switch off or unplug your D-Link products when they are not in use. By doing so you will help to save energy and reduce CO2 emissions. - Page 75 D-Link cerca da sempre di ridurre l'impatto ambientale dei propri stabilimenti e dei propri prodotti. Allo scopo di ridurre al minimo tale impatto, D-Link progetta e realizza i propri prodotti in modo che rispettino il più possibile l'ambiente, utilizzando materiali riciclabili a basso tasso di tossicità...
- Page 76 D-Link a životní prostředí Ve společnosti D-Link jsme si vědomi vlivu našich provozů a výrobků na životní prostředí a snažíme se o minimalizaci těchto vlivů. Proto své výrobky navrhujeme a vyrábíme tak, aby byly co nejekologičtější, a ve výrobcích i obalech používáme recyklovatelné a nízkotoxické materiály.
- Page 77 å verne miljøet og beskytte folks helse. D-Link og miljøet Hos D-Link forstår vi oss på og er forpliktet til å minske innvirkningen som vår drift og våre produkter kan ha på miljøet. For å minimalisere denne innvirkningen designer og lager D-Link produkter som er så...
- Page 78 D-Link och miljön På D-Link förstår vi och är fast beslutna att minska den påverkan våra verksamheter och produkter kan ha på miljön. För att minska denna påverkan utformar och bygger D-Link sina produkter för att de ska vara så miljövänliga som möjligt, genom att använda återvinningsbara material med låg gifthalt i både produkter och förpackningar.
- Page 79 WRITTEN OFFER FOR GPL AND LGPL SOURCE CODE Where such specific license terms entitle you to the source code of such software, D-Link will provide upon written request via email and/or traditional paper mail the applicable GPL and LGPL source code files via CD-ROM for a nominal cost to cover shipping and media charges as allowed under the GPL and LGPL.
- Page 80 License. (Exception: if the Program itself is interactive but does not normally print such an announcement, your work based on the Program is not required to print an announcement.) D-Link DCS-4703E Quick Installation Guide...
- Page 81 Our decision will be guided by the two goals of preserving the free status of all derivatives of our free software and of promoting the sharing and reuse of software generally. D-Link DCS-4703E Quick Installation Guide...
- Page 82 If this is what you want to do, use the GNU Library General Public License instead of this License. D-Link DCS-4703E Quick Installation Guide...
- Page 84 Ver.1.00(WW)_90x130 2016/12/15 RMN0101591...
Need help?
Do you have a question about the DCS-4703E and is the answer not in the manual?
Questions and answers