
Subscribe to Our Youtube Channel
Related Manuals for Tecnosystemi smart clima 11100203


Summary of Contents for Tecnosystemi smart clima 11100203
- Page 1 Vers.02 - 30/07/2014 MANUALE D’USO SOLLEVATORE ELETTRICO TELESCOPICO COD. 11100203...
- Page 2 CERTIFICATO CE In merito alla regolamentazione Europea in vigore, il presente documento viene considerato come “Dichiarazione di conformità”. Di conseguenza, questo manuale è fornito individualmente per ogni sollevatore venduto e messo a disposizione sul mercato. I modelli disponibili sul mercato sono i seguenti: - CM-340 Prodotti in conformità...
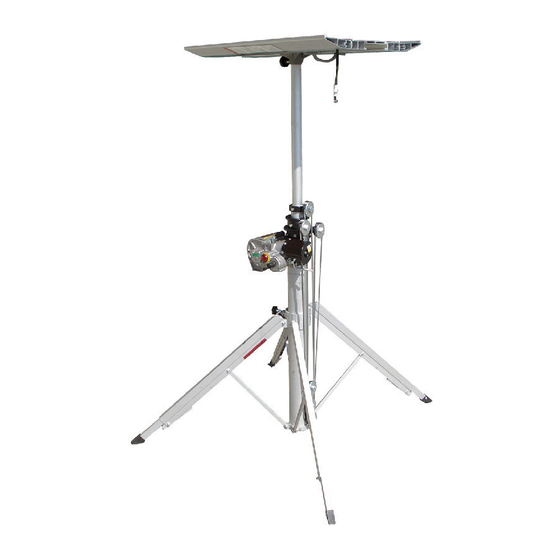
- Page 3 Vi ringraziamo per aver acquistato il sollevatore elettrico e per la fiducia che avete dimostrato nel nostro prodotto. Il Tiramisù è un sollevatore professionale di alta qualità destinato all’installazione, al posizionamento ed al sollevamento di apparecchiature quali: - Climatizzatori - Scaffali - Tubazioni - Schermi giganti - Videocamere...
- Page 4 CONDIZIONI GENERALI DI SICUREZZA INFORMAZIONEI SULL’ORGANIZZAZIONE Assicurarsi che il personale responsabile dell’utilizzo e della manutenzione del sollevatore abbia letto e compreso le istruzioni prima di iniziare qualsiasi operazione. Il personale addetto all’utilizzo dell’apparecchiatura deve poter operare in tutta sicurezza, senza nessun rischio. Agli addetti dovrà...
- Page 5 INFORMAZIONI SULL’UTILIZZO DEL PALO TELESCOPICO DEL SOLLEVATORE Il tubo centrale deve sempre essere appoggiato saldamente a terra (la garanzia non ricorre nel caso di supporto danneggiato) Controllare l’alimentazione elettrica prima di collegare l’apparecchio ad una presa di corrente. Assicurarsi che la vite di fissaggio/bloccaggio della piattaforma sia correttamente avvitata. Assicurasi che la manopola di bloccaggio del treppiede sia correttamente avvitata.
-
Page 6: Messa In Opera
CONTROLLO DEL PALO TELESCOPICO Durante il funzionamento, verificare che tutti gli elementi che compongono il sollevatore funzionino correttamente e non costituiscano un potenziale pericolo. Non utilizzare il sollevatore se l’interruttore di accensione non funziona correttamente. ACCESSORI E MATERIALI RACCOMANDATI L’utilizzo di materiali o di accessori complementari del sollevatore non consentiti e non menzionati nel presente manuale possono provocare danni di grave entità... -
Page 7: Test Di Funzionamento
Nel caso non siate in grado di tirare verso di voi il pulsante rosso d’ e mergenza con una mano, premere leggermente il pulsante di azionamento del comando a joystick e con l’altra mano girare leggermente il pulsante d’ e mergenza e tiratelo. Questa manovra non causa nessun danno all’apparecchio, ma permette di agganciare il riduttore. - Page 8 IMPORTANTE Facendo attenzione a come si avvolge il tamburo, potete verificare se il cavo segue l’avvolgimento in modo corretto. Nel caso di avvolgimento non corretto, il cavo si avvolge a sua volta (foto sopra) in modo non corretto. Quando il limitatore automatico di carico si sgancia emette un suono particolarmente forte: il sollevatore si blocca e la piattaforma non sale più.
-
Page 9: In Caso Di Guasto
IN CASO DI GUASTO CONTROLLO PERIODICO... -
Page 10: Garanzia
OPZIONI KIT RUOTE PER COD. 11100204 Ogni ruota è attrezzata con freno. Le ruote sono 5 in totale: 1 per ogni piede e 1 per il palo centrale telescopico. Per il montaggio su piedi registrabili: levare la gomma di ogni piede e avvitare direttamente la ruota sulla base. Per il montaggio della ruota centrale (palo telescopico): avvitare le 2 viti a disposizione, e svitare leggermente la vite della molla per agganciarsi al supporto. - Page 11 USER’S GUIDE TELESCOPIC ELECTRIC HOISTER COD. 11100203...
- Page 12 CE CERTIFICATION According to the European regulations in force, this document is considered as a a “statement of compliance”. Consequently, this manual is provided for each individual lifter sold and available on the market. The models available on the market are the following: - CM-340 Manufactured in accordance with the following standards: - Instruction EEC for machines 98/37 - 08.1998...
- Page 13 Thank you for purchasing the electric lift and for the confidence you have shown in our product. The “Tiramisu” is a lift for high quality professional installation, positioning and to lifting equipment as: - Air conditioners - Shelves - Pipes - Giant screens - Cameras - Televisions...
- Page 14 GENERAL SAFETY CONDITIONS Ensure that staff responsible for the use and maintenance of the lift has read and understood these instructions before beginning any operation. The personnel using the equipment must be able to operate safely without any risk. The employees must be provided documentation to: - The instructions of use.
- Page 15 EXECUTION SPEED Adjust the rate of ascent and descent according to the loaded weight. DEPOSIT After use, store the hoist in a dry place, keep out of reach of children. HOW TO USE THE TELESCOPIC POLE LIFT The central tube must always be placed firmly on the ground (the guarantee does not occur in the case of damaged support) Check the power supply before connecting the device to a power outlet.
- Page 16 SWITCH OFF AND UNPLUG THE LIFT FROM POWER IN THE FOLLOWING CASES In case storage or before any repair. When you are facing a dangerous situation SUGGESTION OF USE During use, check the proper functioning of the telescopic pole, the load and the objects in proximity of the pole to avoid any potential danger.
-
Page 17: Preliminary Checks
1. Remove the strap from the top of the telescopic pole. 2. Unscrew the screws holding the feet. 3. Tighten the locking screw of the tripod. 4. Press down on the handle at the end of each foot in order to bring down the sliding part of the foot. 5. - Page 18 At the beginning of the climb / descent lightly press the button, and afterwards you can gradually accelerate the movement by pressing harder. IMPORTANT After the full descent of the load, move the switch towards “UP”. In case you forgot to perform this maneuver and press again the starter button, the pole will rise again.
-
Page 19: In Case Of Failure
PLATFORM Picture 1 Picture 2 Before placing the platform above the telescopic pole, make sure that the lift is in level with the appropriate level in the top of the telescopic pole (in case of difficulty, proceed to adjust the mechanical feet again). -
Page 20: Periodic Control
PERIODIC CONTROL POSIZIONE PUNTO CONTROLLO CAUSA RISOLUZIONE Telescopic pole Lubrication Be sure that the tubes of The dust will infiltrate Lubricate the telescopic the telescopic pole are in the tubes, keepin pole with a brush lubricated. them clean will avoid any block.
Need help?
Do you have a question about the smart clima 11100203 and is the answer not in the manual?
Questions and answers