Advertisement
Quick Links
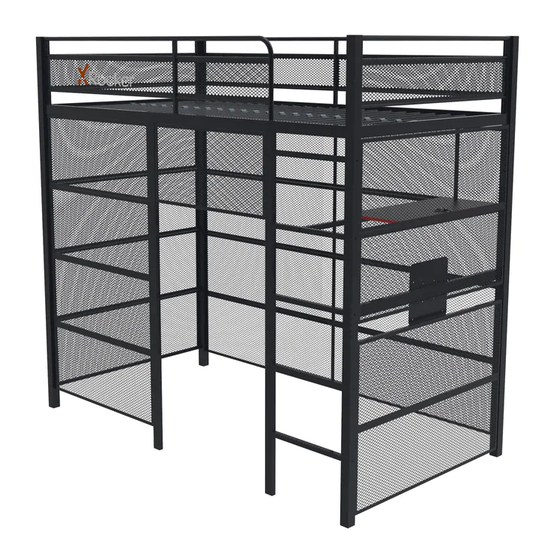
BATTLE DEN GAMING BUNK BED
I MPORTANT - READ CAREFULLY - RETAIN FOR FUTURE REFERENCE
Dimensions
Width -197.5cm
Depth - 96cm
Height - 183cm
Need Help? Contact X Rocker at :
www.xrockeruk.com/pages/support
IMPORTANT: You must keep your original retail receipt as proof of purchase.
1
JZ00-09/15/2020
Advertisement

Related Manuals for X Rocker BATTLE DEN 2020118


Summary of Contents for X Rocker BATTLE DEN 2020118
- Page 1 I MPORTANT - READ CAREFULLY - RETAIN FOR FUTURE REFERENCE Dimensions Width -197.5cm Depth - 96cm Height - 183cm Need Help? Contact X Rocker at : www.xrockeruk.com/pages/support IMPORTANT: You must keep your original retail receipt as proof of purchase. JZ00-09/15/2020...
- Page 2 Safety and Care Advice Important - Please read these instructions fully before starting assembly Check you have all the Assemble on a soft level Make sure you have enough components and tools listed on surface to avoid damaging the space to layout the parts before the following pages.
- Page 3 Safety and Care Advice Important - Please read these instructions fully before starting assembly WARNING THE MATTRESS SURFACE LEVEL SHOULD NOT BE ABOVE THIS LINE 160MM Important: Please note the maximun mattress height is indicated on the vertical bar on the left hand side of the opening at the top of the ladder.
- Page 4 Components - Panels Please check you have all the panels listed below 14 a...
- Page 5 Components - Panels Please check you have all the panels listed below Post 01 x 1 Post 02 x 1 Post 03 x 1 Post 04 x 1 Rear Guard Rail x 1 End Guard Rail x 2 Front Guard Rail x 1 Shelf x 1...
- Page 6 Components - Panels Please check you have all the panels listed below Rear Mesh Panel 01 x 2 Rear Mesh Panel 02 x 2 52d Front Mesh Panel 02 x 1 53 Side Mesh Panel x 8 Front Mesh Panel 01 x 4 23a Support Post 01 x 1 Support Post 02 x 1 22 Ladder x 1...
- Page 7 Components - Panels Please check you have all the panels listed below 60 TV Mount x 1 Shelf Support Rail 01 x 1 Shelf Support Rail 02 x 1 Shelf Support Rail 03 x 2 14 a Slats x 2 4 Bracket x 4 Slat Spacer x 2 3 Plastic Plug x 48...
- Page 8 Components - Fittings Please check you have all the panels listed below Note: The quantities below are the correct amount to complete the assembly. In some cases more fittings may be supplied are required. 35mm M6 Bolt x 7 30mm M6 Bolt x 14 45mm M6 Bolt x 5 28mm M6 Bolt x 4 25mm M6 Bolt x 75...
- Page 9 Assembly Instructions Step Attach End Guard Rail x 1 to Post 01 and Post with 4PCS M6 X 30MM...
- Page 10 Assembly Instructions Step Attach End Guard Rail x 1 to Post 03 and Post with 4PCS M6 X 30MM...
- Page 11 Assembly Instructions Step Attach Rear Guard Rail to Post 02 and Post 03 with Spring Washer 4PCS 4PCS M6 X 30MM 4PCS 4PCS Metal Washer Plastic Washer...
- Page 12 Assembly Instructions Step Attach Ladder to Post with 5PCS M6 X 25MM...
- Page 13 Assembly Instructions Step Attach Front Guard Rail to Post 01 with and Post 04 with 2PCS 2PCS M6 X 30MM M6 X 25MM Spring Washer 4PCS 4PCS Metal Washer Plastic Washer 4PCS...
- Page 14 Assembly Instructions Step Attach Support Post 01 to Front Guard Rail with Then screw to Ladder 2PCS M6 X 19MM...
- Page 15 Assembly Instructions Step Attach Support Post 02 to Rear Guard Rail with M6 X 19MM...
- Page 16 Assembly Instructions Step Attach Shelf Support Rail x 2 to Shelf Support Rail 01 and Shelf Support Rail 02 with M6 X 45MM 4PCS...
- Page 17 Assembly Instructions Step Attach Shelf Support Rail to Post 03 Post 04 with , then Shelf Support Rail 02 to Support Post 02 and Ladder with M6 X 45MM M6 X 35MM 4PCS M6 X 19MM...
- Page 18 Assembly Instructions Step Attach Shelf to Shelf Support Rail 03 x 2 and Support Rail 02 with 4PCS M6 X 28MM...
- Page 19 Assembly Instructions Step Attach Side Mesh Panel x 8 to Post 01 , Post and Post 03 , Post with 32PCS M6 X 25MM...
- Page 20 Assembly Instructions Step Attach Front Mesh Panel 01 x 4 to Post 01 Support Post 01 with 16PCS M6 X 25MM...
- Page 21 Assembly Instructions Step Attach Front Mesh Panel 02 to Support Post 01 and Ladder with 4PCS M6 X 25MM...
- Page 22 Assembly Instructions Step Attach Rear Mesh Panel 01 x 2 and Rear Mesh Panel 02 x 2 to Post 02 and Post 03 with Attach Rear Mesh Panel 02 x 2 to Rear Mesh Panel x 2 with M6 X 35MM 6PCS 16PCS 6PCS...
- Page 23 Assembly Instructions Step Attach TV Mount Post 03 and Post 04 with 4PCS M6 X 19MM...
- Page 24 Assembly Instructions Step a: Secure the Slats 14 a Rear Guard Rail Front Guard Rail b: Secure the Plastic Plug to Rear Guard Rail and Front Guard Rail 14 a 14 a 14 a...
- Page 25 Assembly Instructions Step Secure Slats Spacer Slats 14 a 14 a 14 a...
- Page 26 Assembly Instructions Step 14 a Attach Bracket x 4 to End Guard Rail x 2 with 14 a 14 a 4PCS M6 X 19MM...
- Page 27 Assembly Instructions Step Note: The TV mount mates with M6 screw. If you're using M4 screw to assemble the TV screen, please use part M washer as provided to make sure M4 screw could be also workable for it. 100%...