Table of Contents
Advertisement
Available languages
Available languages
ALLEN+ROTH
and logo design are trademarks or
®
registered trademarks of LF, LLC. All rights reserved.
INSTALLER: Leave this manual with the appliance.
CONSUMER: Retain this manual for future reference.
WARNING
Improper installation, adjustment, alteration,
service or maintenance can cause injury or
property damage. Refer to the owner's information
manual provided with this appliance.
For assistance or additional information consult a
qualified installer, services agency or the gas
supplier.
ATTACH YOUR RECEIPT HERE
Serial Number
Questions, problems, missing parts? Before returning to your retailer, call our customer
service department at 1-866-439-9800, 8 am - 8 pm, EST, Monday - Sunday.
VR20346
Purchase Date
1
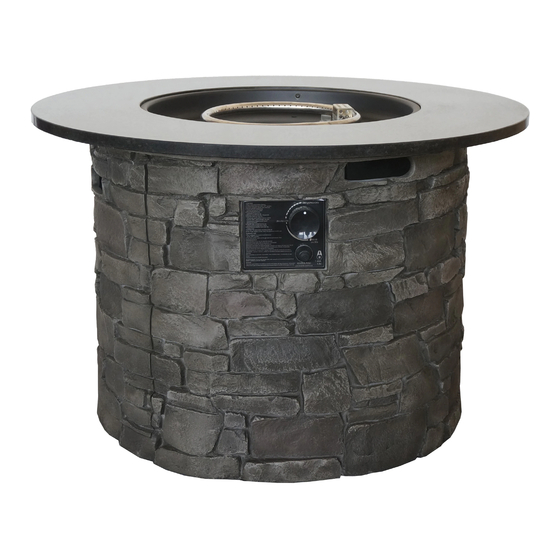
36.2" STACKED STONE
GAS FIRE TABLE
DANGER
FIRE OR EXPLOSION HAZARD
If you smell gas:
• Shut off gas to the appliance.
• Extinguish any open flame.
• If odor continues, leave the area
immediately.
• After leaving the area, call your gas supplier
or fire department.
Failure to follow these instructions could
result in fire or explosion, which could cause
property damage, personal injury, or death.
WARNING
Do not store or use gasoline or other
flammable vapors and liquids in the
vicinity of this or any other appliance.
An LP-cylinder not connected for use shall
not be stored in the vicinity of this or any
other appliance.
WARNING
For outdoor use only.
installation and service must be performed
by a qualified installer, service agency, or
the gas supplier.
WARNING
If the information in this manual is not
followed exactly, a fire or explosion may
result causing property damage, personal
injury, or loss of life.
This appliance can produce carbon
monoxide which has no odor.
Using it in an enclosed space can kill you.
Never use this appliance in an enclosed
space such as a camper, tent, car or
home.
ITEM # 2592445
MODEL # 52052
Español p. 15
Advertisement
Table of Contents

Related Manuals for Allen + Roth 52052


Summary of Contents for Allen + Roth 52052
- Page 1 GAS FIRE TABLE ALLEN+ROTH and logo design are trademarks or ® registered trademarks of LF, LLC. All rights reserved. MODEL # 52052 Español p. 15 DANGER FIRE OR EXPLOSION HAZARD If you smell gas: • Shut off gas to the appliance.
-
Page 2: Safety Information
SAFETY INFORMATION Please read and understand this entire manual before attempting to assemble, operate or install the product. Failure to follow the dangers, warnings and cautions contained in this owners manual may result in a fre or explosion causing damage to property, serious bodily injury or death. WARNING •... - Page 3 SAFETY INFORMATION • Combustible material should not be within 60 inches of the top of the unit, or within 48 inches around the entire unit. • Keep the appliance area clear and free from combustible material, gasoline and other flammable vapors and liquids.
- Page 4 SAFETY INFORMATION Only use the regulator and hose assembly provided with this unit. Replacement parts must be supplied directly by the manufacturer. Inspect the burner before use of this unit. If the burner shows any kind of damage, do not operate the appliance.
-
Page 5: Package Contents
PACKAGE CONTENTS PART DESCRIPTION QUANTITY Firebowl Body Door Burner (preassembled) Guard (preassembled) Lava Rocks 2 bags Protective Cover Battery (AAA) Control Knob (preassembled) Electronic Igniter (preassembled) Feet (preassembled) Touch-up Pen... - Page 6 PREPARATION Before beginning assembly of product, make sure all parts are present. Compare parts with package contents list and hardware contents list. If any parts are missing or damaged, do not attempt to assemble the product. Estimated Assembly Time: 10 minutes No tools required.
- Page 7 ASSEMBLY INSTRUCTIONS 1. Check that the control knob (I) for the gas supply system is turned to the “OFF” position before starting any assembly. 2. Remove door from body (B) and place propane gas tank (not included) into the metal stand inside of the body (B).
- Page 8 ASSEMBLY INSTRUCTIONS 4. Once the tank is attached to the regulator, make sure the propane gas tank sits on the metal stand inside body (B) completely. Turn the preassembled wing screw on the outer part of metal stand clockwise to secure the propane gas tank tightly.
- Page 9 ASSEMBLY INSTRUCTIONS 7. Pour lava rocks (F) into the firebowl (A). WARNING To ensure proper function, the guard (E) on this burner (D) should be free of lava rocks at all times. Keep away from the unit and have the unit to burn 20 minutes for the first time use.
- Page 10 OPERATING INSTRUCTIONS Before performing a leak test, be sure that no sparks can occur and you are in a spacious outdoor area. Connect the propane gas tank to the regulator and turn the valve on the unit to the “OFF” position.
-
Page 11: Care And Maintenance
CARE AND MAINTENANCE • Before performing any maintenance always disconnect propane gas tank. • Store your product indoors during winter months. Avoiding extreme cold temperatures will prevent from exposure damage. • Keep the heating item free and clear from combustible materials. •... -
Page 12: Troubleshooting
TROUBLESHOOTING PROBLEM POSSIBLE CAUSE CORRECTIVE ACTION 1. Igniter pin and burner are wet. 1. Dry off with a soft cloth. 2. Igniter battery is incorrectly inserted. 2. Check which direction the battery is inserted. 3. Igniter pin is broken. 3. Contact the manufacturer for a Heating unit won’t light replacement part. -
Page 13: Replacement Parts List
REPLACEMENT PARTS LIST For replacement parts, call our customer service department at 1-866-439-9800, 8 am - 8 pm, EST, Monday - Sunday. PART DESCRIPTION PART DESCRIPTION Part D Burner Part N Valve Part E Guard Part O Regulator Part G Protective Cover Part P Thermocouple... - Page 15 PIEDRA APILADA, 91.95 CM ALLEN+ROTH y el diseño del logotipo son marcas ® comerciales o marcas registradas de LF, LLC. MODELO N.º 52052 Todos los derechos reservados. PELIGRO PELIGRO DE INCENDIO O EXPLOSIÓN Si percibe olor a gas: • Cierre el suministro de gas al electrodoméstico.
-
Page 16: Información De Seguridad
INFORMACIÓN DE SEGURIDAD Lea y comprenda por completo este manual antes de intentar ensamblar, usar o instalar el producto. No seguir los avisos de peligro, las advertencias y las precauciones de este manual del usuario podría provocar incendios o explosiones que causen daños materiales, lesiones personales graves o la muerte. ADVERTENCIA •... - Page 17 INFORMACIÓN DE SEGURIDAD • El material combustible no debe estar a 152,4 cm de la parte superior de la unidad ni a 121,92 cm alrededor de toda la unidad. • Mantenga el área del electrodoméstico despejada y libre de materiales combustibles, gasolina y otros vapores y líquidos inflamables.
- Page 18 INFORMACIÓN DE SEGURIDAD Use solamente el ensamblaje del regulador y la manguera incluidos con esta unidad. El fabricante debe suministrar directamente las piezas de repuesto. Inspeccione el quemador antes de usar esta unidad. Si el quemador presenta algún tipo de daño, no haga funcionar el electrodoméstico.
- Page 19 CONTENIDO DEL PAQUETE PIEZA DESCRIPCIÓN CANTIDAD Fogón Cuerpo Puerta Quemador (preensamblado) Protector (preensamblado) Rocas de lava 2 bolsas Cubierta protectora Batería (AAA) Perilla de control (preensamblada) Encendedor electrónico (preensamblado) Base (preensamblada) Aplicador de retoque...
- Page 20 PREPARACIÓN Antes de comenzar a ensamblar el producto, asegúrese de tener todas las piezas. Compare las piezas con la lista del contenido del paquete y la lista del contenido de aditamentos. No intente ensamblar el producto si faltan piezas o si estas están dañadas. Tiempo estimado de ensamblaje: 10 minutos No se necesitan herramientas.
-
Page 21: Instrucciones De Ensamblaje
INSTRUCCIONES DE ENSAMBLAJE 1. Verifique que la perilla de control (I) del sistema para el suministro de gas esté en la posición "OFF" (apagado) antes de comenzar cualquier ensamblaje. 2. Retire la puerta del cuerpo (B) y coloque el tanque de gas propano (no se incluye) en la base de metal del cuerpo (B). - Page 22 INSTRUCCIONES DE ENSAMBLAJE 4. Luego de conectar el tanque al regulador, asegúrese de que el tanque de gas propano esté completamente apoyado sobre la base de metal dentro del cuerpo (B). Gire el tornillo de mariposa previamente ensamblado en la pieza exterior de la base de metal en dirección de las manecillas del reloj para asegurar de forma firme el tanque de gas propano.
- Page 23 INSTRUCCIONES DE ENSAMBLAJE 7. Vierta rocas de lava (F) en la chimenea (A). ADVERTENCIA Para garantizar un funcionamiento adecuado, el protector (E) de este quemador (D) debe estar libre de rocas de lava en todo momento. Manténgase alejado de la unidad y permita que permanezca encendida durante 20 minutos en el primer uso.
-
Page 24: Instrucciones De Funcionamiento
INSTRUCCIONES DE FUNCIONAMIENTO Antes de realizar una prueba de fugas, asegúrese de que no se produzcan chispas y de que se encuentre en un área exterior espaciosa. Conecte el tanque de gas propano al regulador y gire la válvula de la unidad a la posición "OFF"... -
Page 25: Cuidado Y Mantenimiento
CUIDADO Y MANTENIMIENTO • Antes de realizar cualquier mantenimiento, siempre desconecte el tanque de gas propano. • Guarde su producto en interiores durante los meses de invierno. No exponer el producto a temperaturas extremadamente frías evitará daños por exposición. • Mantenga el artículo de calefacción libre y despejado de materiales combustibles. •... -
Page 26: Solución De Problemas
SOLUCIÓN DE PROBLEMAS PROBLEMA CAUSA POSIBLE ACCIÓN CORRECTIVA 1. La clavija del encendedor y el quemador 1. Seque con un paño suave. están mojados. 2. Compruebe en qué dirección está colocada 2. La batería del encendedor está colocada la batería. de manera incorrecta. -
Page 27: Lista De Piezas De Repuesto
LISTA DE PIEZAS DE REPUESTO Para obtener piezas de repuesto, llame a nuestro Departamento de Servicio al Cliente al 1-866-439-9800, de lunes a domingo, de 8 a. m. a 8 p. m., hora estándar del Este. PIEZA DESCRIPCIÓN PIEZA DESCRIPCIÓN Pieza D Quemador Pieza N...
Need help?
Do you have a question about the 52052 and is the answer not in the manual?
Questions and answers