Table of Contents
Advertisement
Available languages
Available languages
Quick Links
ALLEN + ROTH and logo design are trademarks or registered trademarks of LF, LLC. All
Rights Reserved
ALLEN + ROTH et son logo sont des marques commerciales ou des marques déposées de
LF, LLC. Tous droits réservés
ALLEN + ROTH y el diseño del logo son marcas comerciales o marcas registradas de LF,
LLC. Todos los derechos reservados
Unique Identifier (UID): _________________________
Questions, problems, missing parts? Before returning to your retailer, call our customer service
department at 866-439-9800, 8 a.m. - 8 p.m., EST, Monday - Sunday.
You may also contact us anytime at partsplus@lowes.com.
2023-03-09
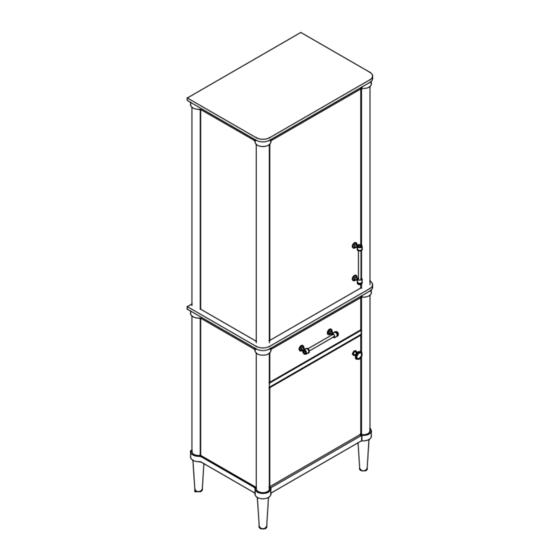
16" [406]
24" [610]
Purchase Date: ________________________
ITEM #: 5288438
RIAN 30 SU
MODEL#: RIAN SU-WW
Measures: inch [millimeter]
PAGE 1
Advertisement
Chapters
Table of Contents

Subscribe to Our Youtube Channel
Related Manuals for Allen + Roth RIAN 30 SU


Summary of Contents for Allen + Roth RIAN 30 SU
- Page 1 ALLEN + ROTH et son logo sont des marques commerciales ou des marques déposées de LF, LLC. Tous droits réservés ALLEN + ROTH y el diseño del logo son marcas comerciales o marcas registradas de LF, LLC. Todos los derechos reservados 16”...
-
Page 2: Table Of Contents
TABLE OF CONTENTS PACKAGE CONTENTS..............................3 HARDWARE CONTENTS.............................4 TOOLS REQUIRED...............................4 SAFETY INFORMATION...............................5 PREPARATION................................5 ASSEMBLY INSTRUCTIONS............................6 HOW TO ADJUST THE DRAWER..........................8 SHELF ADJUSTMENT..............................9 HOW TO ADJUST THE DOOR’S POSITION........................10 CARE AND MAINTENANCE............................11 WARRANTY.................................11 PAGE 2... -
Page 3: Package Contents
PACKAGE CONTENTS PART # DESCRIPTION QUANTITY Door (big) Adjustable shelf Drawer Door (small) Hinge (door) Shelf holder Knob Handle Drawer glides PAGE 3... -
Page 4: Hardware Contents
HARDWARE CONTENTS Wall Anchor Screw Screw ø9x30mm ST4x32mm ST4x20mm Tip-over restraint Strap TOOLS REQUIRED (not supplied) Pencil Screwdriver Level Rubber mallet Measuring Tape Drill PAGE 4... -
Page 5: Safety Information
SAFETY INFORMATION • Please read and understand this entire manual before attempting to assemble, operate or install the product. • Keep small parts away from children during assembly. • Failure to follow warnings and cautions could result in serious injury. WARNING •... -
Page 6: Assembly Instructions
ASSEMBLY INSTRUCTIONS 1. Place the tip-over restraint (DD) on the wall at a proper height, mark the positions of the holes onto the wall. WARNING: Customer must install the tip-over restraints provided. Serious or fatal crushing injuries can occur from furniture tip-over. Use of tip-over restraints may only reduce, but not eliminate, the risk of tip-over. - Page 7 ASSEMBLY INSTRUCTIONS 4. Install the other tip-over restraint on back of the side unit at a proper height with the screws (CC). 5. Connect the 2 tip-over restraints with the strap. PAGE 7...
-
Page 8: How To Adjust The Drawer
HOW TO ADJUST THE DRAWER *If necessary, each drawer is designed to be removed or replaced: DRAWER REMOVAL: 6.1. Pull out the drawer until the lock pins located at the bottom of the drawer are easy to reach. 6.2. Pull out the lock pins located at the bottom of the drawer to the sides to release the pins. 6.3. -
Page 9: Shelf Adjustment
SHELF ADJUSTMENT (HOW TO REMOVE) *Each shelf can be removed or repositioned to create more space: 8.1. Uninstall the screws and remove the shelf (B). 8.2. Pull out the shelf holders (F). SHELF ADJUSTMENT (HOW TO INSTALL) 9.1. Select your desired location and push the shelf holder (F) into place on both the right and left sides. 9.2. -
Page 10: How To Adjust The Door's Position
HOW TO ADJUST THE DOOR’S POSITION To adjust the door front In and Out in-depth, rotate the adjustment screw (A). To adjust the door front Left and Right, rotate the adjustment screw (B). Right Right Left Left To adjust the door front Up and Down in height, rotate the adjustment screw (C). Down Down PAGE 10... -
Page 11: Care And Maintenance
CARE AND MAINTENANCE • For daily maintenance, use a wet cloth and a soft liquid cleaner. • Never use abrasive cleaners or strong bleach, scrapers, metallic brushes, or other objects or any products which can graze or tarnish surfaces. Touch-up pen (applicable to paper laminated finish only): Shake the pen a few times before use. Press the tip down and hold it for 3-10 seconds to release the paint. - Page 12 ALLEN + ROTH et son logo sont des marques commerciales ou des marques déposées de LF, LLC. Tous droits réservés ALLEN + ROTH y el diseño del logo son marcas comerciales o marcas registradas de LF, LLC. Todos los derechos reservados 16”...
- Page 13 ÍNDICE CONTENIDO DEL PAQUETE.............................14 ADITAMENTOS................................15 HERRAMIENTAS NECESARIAS..........................15 INFORMACIÓN DE SEGURIDAD..........................16 PREPARACIÓN................................16 INSTRUCCIONES DE ENSAMBLAJE........................17 CÓMO AJUSTAR LA GAVETA............................19 AJUSTE DE LA ESTANTERÍA............................20 CÓMO AJUSTAR LA POSICIÓN DE LA PUERTA.....................21 CUIDADO Y MANTENIMIENTO..........................22 GARANTÍA .................................22 PAGE 13...
-
Page 14: Contenido Del Paquete
CONTENIDO DEL PAQUETE PIEZA # DESCRIPCIÓN CANTIDAD Puerta (grande) Estante ajustable Gaveta Puerta (pequeño) Bisagra (puerta) Soporte de estante Manija Manija Diapositiva PAGE 14... -
Page 15: Aditamentos
ADITAMENTOS Ancla de expansión de pared Tornillo Tornillo ø9x30mm ST4x32mm ST4x20mm Dispositivo de restricción de volteo Cinta HERRAMIENTAS NECESARIAS (no incluidas) Lápiz Destornillador Nivel Mazo de goma Cinta métrica Taladro PAGE 15... -
Page 16: Información De Seguridad
INFORMACIÓN DE SEGURIDAD • Lea y comprenda este manual en su totalidad antes de intentar montar, utilizar o instalar el producto. • Mantenga las piezas pequeñas fuera del alcance de los niños durante el montaje. • El incumplimiento de las advertencias y precauciones puede provocar lesiones graves. ADVERTENCIA •... -
Page 17: Instrucciones De Ensamblaje
INSTRUCCIONES DE ENSAMBLAJE 1. Coloque el antivuelco (DD) en la pared a una altura adecuada, marque las posiciones de los orificios en la pared. ADVERTENCIA: el cliente debe instalar los retenedores de vuelco suministrados. El vuelco del mueble puede provocar lesiones graves o mortales por aplastamiento. - Page 18 INSTRUCCIONES DE ENSAMBLAJE 4. Instale la otra contención antivuelcos en la parte posterior de la unidad lateral a una altura adecuada con los tornillos (CC). 5. Conecte las 2 contenciones antivuelcos con la correa. PAGE 18...
-
Page 19: Cómo Ajustar La Gaveta
CÓMO AJUSTAR LA GAVETA *Si es necesario, cada gaveta está diseñada para poder retirarla o reemplazarla: RETIRADA DE LA GAVETA: 6.1. Extraiga la gaveta hasta que los pasadores de bloqueo ubicados en la parte inferior de la gaveta sean fáciles de alcanzar. 6.2. -
Page 20: Ajuste De La Estantería
AJUSTE DE LA ESTANTERÍA (CÓMO QUITARLA) *Cada estante se puede retirar o reubicar para crear más espacio: 8.1. Desmonte los tornillos y retire el estante (B). 8.2. Extraiga los soportes de los estantes (F). AJUSTE DEL ESTANTE (CÓMO INSTALAR) 9.1. Seleccione la ubicación deseada y empuje el soporte del estante (F) en su lugar, tanto en el lado derecho como en el izquierdo. 9.2. -
Page 21: Cómo Ajustar La Posición De La Puerta
CÓMO AJUSTAR LA POSICIÓN DE LA PUERTA Para ajustar la profundidad de entrada y salida de la puerta, gire el tornillo de ajuste (A). Entrada Entrada Salida Salida Para ajustar el frente de la puerta a la izquierda y a la derecha, gire el tornillo de ajuste (B). Derecha Derecha Izquierda... -
Page 22: Cuidado Y Mantenimiento
CUIDADO Y MANTENIMIENTO • Para el mantenimiento diario, utilice un paño húmedo y un limpiador líquido suave. • No utilice nunca limpiadores abrasivos o lejía fuerte, raspadores, cepillos metálicos u otros objetos o productos que puedan rozar o deslustrar las superficies. Rotulador de retoque (aplicable solo al acabado laminado en papel): agite el rotulador unas cuantas veces antes de utilizarlo.
Need help?
Do you have a question about the RIAN 30 SU and is the answer not in the manual?
Questions and answers