
Related Manuals for Lean Cars A100


Summary of Contents for Lean Cars A100
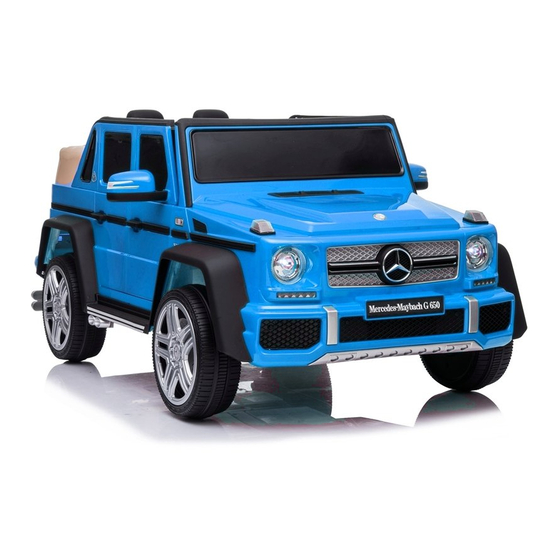
- Page 1 Manual Instruction A100 Mercedes-Maybach G650 Landaulet Official Licensed Product...
-
Page 2: Special Note
Special Note: Picture is for reference only. Please refer to real object. ◆ Please read the manual carefully before assembling; ◆ Preserve the manual properly for future reference; ◆The manual is for assembling and using reference only. Details will be possibly improved and updated, including structure, appearance, packing, functions, and etc. - Page 3 Motor: 12V/540 * 2 Battery: 12V4.5ah * 1/ 12V7ah Charger: 12V500mA/12V1000mA Max Speed:5-7 km/h Suitable Age:3 years+ Maximum Loading Capacity:30 kg Item size:1100×610×510 MM Charging time: 8-12 hours Battery life:300 times charge&discharge...
-
Page 4: Exploded View And Parts List
3. Exploded View and Parts List Parts Name Part Name Body Seat pad Steer Wheel Seat back Car window(L/R) Screw kit Rear view mirror manual windshield Rear side windows(L/R) Front wheel Rear trunk Rear wheel(driving) Rear bumper Wheel cover Remote Motor(L/R) charger Note: some parts need to be fixed from 2 sides. - Page 5 A. Rear driving wheel: Put the axle through the body, and assemble the motor, wheel by shim and M8 nut, then fix the wheel cover on to right buckle position and press it to lock. (Note: motors need to be distinguished as Left & Right.) A.
- Page 6 A. Refer to the picture, put the rear bumper to the body accordingly, and fix it by 4X12 tapping screws.
- Page 7 BPut 2 rear side windows to related positions as picture shows, and lock it by buckle(L and R different), and then assemble the rear trunk onto related positions, then fix it by 4X12 tapping screw;...
- Page 9 A. Battery is located under the seat pad. Connect the red terminal to the red buckle of the battery. A. Put the seat back onto the car body accordingly, and insert the seat pad into right positions of 3 holes from down side of the seat back. Then fix the seat pad by 4 * 12 tapping screws. 7.
- Page 10 A. Refer to the picture shows, insert the car window into the car door accordingly, and fix them by 4 * 12 tapping screws(L & R different). Then put the rear view mirrors(L & R different) onto right position of the door and lock it by buckling themselves. A.
- Page 11 ⦁ Multifunctional control board; ⦁ Power switch; ⦁ Music button; ⦁ Forward/reverse switch; ⦁ Charging socket; ⦁ Pedal accelerator switch: pedal to move, release it to stop the car gradually. 1. USB port: play music files in USB device. 2. TF card port: play music files in TF card device. 3.
- Page 13 Note:Use screwdriver to get screws off and open battery box,install 2 pc AAA 1.5V battery in, and fix it with screws. 9. Functions of Remote:...
- Page 14 The car is with remote priority function: while it is controlled by remote, the step switch does not work; Disconnect the remote , the step switch works then. Remote: Open the battery holder and put in 2 pcs AAA LRO3 batteries. If the batteries are well fixed, there are frequency light and speed light will be on.
- Page 15 10. Warnings & Safety Alert: Warning! ⦁ Choking Hazard: Small parts, Not for kids under 3 years. ⦁ Dispose plastic bags carefully. It’s dangerous to kids. ⦁ Adult assembly required.Use care when unpacking as components to be assembled may pose small parts/sharp edge hazard. ⦁...
- Page 16 Warning! ⦁ Only appointed battery and charger brand are allowed to use to the car. ⦁ Don’t use the car’s battery or charger to other products. ⦁ Don’t change the structure or cable lines. ⦁ Don’t connect the positive pole and negative pole by tools. ⦁...
-
Page 17: Fuse Maintenance
⦁ Connect the charger to the the socket directly. ⦁ Put the charge plug into right socket of alternating currant power. Charging must be done by adult. Please read related notes for charging carefully. 13. Fuse Maintenance: Inspect the charger carefully regularly to check if everything is OK. If there is somewhere with any problem, stop using is till repaired. -
Page 19: Troubleshooting
14. Trouble Shooting Troubles Inspections Solutions Motor not 1. Check if fuse disconnected? Yes, restart the car; rotating No, check the next; 1. Check if pedal switch in poor contact. No,repair the contact. Yes, check the next; 1. Check if motor terminal welded. No, connect it. - Page 20 DISPOSAL OF BATTERIES: CONTAINS SEALED LEAD ACID BATTERY. BATTERY MUST BE RECYCLED. Dispose old batteries at an approved battery dumping station; Contact your local environmental protection agency office for additional information.
- Page 21 Adult assembly required. Use care when unpacking as components to be assembled may pose small parts/sharp edge hazard. Never leave child unattended. To reduce the risk of injury, adult supervision is required. The ride on is unsuitable for children under 36 months due to its maximum speed; Maximum user weight is 30kg.
Need help?
Do you have a question about the A100 and is the answer not in the manual?
Questions and answers