Advertisement
Quick Links
Advertisement

Related Manuals for Saferhomee HB-4040S


Summary of Contents for Saferhomee HB-4040S
- Page 1 Wireless Alarm System User Manual...
-
Page 2: Configuration List
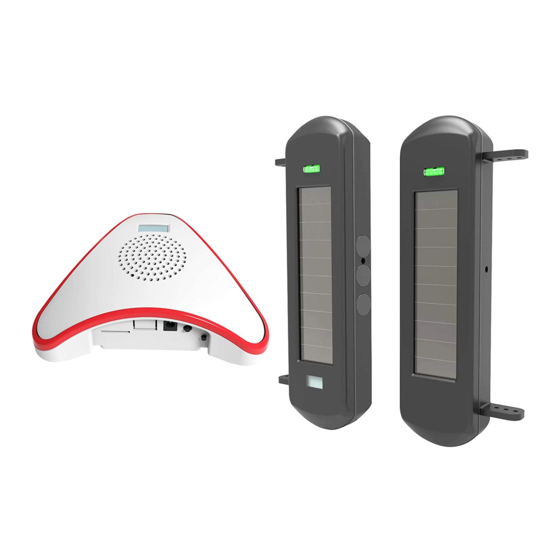
If you want to add additional HTZSAFE sensors to the system,please operate the system according to the part 4 of the manual or contact us directly; After-sale Service After-sale Service E-mail:contact@saferhomee.com 2. System Components And Usage Wireless Alarm Receiver Indicator Light Speaker Indicator Light: Will be red if power on;Will flash if on setting mode... - Page 3 Power Tone ON/OFF Power : power jack(DC5V) ON/OFF: power switch(turn on/off the wireless alarm receiver) set button(add/delete the sensors of the wireless alarm receiver) Tone: Choose the ring tones(total 35 ring tones optional) Volume:Press and hold the“ON/OFF”button first,and then press the“Tone”button to adjust the alarm volume,total 4 volume levels.
- Page 4 Bubble Level: easy to know the beams be installed horizontally Infrared Beam: used to detect the intruder Calibration Hole: easy to align with another beam sensor if the beams apart far away Solar Panel: charge the battery of the beam sensor even in cloudy or rainy days LCD Display: easy to know how well the beam sensor be aligned with each other...
- Page 5 Step2: Turn on the Solar &Wireless Photoelectric Beams: Press the ON/OFF button 3 times(Both the transmitter and receiver) Transmitter Receiver (more than 3 short beeps mean the built-in batteries of the sensor have enough power) Make sure the beams aligned with each other Step 3 (bleep prompt and LCD display more than “100”...
- Page 6 Step 5 Trigger the sensor (completely block all the 3 infrared beams by thick materials, such as books,and the wireless alarm receiver will alarm for several seconds) Step 6 Press“Tone” button to choose the ring tone for this sensor, there are 35 tones to choose from; Tone Step 7 Adjust the alarm volume.
- Page 7 Step 8 Installation 1 Installation method Calibration (1)Place the beam sensor on the same height. (2)Ensure the beam sensor is vertical (the bubble of the horizontal pipe should be in the middle). (3)Adjust the direction of the beam sensor to make them align with each other. Calibration Hole:used to find another device.
- Page 8 2 Installation method(with iron brackets)
- Page 9 Calibration (1)Place the beam sensor on the same height. (2)Ensure the beam sensor is vertical (the bubble of the horizontal pipe should be in the middle). (3)Adjust the direction of the beam sensor to make them align with each other. Calibration Hole:used to find another device.
-
Page 10: Other Settings
4. Other Settings (1)How to add extra sensors to the wireless alarm receiver (up to 32 sensors can be added to the receiver) Step 1 Power on the wireless alarm receiver by the power adapter; Step 2 Press and hold the “ON/OFF” button for 5 seconds and release the button when the indicator light flashing;... - Page 11 Step 4 Trigger the sensor again to confirm the sensor has been added to the wireless alarm receiver already. Step 5 Press“Tone ”Button to choose the ring tone for this sensor, there are 35 tones to choose from Tone (2)How to delete the sensors of the wireless alarm receiver Step 1 Power on the wireless alarm receiver by the power adapter Step 2...
- Page 12 (3)How to adjust the alarm volume Step 1 Power on the wireless alarm receiver by the power adapter Step 2 Press and hold the“ON/OFF”button first,and then press the“Tone”button to adjust the alarm volume,total 4 volume levels ON/OFF Tone (4)How to change the ring tone for the sensors Step 1 Power on the wireless alarm receiver by the power adapter Step 2...
-
Page 13: Technical Parameters
Step 2: Press and hold the ON/OFF button for 10 seconds and release the button when you hear bleep prompt,and then press the ON/OFF button 6 times quickly( both the transmitter and receiver Note:if adjust the sensitivity of the beams back to factory default 200ms ,press the ON OFF button 5 times Step 3: Make sure the solar beams aligned with each other Step 4: Press and hold the ON/OFF button for 10 seconds... - Page 14 Transmitter:500mAh,Receiver:500mAh ≤0.5mA Static working Current 940nm±20nm Infrared Wavelength 1800L ux illumination levl: ≥2mA (Remarks:The outdoor illumination Solar Panel Output Current intensity on rainy days is about 2000L ux) -22°F to 158°F(-30℃ to 70℃) Working Temperature Range After-sale Service E-mail:contact@saferhomee.com 21-HB201905-4040S(1.2)+1T001Q3+(10.10)-02...
Need help?
Do you have a question about the HB-4040S and is the answer not in the manual?
Questions and answers