Advertisement
Quick Links
Please Contact Moen First
For Installation Help, Missing or
Replacement Parts
(USA)
1-800-BUY-MOEN (1-800-289-6636)
Mon - Fri 8:00 AM to 7:00 PM, Eastern
Sat. 9:00 AM to 3:00 PM Eastern
WWW.MOEN.COM
(Canada)
1-800-465-6130
Mon - Fri 7:30 AM to 7:00 PM, Eastern
WWW.MOEN.CA
Por favor, contáctese primero con Moen
Para obtener ayuda de instalación, piezas
faltantes o de recambio
01-800-718-4345
Lunes a viernes de 8:00 a 20:00 hs.
(Costa Este)
Sáb. 8:00 a 18:30 hs. (Costa Este)
WWW.MOEN.COM.MX
Veuillez d'abord contacter Moen
en cas de problèmes avec l'installation, ou pour
obtenir toute pièce manquante ou de rechange
1-800-465-6130
Du lundi au vendredi :
de 7 h 30 à 19 h, HE
WWW.MOEN.CA
HELPFUL TOOLS
For safety and ease of faucet replacement,
Moen recommends the use of these
helpful tools.
Installation Guide
Guía de Instalación
Guide d'installation
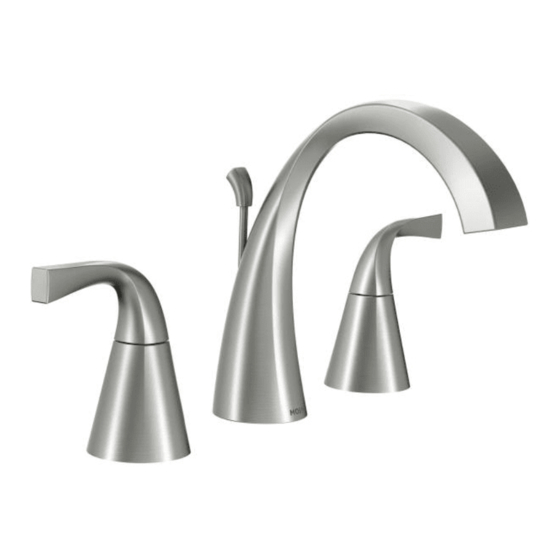
TWO HANDLE LAVATORY FAUCET
MEZCLADORA PARA LAVABO DE
DOS MANERALES
ROBINET DE LAVABO À DEUX POIGNÉES
Style varies by model.
El estilo varía por el modelo.
Le style varie selon le modèle.
HERRAMIENTAS ÚTILES
Para que el cambio de la llave sea fácil y
seguro, Moen le recomienda usar estas
útiles herramientas.
INS10185B - 12/14
84661SRN
OUTILS UTILES
Par mesure de sécurité et pour faciliter
l'installation, Moen suggère l'utilisation des
outils suivants.
Plumber' s Putty or Non-Staining Sealant
Masilla de plomero o sellador que no mancha
Mastic de plombier ou de non-coloration Mastic
Advertisement

Related Manuals for Moen 84661SRN


Summary of Contents for Moen 84661SRN
- Page 1 Sat. 9:00 AM to 3:00 PM Eastern WWW.MOEN.COM (Canada) 1-800-465-6130 Mon - Fri 7:30 AM to 7:00 PM, Eastern WWW.MOEN.CA Por favor, contáctese primero con Moen Para obtener ayuda de instalación, piezas faltantes o de recambio 01-800-718-4345 Lunes a viernes de 8:00 a 20:00 hs. 84661SRN (Costa Este) Sáb.
-
Page 2: Parts List
Parts List A. Handles (x2) J. Spout Mounting Nut B. Spout K. Hose C. Valve Clips (x2) L. Spout Shank D. Upper Mounting Washer (x2) M. Silicone Lubricant E. Lower Mounting Washer (x2) N. Hot Valve Body F. Mounting Nuts (x2) O. - Page 3 INS10185B - 9/14 Parts List Waste Assembly Q. Plug Z. Tail Piece Ensamblaje del desagüe R. Lift Rod AA. Pivot Rod Assemblage de la bonde S. Lift Rod Clip BB. Pivot Rod Nut T. Waste Seat CC. Lift Rod Strap U.
- Page 4 Sealant Sellador Mastic Apply a bead of plumbers putty or other sealant to the base of the Spout (B) as shown. Turn Apply a small amount of Silicone Lubricant (M) to the black rubber o-ring on the Spout Shank (L) as shown. Spout upright.
- Page 5 INS10185B - 9/14 Sealant Sellador Mastic Use Mounting Tool (O) to tighten the Mounting Nut (J) to the Spout Shank (L). Apply a generous bead of plumbers putty or other sealant to underside of the Upper Mounting Washers (D). A putty groove is provided for this purpose. Turn Washers (D) over and position Utilice la herramienta de montaje (O) para apretar la tuerca de montaje (J) a la tubo roscado del on sink as shown.
- Page 6 Slide Clip (C) into the groove on each valve body. Check to see that each valve body outlet Hold Hot Valve Body (N) with one wrench and tighten the Lower Mounting Nut (F) using a 2nd connection below the deck points towards the Spout Shank (L) as shown. wrench.
- Page 7 INS10185B - 9/14 Rotate the red stem extension on the Hot Valve Body (N) clockwise and the blue stem exten- Position (A) with handles pointing in the off direction as shown. Holding the handle stationary sion on the Cold Valve Body (G) counterclockwise until they stop. with one hand, thread the base of the Handle Assembly (A) onto the Valve Bodies (N &...
- Page 8 correct orientation orientación correcta orientation correcte Position the Drain O-ring (X) in the groove at the top of the Tail Piece (Z) and thread onto the Insert Plug (Q) into Waste Seat (T). Waste Seat (T). After (Z) is attached to (T), rotate entire assembly so opening on (Z) points Inserte el tapón (Q) en el asiento del desagüe (T).
- Page 9 INS10185B - 9/14 Verify white Plastic Pivot Rod Seat (Y) is in place with beveled side facing out. The pivot rod Push Pivot Rod (AA) down. Insert Pivot Rod through closest hole on Lift Rod Strap (CC) with (AA) can be installed in two ways. Illustration (19A) shows the Pivot Rod (AA) next to hole in pivot rod down.
- Page 10 1. Connect Supply Lines (FF) (not included) to Valve Bodies (N & G). 1. Attach Supply Lines (FF) to shutoff valves. 2. Use an adjustable wrench to secure. 2. Tighten with wrench until secure. 1. Conecte las líneas de suministro (FF) (no incluidas) al los cuerpos de válvulas (N&G). 1.
- Page 11 INS10185B - 9/14 For Model 84661SRN Para modelo 84661SRN Pour le modèle 84661SRN Sec. Sec. To flush debris from the plumbing system: Remove the aerator by unthreading by hand or by 1. Insert Hex Wrench (P) into aerator hole. using the included Aerator Tool (EE) provided with select models. Run hot and cold water for 2.
- Page 12 Il suffit d’écrire area code and telephone number. estado a otro o de una provincia o nación a otra. Moen lo à Moen inc. à l’adresse indiquée ci-dessous, pour expli- asesorará en el procedimiento a seguir para hacer válida quer le défaut, d’inclure une preuve d’achat, d’inscrire...
Need help?
Do you have a question about the 84661SRN and is the answer not in the manual?
Questions and answers