Table of Contents
Advertisement
Quick Links
Advertisement
Table of Contents

Related Manuals for Gallagher Birth Alarm Advanced


Summary of Contents for Gallagher Birth Alarm Advanced
- Page 2 Thank you for purchasing the Birth Alarm Advanced. This is an extremely reliable reporting system for foal births. We recommend that you read this manual carefully before using it. Proper assembly and operation are essential for proper working.
-
Page 3: Table Of Contents
The inside of the Birth Alarm Advanced Transmitter ..............9 Installing/replacing batteries ....................9 The casing of the Birth Alarm Advanced transmitter............10 The lights (LEDs) of the Birth Alarm Advanced transmitter ............11 The status lights ........................11 Birth Alarm Advanced receiver ...................... 12 The components of the Birth Alarm Advanced receiver............ - Page 4 Alarm Volume ......................... 19 9.3.1 Vibration function ......................19 Setting the language ......................19 Disabling the Birth Alarm Advanced receiver ................ 20 10. Testing ............................20 10.1 The range..........................20 11 Fitting the Birth Alarm onto the mare ................... 21 11.1...
-
Page 5: Introduction
Alarm Advanced makes good use of this tendency. When you fix the Birth Alarm Advanced beneath the mare’s halter (or in an anti-roll girth) you will receive a notification on your receiver. In this way, you will always be warned in time when the birth... -
Page 6: Contents Of The Package
This sends a signal to the receiver as soon as the mare lies down on her side. 2. The special holder This is where the Birth Alarm Advanced transmitter is pushed in. This holder can be fixed beneath the mare’s halter or in the ring of the anti-roll girth. -
Page 8: Preparing For Use
3. Preparing for use First use Before using the Birth Alarm Advanced for the first time, the transmitter has to log on to the receiver. For this, you have to follow the following step-by-step plan once: Step 1 Open the Birth Alarm Advanced transmitter. -
Page 9: Switching On/Off
Switching on/off You can switch the Birth Alarm Advanced transmitter on/off and operate it with the back of the special screwdriver supplied. On one of the long sides of the casing you will find two status lights. To switch ON the Birth Alarm Advanced transmitter, proceed as follows: •... -
Page 10: The Inside Of The Birth Alarm Advanced Transmitter
Always use new batteries at the beginning of the foaling season! If you will not be using Birth Alarm Advanced transmitter for a longer period of time, such as after the foaling season, you should remove the batteries to prevent them from... -
Page 11: The Casing Of The Birth Alarm Advanced Transmitter
The casing of the Birth Alarm Advanced Transmitter The casing of the Birth Alarm Advanced can only be closed in one way. The light guides on the long side of the cover must be on top of the status lights when the cover is screwed down. -
Page 12: The Lights (Leds) Of The Birth Alarm Advanced Transmitter
The lights (LEDs) of the Birth Alarm Advanced transmitter To view the status of your Birth Alarm Advanced transmitter, two status lights are placed on it. The status lights The status lights are on the long side of the casing. These lights both behave exactly the same. The double version is only meant to be able to read the status of your mare both left and right at all times. -
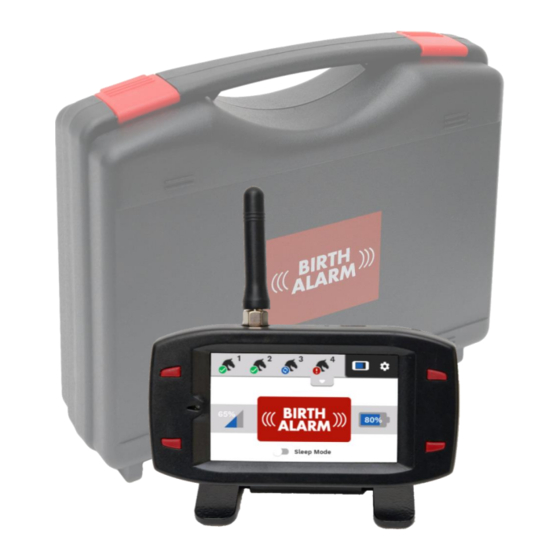
Page 13: Birth Alarm Advanced Receiver
The Birth Alarm Advanced receiver consists of the following components: 1. Display (with touch function) 2. Mounting clip. This is used to mount the Birth Alarm Advanced receiver on the standard or, for example, on the trouser belt. 3. A 3-colour LED that allows extra emphasis to be placed on the current state and displays short events. -
Page 14: Control Of The Birth Alarm Advanced Receiver
6.2.2 The eco mode You can use this to put your Birth Alarm Advanced receiver into economy mode with the POWER button / eco button. This will turn the screen off and your receiver will use less energy. When an alarm or warning is received from one of the transmitters, the display will immediately turn on again. -
Page 15: The Information Field
6.3.2 The horse's head symbol This symbol indicates that a Birth Alarm Advanced transmitter has been logged on to your Birth Alarm Advanced receiver and that the alarm indicator has been set up as a birth detection system. 6.3.3 The door symbol This symbol indicates that the relevant Birth Alarm Advanced transmitter is set as an anti-burglary alarm. -
Page 16: The Settings Button
Registering a Birth Alarm Advanced Transmitter When you switch on a Birth Alarm Advanced transmitter, it will first log on to the Birth Alarm Advanced receiver. This activates the tab with the number of the transmission. (The 'disconnect' symbol disappears and changes into a horse's head symbol). -
Page 17: Connecting The New Birth Alarm Advanced Transmitter
You use the sleep mode of the Birth Alarm Advanced if your peri-parturient mare rests fully stretched or sleeps. The sleep mode is a certain adjustment in the operation of the Birth Alarm Advanced. This adjustment ensures that an alarm as a result of the mare's only resting fully stretched is prevented. -
Page 18: Colic Position
65°. Colic position The Birth Alarm Advanced gives you the possibility to use the system as a Colic reporting system. The system will then immediately warn you when a mare shows colic suspicious behaviour. To activate the colic position, proceed as follows. -
Page 19: The Settings Menu
The settings menu Via the settings menu you can change various settings relating to the Birth Alarm Advanced receiver itself. To access the settings menu, click on the toothed wheel in the top right-hand corner of the screen. -
Page 20: Eco Mode
Alarm Volume You can set the sound intensity of the Birth Alarm Advanced receiver. This can be done via the volume buttons (6.2.3), but also via the settings screen. To do this, proceed as follows: •... -
Page 21: Disabling The Birth Alarm Advanced Receiver
• Preferably take the Birth Alarm Advanced transmitter to where your mare is located. • Take the Birth Alarm Advanced transmitter in your hands and switch it on so that the status light flashes green once every 8 seconds. •... -
Page 22: Fitting The Birth Alarm Onto The Mare
So try to make sure that you place the receiver in a place where there are as few obstacles as possible in the way. Fitting the Birth Alarm onto the mare To use the Birth Alarm Advanced in a girth or underneath the halter, it must be attached to the holder supplied. To do this, proceed as follows: •... -
Page 23: Fitting The Birth Alarm Beneath The Halter
11.1 Fitting the Birth Alarm beneath the halter If you want to use the Birth Alarm Advanced beneath a halter, mount it as shown below using three tie-wraps. 11.2 Fitting the Birth Alarm into an anti-roll girth If you are using the Birth Alarm Advanced in an anti-roll girth, you must mount the holder with the Birth Alarm Advanced in accordance with the illustration below. -
Page 24: Summary And Modes Of Use
Summary and modes of use Below is a brief description of how the Birth Alarm Advanced works and how it should be used. We recommend that you read this text. The Birth Alarm Advanced transmitter checks the position of your mare once every eight seconds. In the intervals the Birth Alarm Advanced will switch to an energy-efficient state so that the battery is not overloaded. -
Page 25: Technical Data
The manufacturer and importer are not liable for any damage whatsoever arising from the use of the Birth Alarm Advanced. Delivery and activities are carried out according to the general conditions of Gallagher Europe B.V.
Need help?
Do you have a question about the Birth Alarm Advanced and is the answer not in the manual?
Questions and answers