Advertisement
Quick Links
Hardware kit* / Trousse de quincaillerie*/ Kit de aditamentos*
Block connector
Connecteur de bloc
Conector de bloque
Corner connector
Connecteur d'angle
Conector de esquina
DO NOT ATTEMPT TO INSTALL TAPE LIGHT WHILE PLUGGED IN.
This product has a polarized plug (one blade is wider than the other) to reduce the risk of electric shock. The plug only fits one way into a polarized outlet. DO NOT ALTER THE PLUG.
READ THE ENTIRE MANUAL PRIOR TO INSTALLATION. Verify package and hardware contents. Save these instructions.
IMPORTANT SAFETY INFORMATION
1. No parts are serviceable on this product. DO NOT alter anything in this kit other than the
tape light length.
2. DO NOT INSTALL WHILE UNIT IS PLUGGED IN. DO NOT plug the power cord into the
power source until installation is complete.
3. For electrical requirements, see back of driver label.
4. For INDOOR locations only.
5. DO NOT touch, operate, or install fixture while in contact with water. Not intended for
illumination of aquariums.
6. DO NOT mount over sinks or stoves.
7. NOT intended for recessed installation in ceilings or soffits. DO NOT run ANY cords
behind walls, ceilings, soffits, cabinets or a similar permanent structure where it may be
inaccessible for examination.
Select a location for the LED tape light and mark it. Verify that the power cord reaches the nearest power outlet and will reach the LED tape light. Thoroughly clean the mounting surface with rubbing
alcohol and allow it to dry. DO NOT PLUG THE POWER CORD INTO THE POWER SOURCE UNTIL INSTALLATION IS COMPLETE.
Measure length of the LED tape light carefully before cutting to ensure that the block and corner connectors do not need to be repositioned
as this may affect the performance of the tape light.
ADJUSTING TAPE LENGTHS
The LED tape light can only be cut on the "cut symbol" which is located on
2 in. (5,1 cm) incremental lengths, allowing for cornering and/or custom
installs.
In the event the tape light is cut too short, use an included block connector
(for direct link) or corner connectors (for tight radius corner, to rejoin both
segments
ONLY SEGMENTS PREVIOUSLY REMOVED CAN BE ADDED BACK IN. ADDITIONAL TAPE LIGHT LENGTHS CANNOT BE ADDED.
OPTIONAL: BLOCK AND CORNER CONNECTORS
NOTE: Failure to peel the backer
can keep the contacts from
piercing the contact plates
and make it difficult to close
the latches.
NOTE:The polarity symbols
("+"and "-") are located on
the LED tape light every
2 in. (5 cm).
Peel back a small amount of the liner of the adhesive tape backer about 0.5 in. (1,27cm). The tape light is polarity sensitive, meaning all
the "+" symbols need to be aligned on one side and all the "-" symbols need to be aligned on the other side of the connections.
To open the connectors latches for use, carefully pry open the latches with a flathead screwdriver.
Line up all the "+" on the LED tape light sections being connected on the same side (as shown). Once the latches are open,
seat the LED tape light sections on top of the contacts. One at a time, close down on the latches until they are locked. The
contacts will pierce the contact plates in the LED tape light to complete the connection.
ATTACHING TAPE LIGHT TO SURFACE
adhesiveness of the tape backing.
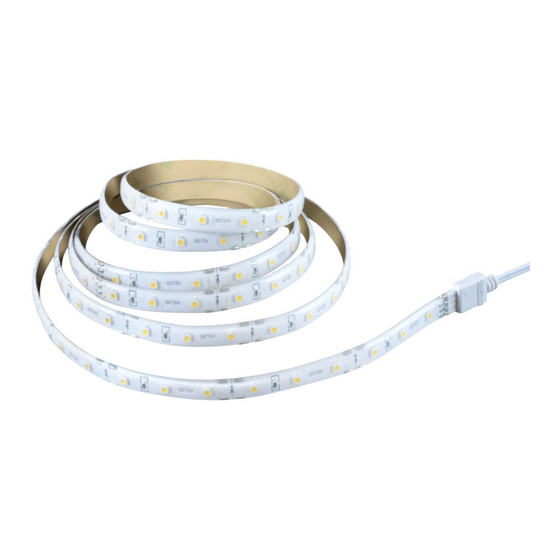
LED tape light
Ruban lumineux à DEL
Luz LED con cinta autoadhesiva
WARNINGS AND CAUTIONS
NOTE: DO NOT cut the
LED tape light strips
anywhere other than the
"Cut Symbol". Doing so
will damage the tape light.
NOTE: Insert the tip of the
screwdriver into the gaps
between the connector base
and the latches and twist.
Do not reposition tape light once it is
mounted. Doing so will reduce the
Once in place, allow the tape adhesive to
cure for 24 hours before use.
KIT DE RUBAN LUMINEUX BLANC AUTO-ADHÉSIF (Page 2)
KIT DE CINTA AUTOADHESIVA DE LUZ BLANCA (Página 4)
Model / Modèle / Modelo #: AC1067-WHG-06LF0-G, AC1067-WHG-12LF0-G
Power cord
Cordon d'alimentation
Cable de alimentación
8. Tape light must be fully uncoiled for proper operation, and to prevent overheating.
9. This tape light is NOT expandable. Additional LED tape light lengths CANNOT be added.
10. DO NOT look directly at lighted LEDs for any length of time.
11. Lights may be installed inside of an enclosure, such as a cabinet, ONLY when the
POWER ADAPTER is located outside of the enclosure.
12. Use only insulated staples or plastic ties (not included) to secure the cords.
13. DO NOT use with an extension cord. Use a power strip with integral over current protection
to supply power to the fixture. NEVER use power strip unless the plug can be fully inserted.
14. Reattaching the connectors multiple times may damage to the tape light.
15. DO NOT USE THIS FIXTURE WITH A DIMMING CIRCUIT. If dimmer controls are present,
remove and replace.
16. If unfamiliar with electrical installations, contact a qualified electrician to install.
17. LEDs gradually emit less light over their lifetime.
INSTALLATION
CUT
SYMBOL
BLOCK CONNECTORS
Align the polarity Symbols
CORNER CONNECTORS
Once all the needed connections have been made, peel the adhesive backer off the tape light in
incremental lengths and affix the tape light to the mounting surface while pressing firmly as the strip light
is installed. NOTE: The tape light may not adhere properly, to unfinished wood or particle board surfaces.
Applying a coat of varnish, or polyurethane to the mounting surface, or using insulated wire cable clips
(not included) may be needed to reinforce the holding strength of the tape light adhesive.
SELF-ADHESIVE WHITE TAPE LIGHT KIT (Page 1)
*Actual hardware may differ from illustration.
*La quincaillerie incluse peut être différente de l'illustration.
*Los aditamentos reales pueden diferir de los que se muestran en la ilustración.
Align the polarity Symbols
The corner connectors are flexible
and can be used either for splicing
or navigating tight radiuses the
LED tape light is unable to form to.
DO NOT CUT the flexible cord.
Required
Nécessaire
Se necesita
Advertisement

Related Manuals for Good Earth Lighting AC1067-WHG-06LF0-G


Summary of Contents for Good Earth Lighting AC1067-WHG-06LF0-G
- Page 1 SELF-ADHESIVE WHITE TAPE LIGHT KIT (Page 1) KIT DE RUBAN LUMINEUX BLANC AUTO-ADHÉSIF (Page 2) KIT DE CINTA AUTOADHESIVA DE LUZ BLANCA (Página 4) Model / Modèle / Modelo #: AC1067-WHG-06LF0-G, AC1067-WHG-12LF0-G Required Hardware kit* / Trousse de quincaillerie*/ Kit de aditamentos* Nécessaire...
- Page 2 1400 East Business Center Drive, Ste. 108 Mount Prospect, IL 60056 Printed in China ® Good Earth Lighting is a registered trademark of Good Earth Lighting, Inc. © 2019 Good Earth Lighting, Inc. ® NE PAS ESSAYER D'INSTALLER LE RUBAN LUMINEUX PENDANT QU'IL EST BRANCHÉ. AVERTISSEMENTS ET MISES EN GARDE Ce produit a une fiche polarisée (une lame est plus large que l’autre) afin de réduire le risque de choc électrique.
- Page 3 Centre de service à la clientèle au 1-800-291-8838 de 8h30 à 17h00, HNC, du lundi au vendredi. Imprimé en Chine Good Earth Lighting 1400 East Business Center Drive, Ste. 108 Mount Prospect, IL 60056 ® Good Earth Lighting sont des marques de commerce déposée de Good Earth Lighting, Inc. © 2019 Good Earth Lighting, Inc. ®...
- Page 4 ¿Necesita ayuda? al Cliente al 1-800-291-8838, 8:30 a.m.-5 p.m., Hora Central Estándar (CST), de lunes a viernes Impreso en China Good Earth Lighting® 1400 East Business Center Drive, Ste. 108 Mount Prospect, IL 60056 1921INAC1067REV1 Good Earth Lighting son marcas registradas de Good Earth Lighting, Inc. © 2019 Good Earth Lighting, Inc.