Table of Contents
Advertisement
Quick Links
INSTRUCTION MANUAL
AC DIGITAL CLAMP METER
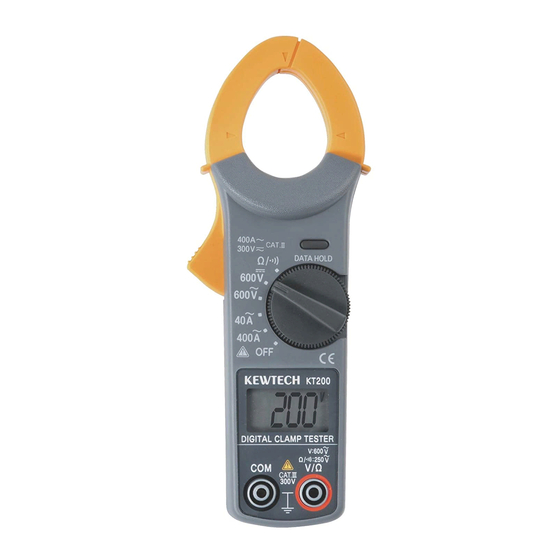
Trigger
COM Terminal
1. Features
¡Safety design conforming to the following provi-
sions of IEC61010.
Overvoltage category III 300V, pollution degree 2,
Overvoltage category II 600V, pollution degree 2,
¡Data hold switch for easy reading in dimly light
or hard-to-read locations.
¡ Sleep feature to extend battery life.
¡Beeper permits easy continuity check.
¡Provides a dynamic range of 4,000 counts full
scale.
¡Uses shrouded transformer jaws to further
improve safety.
2. Safety Warnings
¡This instrument has been designed and tested
according to IEC Publication 61010 : Safety
Requirements for Electronic Measuring
Apparatus. This instruction manual contains
warnings and safety rules which must be
observed by the user to ensure safe operation
of the instrument and retain it in safe condition.
Therefore, read through these operating
instructions before using the instrument.
¡Read through and understand instructions
contained in this manual before using the
instrument.
¡Save and keep the manual handy to enable
quick reference whenever necessary.
KT200
Transformer Jaws
Data Hold Switch
Function Selector Switch
WARNING
Display
V/Ω Terminal
Advertisement
Table of Contents

Summary of Contents for Kewtech KT200
- Page 1 INSTRUCTION MANUAL AC DIGITAL CLAMP METER KT200 Transformer Jaws Data Hold Switch Trigger Function Selector Switch Display COM Terminal V/Ω Terminal 1. Features ¡Safety design conforming to the following provi- sions of IEC61010. Overvoltage category III 300V, pollution degree 2, Overvoltage category II 600V, pollution degree 2, ¡Data hold switch for easy reading in dimly light or hard-to-read locations.
- Page 2 ¡Be sure to use the instrument only in its intended applications and to follow mea- surement procedures described in the manual. ¡Be sure to understand and follow all safety instructions contained in the manual. Failure to follow the above instructions may cause injury, instrument damage and/or damage to equipment under test.
- Page 3 CAUTION ¡Make sure that the function selector switch is set to the appropriate position before making measurement. ¡Always make sure to insert each plug of the test leads fully into the appropriate terminal on the instrument. ¡Make sure to remove the test leads from the instrument before making current measurem- ent.
- Page 4 ¡Low Battery Warning : is shown on the display ¡Overrange Indication : OL. is shown on the display ¡Response Time : Approx. 2 seconds ¡Sample Rate : About 2.5 times per second ¡Temperature and Humidity for Guranteed Accuracy: 23±5℃, relative humidity up to 85% without condensation ¡Operating Temperature and Humidity : 0〜40℃, relative humidity up to 85%...
- Page 5 4. Preparation for Measurement 4-1 Checking Battery Voltage Set the function selector switch to any position other than . When the display is clear without showing, proceed to measu- rement. When the display blanks or indicated, replaces the batteries according to the instructions described in section 7. Battery Replacement.
- Page 6 5-2 AC Voltage Measurement DANGER ¡Never use the instrument on a circuit with a voltage higher than 600 VAC. Otherwise, electric shock hazard or damage to the instrument or the circuit under test may result. ¡Do not make measurement with the battery compartment cover removed. (1)Set the function selector switch to the position.
- Page 7 6. Other Functions 6-1 Sleep Function NOTE The instrument still consumes small amount of battery power in the sleep mode. Make sure to set the function selector switch to the position after use. (1)Sleep Mode This is a function to prevent the instrument from being left powered on in order to conserve battery life.
- Page 8 7.Battery Replacement WARNING To avoid electric shock hazard, make sure to set the function selector switch to remove the test leads from the instrument before trying to replace the batteries. CAUTION ¡Do not mix new and old batteries ¡Make sure to install battery in correct polarity as indicated inside the battery compartment.


Need help?
Do you have a question about the KT200 and is the answer not in the manual?
Questions and answers