
Related Manuals for Dymo Rhino 5000


Summary of Contents for Dymo Rhino 5000
- Page 1 Electronic Labelmaker Page 3 User Guide Imprimante Electronique Page 13 Guide D‘Utilisation...
-
Page 2: Printer Features
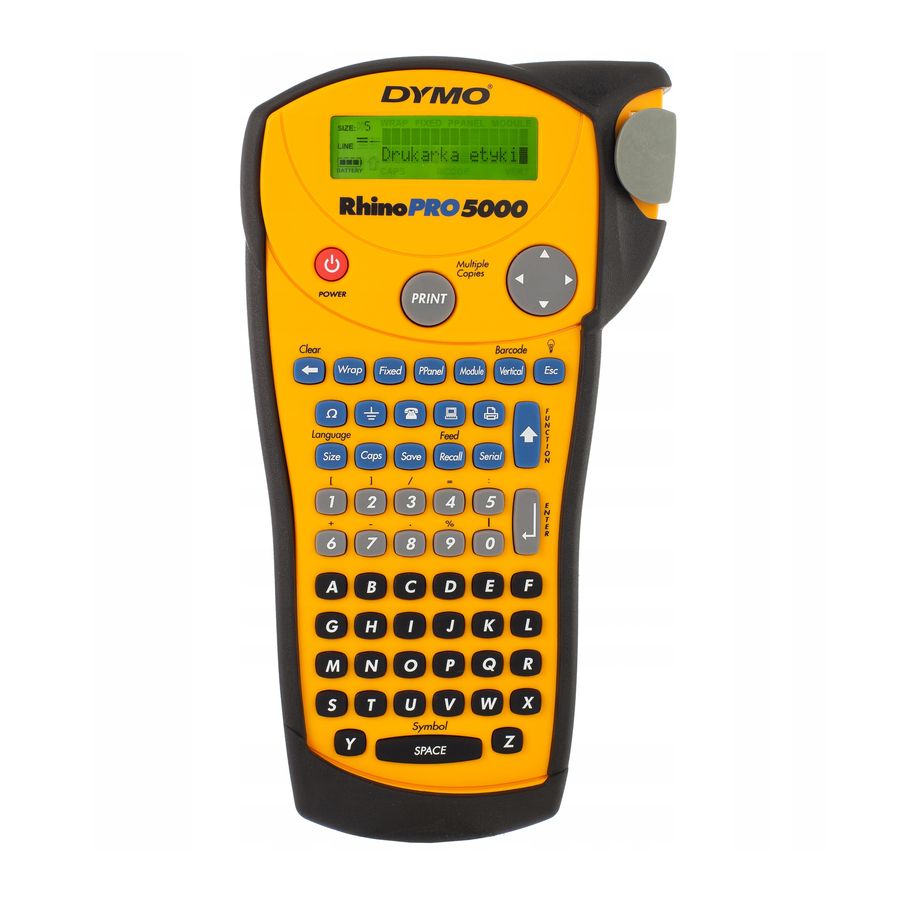
AC Power Connector Power Button Print Button Hot Keys Backspace/Clear All Symbol Keys Function Keys Numeric Keys Alpha Keys Figure 1 RhinoPRO 5000 Printer Tape Exit LCD Display Cutter Lever Navigation Key Thumb Latch for Tape Compartment Escape/Backlight Function/Shift Enter/OK... -
Page 3: About Your New Printer
Warranty Registration Please complete the warranty registration card and return it to the appropriate customer service address within seven days. Visit www.dymo.com/ industrial for details. Getting Started Follow the instructions in this section to get started by printing your first label. -
Page 4: To Insert Tape Cassette
1. Press the thumb catch on the right side of the printer to open the tape cassette door. The first time you use the printer, remove the protective cardboard insert from between the print head and pinch roller. See Figure 3. -
Page 5: Getting To Know Your Printer
3. Cut the label using your thumb to lift the cutting lever and pull it towards the back of the printer. See Figure 5. Figure 5 4. Remove the label. Congratulations! You have printed your first label. Continue reading to learn more about the options available for creating labels. -
Page 6: Navigation Key
Figure 7 shows the Font menu. XS S M L XL Figure 7 The font size you can use depends on the size of label tape that is installed in the printer. To set the font size 1. Press SIZE 2. -
Page 7: Using The Hot Keys
For example, if you repeatedly press the letter a, you will see a à á â ã ä å and so on through all the variations available. The order in which the character variations appear depends on the language you have selected to use. Saving your Label You can save up to eight labels in memory. -
Page 8: Printing Fixed Length/Patch Panel Labels
Printing Fixed Length Labels Normally, the length of the label is determined by the length of the text entered. However, you may wish to make a label for a specific purpose that is a fixed length regardless of the length of the text. You can specify a fixed length for a label in 0.250”... -
Page 9: Printing Barcode Labels
Printing Barcode Labels The printer can generate two types of barcodes: CODE-39 and CODE-128. You can only print a barcode on 3/4” (19 mm) label tape. The barcode will print horizontally along the label with the text in small print underneath the barcode. -
Page 10: Cleaning Your Printer
Your printer is designed to give you long and trouble-free service, while requiring very little maintenance. Clean your printer from time to time to keep it working properly. Clean the cutter blade each time you replace the tape cassette. To clean the cutter blade 1. -
Page 11: Troubleshooting
Batteries almost discharged. Tape Jam Motor is stalled due to tape jam. If you still need assistance, contact DYMO Customer Support for your country. The Warranty booklet includes a list of contact numbers for each country. Documentation Feedback We are constantly working to produce the highest quality documentation for our products. We welcome your feedback. -
Page 13: Mise En Route
À propos de votre nouvelle imprimante Grâce à votre nouvelle imprimante DYMO ™ RhinoPRO 5000, vous pourrez créer une grande variété d’étiquettes autocollantes de grande qualité. Vos étiquettes pourront être imprimées en plusieurs tailles et styles différents. L’imprimante utilise des cassettes d’étiquettes industrielles RhinoPRO de... -
Page 14: Insertion De La Cassette De Ruban
Insertion de la cassette de ruban Votre imprimante est livrée avec une cassette de ruban. Visitez www.dymo.com/industrial pour des informations sur l’achat de cassettes d’étiquettes supplémentaires. Pour insérer la cassette de ruban 1. Appuyez sur le loquet situé sur la droite de l’imprimante pour ouvrir le compartiment à... - Page 15 Impression de votre première étiquette Vous êtes maintenant prêt à imprimer votre première étiquette. Pour imprimer une étiquette 1. Entrez le texte pour créer une étiquette simple. 2. Appuyez sur print 3. Coupez l’étiquette en utilisant votre pouce pour relever le levier de coupe et tirez vers l’arrière de l’imprimante.
- Page 16 Touche de fonction La touche sert à choisir la fonction ou le symbole indiqué au-dessus d’une touche. Par exemple, si vous appuyez sur size (Taille de police) s’affiche mais, si vous appuyez simultanément sur menu Language (Langue) qui apparaît. Touche d’espace arrière La touche supprime le caractère à...
- Page 17 Pour ajouter un symbole 1. Appuyez sur rangée de symboles illustrés dans la Figure 9 s’affiche. 2. Utilisez les touches fléchées pour vous déplacer jusqu’au symbole désiré. Utilisez vous déplacer horizontalement dans une rangée de symboles. Utilisez verticalement les rangées de symboles. 3.
- Page 18 Utilisation des touches d’accès rapide Les touches d’accès rapide vous permettent de créer des étiquettes pour des applications spécifiques. Des touches sont disponibles pour les étiquettes enveloppantes, fixes, pour panneaux de brassage, borniers et codes barres. Voir Figure 11. WRAP FIXED PPANEL TBLOCK Figure 11...
- Page 19 Impression d’étiquettes pour panneaux de brassage Le mode panneaux de brassage vous permet d’étiqueter une rangée de ports sur un panneau de brassage. Vous sélectionnez la distance entre les ports, puis vous entrez le texte désiré, sérialisez et imprimez. Vous obtenez ainsi une longue étiquette avec un texte multiple également espacé...
-
Page 20: Options D'impression
Pour créer un code barres 1. Entrez le texte que vous souhaitez voir apparaître avant le code barres de l’étiquette. (En option) 2. Appuyez sur VERT 3. Utilisez les touches fléchées pour choisir CODE-39 ou CODE-128, puis appuyez sur 4. Entrez le texte pour le code barres entre les symboles des codes barres ( ), puis appuyez 5. -
Page 21: Nettoyage De L'imprimante
Entrez une valeur entre 1 et 99 pour les nombres et entre 1 et 26 pour les lettres. Pour imprimer plusieurs copies de la même étiquette sérialisée, choisissez le nombre de copies de chaque étiquette à imprimer. Voir Impression de copies multiples à la page 20. -
Page 22: Dépannage
Tape Jam Le moteur cale à cause d’un bourrage du ruban. Si vous avez encore besoin d’aide, contactez le service client DYMO de votre pays. Le livret de garantie contient une liste des numéros de contact pour chaque pays. Commentaires sur la documentation Chez DYMO Corporation, nous travaillons continuellement à... -
Page 23: Contacting Customer Support
Contacting Customer Support The following table provides a list of telephone numbers to reach DYMO Sales and Support departments. You can also reach DYMO at www.dymo.com. Country Australia Austria Belgium Canada Czech Republic Denmark Finland France Germany Hong Kong Hungary... - Page 24 No part of this document may be reproduced or transmitted in any form or by any means or translated into another language without the prior written consent of DYMO Corporation. RhinoPRO is a trademark of DYMO Corporation. DYMO is a registered trademark of Esselte Corporation. All other trademarks are the property of their respective holders.
Need help?
Do you have a question about the Rhino 5000 and is the answer not in the manual?
Questions and answers