
Related Manuals for MAKER MADE Standard Frame

Summary of Contents for MAKER MADE Standard Frame
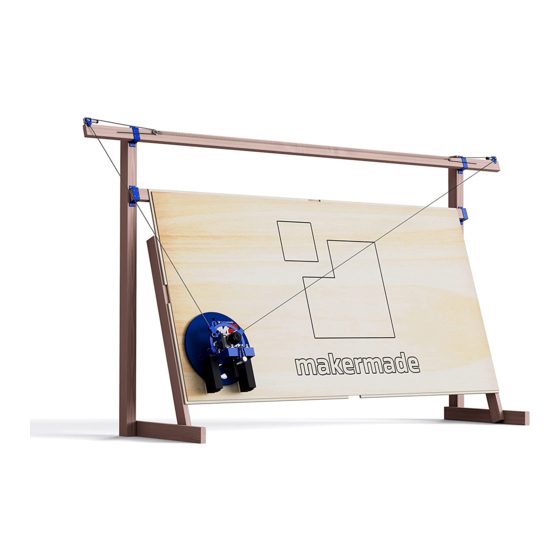
- Page 1 Set-Up Guide for The Standard Frame A guide to assembling the recommended 10ft top beam frame for our MakerMade M2 CNC Kit. v 1.5 Updated 8.30.21 ©Maker Made, LLC...
-
Page 2: Table Of Contents
TABLE OF CONTENTS SECTION 1. Intro - 3 SECTION 2. Materials Needed - 4 SECTION 3. Building the Standard Frame Building the canvas - 5 Attaching the motors - 6 Attaching the stud mounts - 7 Frame legs - 8... -
Page 3: Section 1. Intro
1. Setting up the M2 can be broken down into three main parts: building the M2, building the frame (or mounting it on an existing Maslow frame), and calibration. This guide covers the standard frame. 2. I’m Drew and I made this guide! My notes are tips and tricks to help you along. -
Page 4: Section 2. Materials Needed
M2 while it cuts. The M2 mounts for your frame are included, but you will need to purchase the following from a local hardware store to build the standard frame to cut 4ft x 8ft. Drew’s Note: We recommend reading this entire section before beginning. -
Page 5: Building The Canvas
Building the canvas Drew’s Note: Labeling the ends of the board ensures that we are measuring from the same end of each board. This mitigates small height differences in the 2in x 4in boards, so the canvas wasteboards are the same height from the floor on each canvas. -
Page 6: Attaching The Motors
Attaching the motors Measure the actual length of the 2in x 4in x 10ft beams and mark the exact center of each on a 4in face. Draw a straight line across the center with the speed square. Write top on a 2in edge of each and extend the center line around the beam and across the top with the speed square. -
Page 7: Attaching The Stud Mounts
Attaching the stud mounts Drew’s Note: For the M2’s alignment calibration calculation (that’s fun to say), we have to make sure that the stud mounts are exactly perpendicular to the beams. To ensure this, attach each screw part-way before moving to the next. -
Page 8: Frame Legs
Frame legs Lay the 2in x 4in x 8ft vertical frame legs on the floor, on their 2in edges. Label them something fun, so you remember that they are, or just vertical frame legs. On each board, write bottom on one end and top on the other. bottom bottom Measuring from the bottom end, measure and mark at 55in (139.7cm) , 61.75in (156.8cm), 70in... - Page 9 Frame legs (continued) 8. Position the top beam on the legs, with the taller side of the stud mounts flush with the 70in line. Repeat the process of step 7, by centering the top and bottom holes of the stud mount on the perpendicular line and attaching with the long wood screws.
-
Page 10: Attaching The Canvas Frame
Attaching the canvas Drew’s Note: WARNING: This frame is designed to lean against a wall for safety. If it is not against a wall, it could tip over. For added safety, you can toenail one of the vertical frame legs into a stud or use an L-bracket (not- included), similar to what you would for an oven safety bracket. -
Page 11: Leveling Your Frame -11
Leveling your frame Drew’s Note: It’s very important that your frame is square and level! All of the M2 calibrations are based on a well built frame. If the frame isn’t level and square, the M2 will slant when it cuts and have all kinds of other small problems. - Page 12 Attaching the skirts Drew’s Note: A skirt’s purpose is to act as a stabilizer for your M2 when it gets near the edge while cutting and the sled edge extends beyond your canvas. The bottom skirt makes it easier to mount your material to cut, because it acts as a support.
-
Page 13: Attaching The Chains
Attaching the chains Drew’s Note: We recommend a friend help you connect the spring and each person wear safety goggles during stretching. The chain can snap back, causing damage to people, pets, and surroundings! To attach the chains on the front of the top beam, measure and mark 1.5in (4cm) from the bottom and 15in (38cm) toward the center, from the end of the top beam. - Page 14 Mounting the M2 to the frame Drew’s Note: We recommend wearing safety goggles and having a friend help mount the sled to the frame. The chain can slip off the sprockets, causing the spring to snap and hurt people, pets, and surroundings.
-
Page 15: Arduino Due And Shield
ARDUINO DUE board and shield Drew’s Note: The M2’s brain is an Arduino DUE microcontroller. We recommend mounting the DUE to the wall behind your frame, but it can be mounted in any safe location where it won’t be stepped on or in conflict with the M2 during operation. - Page 16 APPENDIX 1 - TIPS Click here to check out updates on our FAQ section! The MakerMade M2 CNC kit is used to assemble a large format CNC machine. It is designed to use a router (or another tool) to cut 4ft by 8ft sheet materials. When used correctly, this machine is very safe.
-
Page 17: What's In The Box
Ring Carriage Cables Roller Bearing Carriages Z-Axis Mount L-Brackets Z-Axis Assembly Sled Router Clamp Roller Bearings (4) Chains 335cm/11ft (2) Dust Collection Bracket Spring Maker Made Router Bit Velcro Dust Collection and Acrylic Dust Cover Starter Set Brick Mounting Straps (3) - Page 18 Maker Made USB Marker Stickers, Quick Start Chain Mounting Hardware Guide, and Welcome Bag A Letters Cotter pins (2) Chain sprocket (2) Small nails (2) Large nails (2) White spacers (2) Spring Hardware Bag B Short/Long Frame Short/Long Frame X/Y Motor Hardware Bag E...
- Page 19 APPENDIX 3 - OVERALL DIMENSIONS (2.4m) tall It’s 6.5ft (1.98m) from the floor to the top of the x/y motors, If the 8ft vertical frame legs are cut down (optional).
- Page 20 APPENDIX 4 - CUSTOM FRAMES Visit our M2 Resources page for instructions over how to build the mini, standard, or XL frames by MakerMade. Mini Frame: Standard Frame: XL Frame: 6ft Top Beam 6ft Top Beam 12ft Top Beam Smaller Chain...
Need help?
Do you have a question about the Standard Frame and is the answer not in the manual?
Questions and answers