
Related Manuals for Pamex Enkore Series


Summary of Contents for Pamex Enkore Series
- Page 1 Pamex Enkore Series A Multi-Family Door Access Control Solution Project Implementation Guide...
-
Page 2: Table Of Contents
Table of Contents Introduction Before Installation Check List Pamex MFSP Service Platform Implementation Guide Concepts Construction Phase Lock Registration Phase Plan your area tree Build the area tree using MF-Admin Server Plan your programming cards Setup Wifi AP and Create Programming Cards... - Page 3 System Parameters Mifare Card Specification Card Types Area Types Lock Real Time Events Default Severity of Alert Types FCC Statement NCC Statement...
-
Page 4: Introduction
Introduction The Pamex Enkore series is a total solution for multi-family door access control. It not only has several models of the lock but also the browser-based central management system (MF-Admin server) . Figure 1 : Pamex Enkore System Architecture Overview... - Page 5 8. MFSP platform : MFSP (Multi-Family Service Platform) is a cloud service for all the MF-Admin Servers around the world. This platform is operated by Pamex. Connected your MF-Admin Server to MFSP is not required but we encourage you to do so.
-
Page 6: Before Installation
Pamex MFSP Service Platform ● This section is for Pamex only. ● Before any Enkore installation, Pamex admin will have to create a project in MFSP in order to get the unique project code. ● An Enkore installation will need at least one Crypto card to activate all the locks. -
Page 7: Implementation Guide
In this guide, we will use the term Card or Key from time to time. Both terms refer to the Mifare Card or Mifare key fob is issued by Pamex Enkore solution. Used by the Pamex Enkore system. -
Page 8: Construction Phase
Construction Phase Make sure you have Crypto Cards and Construction Cards on hand. Crypto Card and Construction Card are shipped from Pamex together with physical locks. (See Appendix: Card Types) In the scenario that wifi network and MF-Admin Server is not ready, and you have installed locks on the doors, you will need Construction Cards to unlock and open the door. -
Page 9: Lock Registration Phase
Lock Registration Phase MF-Admin Server is required to complete all the tasks in this phase. Please follow the MF-Admin Server & MP100 Installation Guide to install MF-Admin Server. MF-Admin Server is a web-based application with access controlled by login id and password. -
Page 10: Plan Your Area Tree
Plan your area tree Area tree is the topology of your property. Before you can register your physical locks and link the locks to their corresponding lock place, you have to build the area tree in MF-Admin Server. There are three types of areas : group, unit, public (See Appendix: Area Types for detail). -
Page 11: Build The Area Tree Using Mf-Admin Server
Build the area tree using MF-Admin Server Navigate to build area tree page. P roperty Management = > Build Property For a brand new property, you will see only one node at beginning. Click and edit root area name. Click edit button on Root Area and select Add Public Area. - Page 12 Click name text to edit group name. Click menu button on Group Area M and select “Add Lock Place”. Edit lockplace name. Click menu button on Group Area M and select “Add Unit”. Click name text to edit unit name and lockplace name.
- Page 13 Keep adding unit from B to D Click Save To Server to save the area tree. Note that there are many ways to build an area tree as above. You may find another techniques in M F-Admin Server User Manual. I f you make any mistakes during building the tree, just click “Reload from server”...
-
Page 14: Plan Your Programming Cards
Plan your programming cards The area tree is now ready to be linked to physical locks. Pamex Enkore locks support WPA2 encryption to connect to the Wifi AP. When a lock is scanned by a programming card, the preferred Wifi AP SSIDs will be loaded into the lock from programming card. - Page 15 several cards with the same settings in order to program the locks in parallel by several workers. In the case that several workers are programming locks in parallel, please label the UID of the card (UID can be found on MF-Admin page when you create the programming card) on the programming card with a sticker or marker.
-
Page 16: Setup Wifi Ap And Create Programming Cards
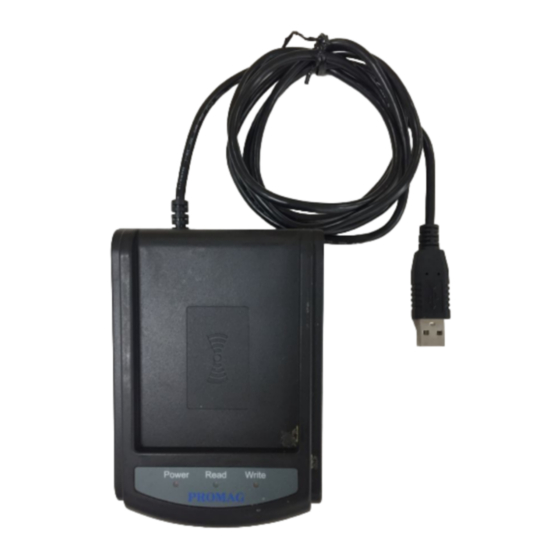
Setup Wifi AP and Create Programming Cards Navigate to system parameters page. S ystem Management => S ystem Parameters Select W ifi AP Setting Click A dd One to add wifi ap and click S ave to save wifi ap. Navigate to create programming cards page. - Page 17 Check the checkbox on those wifi ap and click I ssue Key . Place key/card on reader first.
- Page 18 Click W rite Key/Card to get Key’s UID. The g reen light L ED on Read will blink. If W rite Key/Card f ailed with t hree beep sounds and display following message, please re-place key/card and click W rite Key/Card a gain.
-
Page 19: Register Locks To Mf-Admin Server
If programming key issued successfully, two beep sounds will be made. Register Locks to MF-Admin Server Please bring a tablet or mobile phone with Chrome browser. Follow below steps to register a lock : A. Open Chrome and type in MF-Admin server URL. B. - Page 20 F. Link the physical lock on Room A to the lockplace. Click lock icon near Unit Area A. A pop-up window will show up listing all the locks not linked yet. Click the one you like to link. G. Link the lock to R oom A lockplace. G.1.
-
Page 21: Verify Lock Registration Using Master Card
Verify lock registration using Master Card Master Card is granted unlimited access to any locks in the project. After locks are registered to MF-Admin server, only Residential Cards and Master Cards can be recognized. To verify that all the locks are successfully registered and linked to the right lock places in the area tree, let’s first create the master card. - Page 22 Place key/card on reader first. Click W rite Key/Card to get Key’s UID.
- Page 23 The g reen light L ED on Read should blink. If W rite Key/Card f ailed with t hree beep sounds and display following message, please re-place key/card and click W rite Key/Card a gain. If master key issued successfully, two beep sounds will be made.
- Page 24 ● How to verify Master Card to a lock : Prepare an invalid Mifare Card X(You may issue an invalid card easily by assigning wrong area to the card). By default, a lock will report to MF-Admin Server and get the newly create card list from MF-Admin Server every 5 mins(Wall Reader). It means the newly created Master Card will go to the locks after 15 mins.
- Page 25 ○ If problem still exist, please contact your reseller for help. Please keep the Master Card safe and secure. Congratulations ! The system is ready and let’s go to Go-Live phase.
-
Page 26: Go-Live Phase
Go-live Phase We will present several daily operations when the system goes live. Most of the daily work of an administrator or property owner should be card/key management. You have seen several card types in the previous sections: Crypto Card, Construction Card, Programming Card and Master Card. - Page 27 In Time Control Templates c lick C reate button. Edit the template name, According to the document, the Guest Swimming Pool Period only open on 8 :00 ~ 18:00 Sat, 8:00 ~ 18:00 Sun . Let’s edit the time control to meet the requirement and click ...
- Page 28 Let’s create some user templates. We just provide basic information for demo purpose. User Type Information Tanant A Kevin Huang, kevin@alzk.com.tw Tenant B Tony Lin, lintungwei@gmail.com Tenant C Mark Chu, mark@alzk.com.tw Tenant D Jay Chen, jay@alzk.com.tw Staff S1 Peter Liu, peter@alzk.com.tw Staff S2 Ricky Chang, ricky@alzk.com.tw Vendor V...
- Page 29 Please repeat the work and create tenant B, C, and D. ❖ Steps to create staffs Navigate to create staffs page. U ser Management => S taff Edit staff information and click C reate Staff . The table below the input area will list all the staffs created : Follow the same process to create staff Ricky Chang.
- Page 30 Edit vendor information and click C reate Vendor . It will display vendor list below the input area. Click E mployee button on A ctions filed to add employee. Edit employee information and click C reate New Employee The employee list will be displayed at the bottom of this page.
- Page 31 ● Key Template Key template probably is the most useful supporting features when issue abundant keys. It is almost the same as issue a key but you may save the setting for later use. Let’s create two templates : STAFFS Public Area P (24 hours allowed), Group Area M (24 hours allowed) TENANTS...
- Page 32 After clicking C reate button it will display A rea Control p age. According to the requirement, Staffs can access P ublic Area P (24 hours allowed), Group Area M (24 hours allowed) . Let’s check the box on P ublic Area P...
- Page 33 Check the box on P ublic Area P and click its t ime control button . According to the requirement, Tenants can access P ublic Area P (6:00 ~ 21:00), Group Area M (24 hours allowed) . Let’s edit the P ublic Area P t ime control and click ...
-
Page 34: Create Tenant Cards
Click S ave to save T ENANTS key template. Navigate to key template management page. Key Management => K ey Template You can see those key templates has been created by pull down the select list. Create Tenant Cards In SIMPLE project, you should at least create 4 tenant cards (Card A~D) for Room A to D with below access control :... - Page 35 Card A Public Area P (6:00 ~ 21:00), Group Area M (24 hours allowed), Unit A (24 hours allowed) Card B Public Area P (6:00 ~ 21:00), Group Area M (24 hours allowed), Unit B (24 hours allowed) Card C Public Area P (6:00 ~ 21:00), Group Area M (24 hours allowed), Unit C (24 hours allowed) Card D...
- Page 36 Click S elect Tenant and it will pop up a window to display all tenants you created in user management function. Select tenant k evin to issue key. Select tenant kevin will automatically bring his information back to the Basic Information tab.
- Page 37 According to the requirement, tenant K evin can access P ublic Area P (6:00 ~ 21:00), Group Area M (24 hours allowed), Unit A (24 hours allowed) . We had already set up time control of P ublic Area P and G roup Area M via tenant key template, so let’s check ...
- Page 38 At the R eview & Issue Key page we can verify the information of tenant key including B asic Information , U nit Area & time control information, Public Area & , time control information G roup area & time control information Click ...
- Page 39 Place key/card on reader first. Click R ead Key From Reader to get Key’s UID.
- Page 40 The g reen light L ED on Read should blink. If W rite Key/Card f ailed with t hree beep sounds and display following message, please re-place key/card and click W rite Key/Card a gain.
- Page 41 If read key successfully click W rite Key/Card to issue master key. Write Key/Card successfully with t wo beep sounds. Repeat the similar process to create Tenant Cards for B,C and D.
-
Page 42: Create Staff Card
Create Staff Card We will then create 2 staff cards in SIMPLE project. Again, you may use the STAFFS key template to complete this job. This time you can practice to choose the staff information from the staff users you created previously. Staff S1 Public Area P (24 hours allowed), Group Area M (24 hours allowed) Staff S2... - Page 43 Click S elect Staff and it will pop up a window to display all staffs you created at user management. Select staff P eter to issue key. After selecting staff peter the B asic Information page will automatically attach staff’s information.
- Page 44 At the R eview & Issue Key page we can verify the information of staff key including Basic Information , U nit Area & time control information, Public Area & time , control information G roup area & time control information Click ...
- Page 45 Click W rite Key/Card to get Key’s UID.
- Page 46 The g reen light L ED on Read should blink. If W rite Key/Card f ailed with t hree beep sounds and display following message, please re-place key/card and click W rite Key/Card a gain Write Key/Card successfully with ...
-
Page 47: Create Vendor Card
Create Vendor Card Create a vendor card for Vincent Chou, an employee of Dust Buster cleaning company. He will come to clean the swimming pool and the area around Room A~D at 8:00 - 12:00 on every Monday. So we will create a card for him to enter Lockplace P and Lockplace M with time control template : House Cleaning Period. - Page 48 After selecting vendor vincent, the B asic Information page will automatically attach vendor’s information. Check the box on P ublic Area P and click t ime control button t o edit. According to the requirement, Vendors can access at 8 :00 - 12:00 on every Monday...
- Page 49 Check the box on G roup Area M a nd click t ime control button t o edit.
- Page 50 Use H ouse Cleaning Period t ime control template we created before on G roup Area M t hen click S ave to save time control setting. At the R eview & Issue Key page we can verify the information of vendor key including ...
- Page 51 Click I ssue/Write Key to issue the vendor key. Place key/card on reader first.
- Page 52 Click W rite Key/Card to get Key’s UID. The g reen light L ED on Read should blink. If W rite Key/Card f ailed with t hree beep sounds and display following message, please re-place key/card and click ...
- Page 53 Write Key/Card successfully with t wo beep sounds..
-
Page 54: Create Guest/Temp Card
Create Guest/Temp Card Guest Card and Temp Card are almost the same. They serve the purpose to temporarily grant access to a visitor. The default expired date will be one day only. The one time pass attribute can be used to further restrict access to lockplace to only one time for all the lockplaces granted. - Page 55 Edit guest information. At A rea Control page, Check the box on P ublic Area P a nd click edit t ime control button . Let’s assume guest A ugust c an access P ublic Area P on this w eekend , edit time control settings and click ...
- Page 56 Click I ssue/Write Key to issue A ugust g uest key.
- Page 57 Place key/card on reader first. Click W rite Key/Card to get Key’s UID.
-
Page 58: Shutdown Public Area
The g reen light L ED on Read should blink. If W rite Key/Card f ailed with t hree beep sounds and display following message, please re-place key/card and click W rite Key/Card a gain. Write Key/Card successfully with ... -
Page 59: Area Time Control
MF-Admin server has two features: Area Time Control and Lock Scheduling which will help you to complete this task in a second without re-issuing any cards. ● Area Time Control Area Time Control is another layer of time control which logically AND with the time control you set on the Mifare card during card creation for a specific area/lockplace. -
Page 60: Lock Scheduling
Assume the area time control of swimming pool is only for S aturday and Sunday 24 hours . Let’s edit swimming pool time control to meet the requirement, click S ave to save time control setting. You can see the lock on P ublic Area P i s b linking which means there is a time control setting over this area... - Page 62 Click the lock icon in P ublic Area P . In O peration Mode dialog, select P rivate and click S ave . The P ublic Area P l ock icon color will turn to light green which means it is not normal setting...
- Page 63 day in a weekly manner. We will not demo it here. Please see M F-Admin Server User Manual for detail.
-
Page 64: Access Control Rule
Access Control Rule It is time to elaborate how access rules works. All the locks will apply the access rule when scan a card. Below is the default access rule settings : You have to choose one of the three settings to apply to a combination of card types and area types. - Page 65 System Management => S ystem Parameters According to the document, we would want to block all users including the staff to enter swimming pool in private mode. Find out the S taff field and edit NoPrivacy to N o and click S ave . Now, the swimming pool has been shut down completely except Master Key.
-
Page 66: Time Control - Add/Remove Holidays
Time Control - Add/Remove Holidays Time control settings can be found in many places in the system and it is straightforward to use. There is only one thing to remind, the holiday. In addition to the settings for 7 days a week, you have another row (the bottom row) to set time control which is the holiday setting. - Page 67 Click Save to save the holiday. ❖ Remove holiday Click X to remove holiday and click S ave . The holiday setting takes precedence over weekly settings. It means if today is a holiday and Monday, then the system will check holiday’s settings instead of Monday’s settings.
-
Page 68: Advanced Setup Guide
Advanced Setup Guide Note : Do not try this section without assistance from reseller or Pamex. Changing any of the parameters in this section to unreasonable value might lead to unexpected system behavior. Lock Report Interval Lock report interval can be changed at the Lock Operation function. -
Page 69: Alert Settings
3 0 mins . Click S chedule Job to change the report interval setting. To save the battery’s life, Pamex Enkore smart lock is not always connected to MF-Admin Server. The locks will connect to the MF-Admin Server as the report interval. - Page 70 When you login the MF-Admin Server, there are two icons showing the total number of new alerts at the navigation bar : In the Alert tab of the system parameters, you can see there are twelve types of alert that will be generated in the system: There is no alert enabled by default.
-
Page 71: Appendix
Appendix Lock UI Patterns (LED & Buzzer) Leverset & Deadbolt Beep一聲紅燈亮, 馬達校正, 紅綠交替一次,, 完成後鎖舌伸出, 第一次換電池 (Recovery Card後) Beep 一聲紅燈閃 紅燈亮, beep一聲, 紅綠交替兩次, beep一聲, 不作馬達校正. 鎖 非第一次換電池 舌不動. Crypto Card 綠燈亮, 長beep Beep一聲, 綠燈亮, 鎖舌收 刷卡開門 Beep一聲, 紅燈亮, 鎖舌出 刷卡鎖門 紅燈閃三次, Beep三聲 非法卡... - Page 72 之後刷卡可正常鎖門 弱電處理 鎖在每次運作後, 餘600次開關電力時 : 紅燈每10秒閃一次, 持續1分鐘 餘400次開關電力時 : 紅燈每5秒閃一次, 持續1分鐘 餘200次開關電力時 : 紅燈每2秒閃一次, 持續1分鐘 斷電處理 餘待機電力3個月, 可支援一次刷卡開門電力 Leverset & Deadbolt Change the battery a beep with a red blink + motor adjustment + a red blink + a (the first time after green blink(finished with a latch appear) + a beep with a red tapping a recovery blink...
-
Page 73: Wall Reader
card) connect with the APs. Lock Out Red blinks for 3 mins as a default Key cover open 10 red blinks + 10 beeps Malfunction when the latch jammed, the motor rotate continuously with 3 red tapping to unlock blinks + 3 beeps, failed to try after 30 secs, be able to open the door by tapping the card. -
Page 74: Wall Reader
Lock Out 閉鎖 紅燈亮三分鐘(預設) Wall Reader Crypto card a green blink with a long beep. Tap to lock a green blink with a beep. Tap to unlock a red blink with a beep. Invalid card 3 red blinks with 3 beeps Red blinks between seconds lasting 1 minute as a default.(Lock Out) Construction Card (same as lock/unlock) -
Page 75: Wifi Ap Specification And Settings
Wifi AP Specification and Settings Wifi network is necessary for Pamex Enkore solution. The network setup is out of the scope of this manual. Please make sure your network is well configured with your system vendors. Pamex Enkore locks support most of the popular wifi APs in the market. Please make sure your Wifi AP has the features listed below : ●... -
Page 76: Factory Default Settings - Wall Reader
Factory default settings - Wall Reader ● Model No:KA-WR1S/KA-WR1N ● Operation Mode:Normal ● Lock Parameters a. Volume:3 (high) b. Enabled Locking Mode:Auto lock c. Auto Lock Delay:10 secs d. Report Interval:300 secs ● Lockout Settings a. Time to count fail(secs):60 b. -
Page 77: Factory Default Settings - Deadbolt
Factory default settings - Deadbolt ● Model No: a. D1:KA-D7P1S b. D2:KA-D7P1A ● Operation Mode:Normal ● Lock Parameters a. Volume:3 (high) b. Enabled Locking Mode: ■ D1:Auto reset turnpiece ■ D2:Scan lock c. Auto Lock/Reset Turnpiece Delay (secs) ■ D1:5 ■... -
Page 78: Factory Default Settings - Leverset
Factory default settings - Leverset ● Model No:KA-LNP5C ● Operation Mode:Normal ● Lock Parameters a. Volume:3 (high) b. Enabled Locking Mode:Auto lock c. Auto Reset Turnpiece Delay(secs):5 d. Report Interval:900 secs ● Lockout Settings a. Time to count fail(secs):60 b. Fail Try(times):4 c. -
Page 79: Factory Default Settings - Interconnect
Factory default settings - Interconnect ● Model No: a. I1:KA-INP35S b. I2:KA-INP35A ● Operation Mode:Normal ● Lock Parameters a. Volume:3 (high) b. Enabled Locking Mode: ■ I1:Auto reset turnpiece ■ I2:Scan lock c. Auto Lock/Reset Turnpiece Delay (secs) ■ I1:5 ■... -
Page 80: Mf-Admin Server Parameters Default Settings
MF-Admin Server Parameters default settings Application Parameters Please see M F-Admin Server User Manual. System Parameters Please see MF-Admin Server User Manual. -
Page 81: Mifare Card Specification
M Hz contactless smart card standard. It incorporates A ES and D ES/Triple-DES encryption standards, as well as an older proprietary encryption algorithm. Pamex Enkore supports o nly M IFARE DESFire EV1 / EV2 compatible cards/key fobs. -
Page 82: Card Types
Crypto Card : To recognize any other types of card, a lock has to read Crypto card. Crypto card is not issued from MF-Admin server. It should be provided by Pamex and is unique to your project. Construction Card : Before the wifi network is ready, the only way to unlock the door locks will be using the construction cards. - Page 83 Master Card is an unrestricted access card to any door locks in the project. It is created using MF-Admin server. Master Card is only valid to the locks which has registered to MF-Admin server.
-
Page 84: Area Types
Area Types There are three types of area you may create in MF-Admin Server : Group Area : Group area is like a folder. It is used to group together the units and public areas in the same floor/building for example. Unit Area ... -
Page 85: Lock Real Time Events
Lock Real Time Events 1. Battery Change 2. Battery Low 3. Card space 90% full 4. Card# limitation reached 5. Firmware upgrade completed 6. Force to Normal 7. Invalid Key 8. Key Cover Open 9. Lock Out 10. Lock Schedule activated by staff 11. -
Page 86: Default Severity Of Alert Types
Default Severity of Alert Types Alert Name Severity Battery Change Battery Low Card space 90% full Card# limitation reached Dead Lock Firmware upgrade completed Force to Normal Invalid Key Key Cover Open Lock Out Lock Schedule activated by staff One Time Pass Success... -
Page 87: Fcc Statement
FCC Statement FCC Statement: Enkore KE1-LNP5C(FCC ID:2AQ8A-KE1LNP5C), Enkore KA-WR1N(FCC ID:2AQ8A-KAWR1N), Enkore KA-WR1S(FCC ID:2AQ8A-KAWR1S) compile with part 15 of the FCC Rules. Operation is subject to the following two conditions: (1)Enkore KE1-LNP5C, Enkore KA-WR1N, Enkore KA-WR1S may not cause harmful interference, (2)Enkore KE1-LNP5C, Enkore KA-WR1N, Enkore KA-WR1S must accept any interference received, including interference that may cause undesired operation. -
Page 88: Ncc Statement
NCC Statement NCC Statement: Taiwan Regulatory Information(NCC) 低功率電波輻射性電機管理辦法 第十二條 經型式認證合格之低功率射頻電機,非經許可,公司、商號或使用者均不得擅自變更頻率、加 大功率或變更原設計之特性及功能。 第十四條 低功率射頻電機之使用不得影響飛航安全及干擾合法通信;經發現有干擾現象時,應立即停用 ,並改善至無干擾時方得繼續使用。 前項合法通信,指依電信法規定作業之無線電通信。 低功率射頻電機須忍受合法通信或工業、科學及醫療用電波輻射性電機設備之干擾。...
Need help?
Do you have a question about the Enkore Series and is the answer not in the manual?
Questions and answers