Table of Contents
Advertisement
Quick Links
Advertisement
Table of Contents

Related Manuals for Yolink YS6704-UC

Summary of Contents for Yolink YS6704-UC
- Page 1 In-wall Outlet YS6704-UC Installa on & User Guide Rev 1.1...
-
Page 2: Table Of Contents
····· ····· ···················································· · · · ·· · ·1 Introduc on ······························································································2 Set Up ····································································································· ·4 · Installa on ································································································6 Using the YoLink App ················································································11 About YoLink Control ······························ ················ ··································18 Maintenance ······················································································· ····24 · Specifica ons ····················································································· ·····26 ·... -
Page 3: In The Box
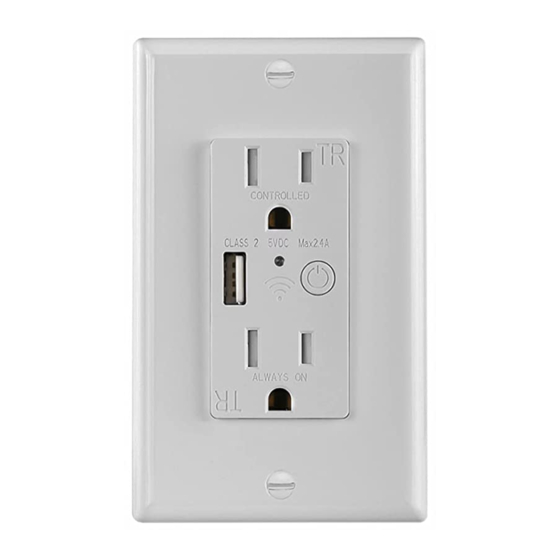
In the Box A. In-wall Outlet Cross Head Screw (M3) C. Slo ed Head Screw (M3) (2) D. Quick Start Guide CONTROLLED CLASS 2 5VDC Max2.4A ALWAYS ON... -
Page 4: Introduc
With one independent control outlet, plus one always on outlet and one always on USB ports, you can easily control lights and home electric devices plugged into the controlled outlet via YoLink App on your iOS or Android devices, as well as popular voice assistants and 3rd-party automa on apps such as IFTTT. - Page 5 Outlet is On (Not on when the outlet is Off) Blinking Green Connec ng to Cloud CONTROLLED Fast Blinking Green CLASS 2 5VDC Max2.4A Establishing Connec on with YoLink System Slow Blinking Green Upda ng ALWAYS ON Irregular Blinking Green Removing Connec on to YoLink System...
- Page 6 Set Up Follow the steps below to set up your In-wall Outlet via the YoLink app Set Up - First-Time YoLink Users (Exis ng users proceed to Add Device, next page) * Get ready: To set up and use your In-wall Outlet , you will need an Apple iPhone or tablet that is iOS 9.0 or higher, or an Android phone or...
- Page 7 Add Device Tap “ ” bu on, then scan QR Code on the device Turn on power a er installa on (refer to Installa on sec on on next page), the Status LED will blink green several mes . The green LED indicates the device is online and ready to use CONTROLLED CLASS 2 5VDC Max2.4A ALWAYS ON...
-
Page 8: Installa
Installa on IMPORTANT SAFETY NOTICE! If you are not comfortable working with 120V electrical wiring, please consult or hire a qualified electrician. Turn off circuit(s) at the breaker or fuse panel, and confirm there is no voltage in the box before star ng the installa on (there may be mul ple live circuits within the switch box). Failure to use best electrical safety prac ces can result in injury or death! All wiring connec ons must be made a er the power is turned off... - Page 9 Get Ready Begin Installa on: Exis ng wall outlet (to be replaced) or Turn off circuit(s) at the breaker or fuse new box with wiring ready (neutral wire panel, and confirm there is no voltage in required) the box before star ng the installa on (there may be mul ple live circuits At least 2 inches of box depth is required within the switch box)
- Page 10 Unscrew the outlet from the electrical Compare your new outlet with the one box and pull it out with the wires s ll you’re replacing to find the corresponding a ached l o c a o n s fo r t h e e l e c t r i c a l s c r e w Three wires will be a ached to the outlet: an connectors incoming hot wire, which is...
- Page 11 C o n n e c t t h e fi rs t w i re y o u u n s c re w t o t h e a s s o c i a t e d s c re w t e r m i n a l o n t h e I n - w a l l O u t l e t ;...
- Page 12 Gently push the new, wired outlet back Snap on the outlet plate and screw it, into the electrical box and screw it in turn on the power at the circuit breaker place Hot/Live CONTROLLED CLASS 2 5VDC Max2.4A Neutral ALWAYS ON Ground Push outlet and wiring Snap on the plate and screw it...
-
Page 13: Using The Yolink App
Using the YoLink App Device page Details * Tap to go to Details page (refer to page 12) Connec on status Device name of outlet and Hub * Edit name on Details page * Tap to turn on/off the outlet Real- me status: Turned on or turned off... - Page 14 * Tap to sync with mobile to page Power on status * Tap to delete the device from a er an update your YoLink account or power loss Switch Last State or Off or On * Default is set to Last State...
- Page 15 Timer With YoLink app, you can set up a mer to turn on or/and off the outlet Note One mer will run only once. You can set a new mer a er the mer has already run or once you...
- Page 16 Schedule Create on/off schedules to automate your outlet to work around your home and work schedules Note You can have a maximum 6 schedules at one me A er se ng up, the schedule is running at device without internet You may add as many schedules as you want in Automa on se ngs.
- Page 17 Scene Set one-click control for mul ple devices in your YoLink app. You can only run a scene via your YoLink app Go to “Smart”, tap “Scene” followed by the “ ” icon to add a scene Fill in details followed by the “...
- Page 18 Automa on Easily set up rules for “if this then do that” func ons Go to “Smart”, tap “Automa on” followed by the “ ” icon to add an automa on Fill in details followed by the “ ” icon Tap to add an Tap to save the se ngs automa on...
- Page 19 Voice Assistants Connect YoLink with third-party voice assistants ser vice to control or monitor the status of your devices through voice commands Tap “ ” in the upper le corner to go to My Profile Go to Se ngs > Voice Assistants for the applicable voice assistant integra on guide...
-
Page 20: About Yolink Control
Hub or an internet connec on. (Use of YoLink Control is op onal; you can use the Automa on feature in the app OR use YoLink Control, but YoLink Control offers the benefit of opera on without the Hub or internet connec on.) One device controls another, directly. - Page 21 Note If you want to turn off the YoLink Plug Mini when the outlet turn s on, turn off the YoLink Plug Mini first, and let it enter pairing mode For the same In-wall Ou tlet and YoLink Plug Mini , you can only choose to either turn on or turn off...
- Page 22 Turn on the plug * verify the Status LED of YoLink Plug Mini displays blue. Refer to the YoLink Turn on the outlet Plug Mini manual for more informa on: * verify the Status LED of In-wall Outlet displays green...
- Page 23 Opera on When the outlet turns on, the YoLink Plug Mini will now immediately turn on. The plug will remain turned on un l turned off using the POWER bu on or via the app More advanced sequences, controlling mul ple outputs (e.g. turn off plug) are available via the YoLink app Turned off...
- Page 24 Unpairing At the In-wall Outlet (controller), turn on the outlet using POWER bu on or via YoLink app (verify the Status LED of In-wall Outlet displays green). Press and hold the POWER bu on for 10-15 seconds un l the LED irregularly blinks green...
- Page 25 POWER Bu on POWER Bu on Hold the POWER button on the In-wall Hold the POWER button on the YoLink Outlet (Turned on) for 10-15 seconds, Plug Mini for 10-15 seconds, until the until the green light blinks irregularly...
-
Page 26: Maintenance
Maintenance Firmware Update To ensure our customers have the best user experience, we highly recommend you update to the newest version firmware when an update is available In “Firmware”, if a new version is listed as available (#### ready now), click it to start the firmware update process You may use your device during the update as it is performed in the background. - Page 27 Factory reset will erase all of your se ngs and restore it to factory defaults. A er the factory reset, your device will remain in your Yolink account Hold the POWER bu on for 20-25 seconds un l the Status LED slowly blinks green irregularly...
-
Page 28: Specifica Ons
Specifica ons AC100-120V 60Hz Input/Output Voltage: Maximum Current: USB Output: 5V 2.4A MAX Environment: Temperature: 14°F - 104°F -10°C - 40°C Humidity: 10% - 90% non-condensing... - Page 29 Dimensions: Unit: inches (millimeters) 1.69 (43.0) 1.81 (46.0) 2.76 (70.0) 0.24 (6.0) 1.34 (34.0) 0.06 (1.5) CONTROLLED CLASS 2 5VDC Max2.4A 1.30 (33.0) ALWAYS ON 1.30 (33.0) 1.30 (33.0) 1.48 (37.5) 1.69 (43.0) FRONT SIDE FACEPLATE FACEPLATE (FRONT) (SIDE)
- Page 30 - Power outages (before or during) can prevent the mer from execu ng. Press the power bu on once to turn on/off the outlet, also you can turn on/off the outlet via YoLink app or set a new mer. (When you add a rese ng/one- me-use mer this will need to be amended with that new informa on.)
-
Page 31: Warning
Warning Please install, operate and maintain the In-wall Outlet only as outlined in this manual. Improper use may damage the unit and/or void the warranty Do not load more than 15A(resis ve) for the device. Other loads (16A, etc.) will damage the device, and power supplies other than the supplied unit may damage the device. -
Page 32: Customer Service & Warranty
If you have any difficul es installing or using your In-wall Outlet, please contact our Customer Service department during business hours: US Live Tech Support: 1-949-825-5958 M-F 9am - 5pm PST Email: service@yosmart.com YoSmart Inc. 17165 Von Karman Avenue, Suite 105, Irvine, CA 92614 Warranty 1 Year Limited Electrical Warranty YoSmart warrants to the original residen al user of this product that it will be free from defects in... - Page 33 FCC Statement This equipment has been tested and found to comply with the limits for a Class B digital device, pursuant to part 15 of the FCC Rules. These limits are designed to provide reasonable protec on against harmful interference in a residen al installa on. This equipment generates, uses and can radiate radio frequency energy and, if not installed and used in accordance with the instruc ons, may cause harmful interference to radio communica ons.
- Page 34 Note: The manufacturer is not responsible for any radio or TV interference caused by unauthorized modifica ons to this equipment. Such modifica ons could void the user’s authority to operate the equipment. FCC RF Radia on Exposure Statement This equipment complies with FCC RF radia on exposure limits set forth for an uncontrolled environment.
Need help?
Do you have a question about the YS6704-UC and is the answer not in the manual?
Questions and answers