Advertisement
Quick Links
ASSEMBLY MANUAL
Contents
Contents .................................................................................................................................................. 1
Introduction ............................................................................................................................................ 1
Warnings and safety issues .................................................................................................................... 2
Hardware description and how to build it ............................................................................................ 3
Hardware specifications ....................................................................................................................... 10
Components ......................................................................................................................................... 11
Software Description ............................................................................................................................ 13
Introduction
Hardware
The ECG device can be built easily (in less than 1 hour) and only a very basic electronics skills
are needed.
The simple circuit design and layout are a good compromise for having both a low cost and
good performance. It is based on few boards to be connected together:
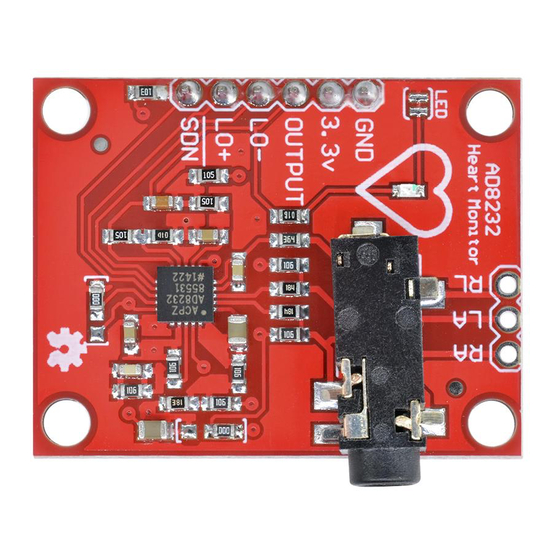
• ECG module AD8232 (Module Single-Lead, Heart Rate Monitor Front End)
• Arduino Nano board
• HC-05 (or HC-06) Bluetooth module
Few connections are needed (connector cables and/or soldering)
Software
No software programming knowledge is required since all you need is to install the App by
opening the apk file from an Android smartphone and to upload the provided Arduino sketch
on the Arduino board (this can be done easily by using the Arduino Software IDE and one of
the many tutorials available on the web).
Advertisement

Related Manuals for ECG AD8232


Summary of Contents for ECG AD8232
-
Page 1: Table Of Contents
Introduction Hardware The ECG device can be built easily (in less than 1 hour) and only a very basic electronics skills are needed. The simple circuit design and layout are a good compromise for having both a low cost and good performance. -
Page 2: Warnings And Safety Issues
Use at your own risk. It is imperative that anyone who wants to build this device have a good understanding of using electricity in a safe and controlled manner. The ECG device is electrically connected to a person and only low voltage batteries must be used for safety precautions and to prevent damage to the device. -
Page 3: Hardware Description And How To Build It
(figures 2 and 3). The battery supplies the Arduino board; HC-06 (or HC-05) module is supplied by the Arduino 5 V voltage output while AD8232 module is supplied by the Arduino 3.3 V voltage output. Figure 1: ECG hardware connections schematics... - Page 4 Figure 2: ECG hardware connections Figure 3: example of female header connectors cable Beside the main connection scheme of figure 1, detailed steps are here described: • additional RLD resistor for safety issue • alternative “home made” electrodes cable • alternative GND connection to avoid soldering...
- Page 5 AD8232 modules usually uses a 360 kOhm resistor (fig. 4) in series with the RLD output since its supply is 3.3V. Even if the AD8232 module is powered by the Arduino at 3.3 V, in the worst-case failure, the battery voltage value should be considered. So, if a 6V battery is used, to keep the RLD current limit lower than 10 uA, a resistor higher than 600 kOhm is needed (current = voltage / resistance) like a 680 kOhm resistor.
- Page 6 RLD resistor Figure 6: additional resistor board connected to the AD8232 board Alternative “home made” electrodes cable Off the shelf AD8232 modules usually includes the electrodes cable that can be plugged in the boards directly through the dedicated connector (fig. 7).
- Page 7 Figure 7: AD8232 electrodes cable However, it is possible to make a customized electrodes cable and to connect it to the dedicated pins of AD8332. The cable can be realized by using a coaxial cable (better if shielded, to reduce external noise), alligator clip, heat shrink tubing and female header connectors (fig.
- Page 8 Since the Arduino Nano board has only 2 ground (GND) pins, one can connected to the battery negative terminal and the other one can be connected to both GND pin of AD8232 and GND pin of HC-06. To avoid direct soldering on the boards, it is needed to find a solution like the one in fig.
- Page 9 Figure 11: ECG hardware Figure 12: ECG device inside its box...
-
Page 10: Hardware Specifications
AD8232 modules usually have a overall gain of 1100 (100 for the instrumentation amplifier and 11 for a second amplifying stage). Such Gain value can be specified in the variable “Gain” inside the “Setting” page of the app (see “User Manual” file) to have the right ECG amplitude value in mV. -
Page 11: Components
By excluding the Smartphone and disposable parts (electrodes and batteries), the device whole cost is between 20 and 25 Euros (25-30 US dollars). Here all the components needed: • ECG module AD8232 (Module Single-Lead, Heart Rate Monitor Front End) + electrodes cable (usually already included in the off the shelf module) •... - Page 12 Figure 15: HC-06 module and its cable Figure 16: switch example Figure 17: battery clip example Figure 18: battery holder...
-
Page 13: Software Description
Arduino Micro (this board was not tested). For other Arduino board the sketch file may need changes. • Installing the ECG SmartApp: To install the App, copy the provided apk file “ECG_SmartApp.apk” on the smartphone memory, open it and follow the instruction by accepting the permissions.
Need help?
Do you have a question about the AD8232 and is the answer not in the manual?
Questions and answers