Table of Contents
Advertisement
Quick Links
Advertisement
Table of Contents

Summary of Contents for ALLEN & HEATH M-Waves V1
- Page 1 Allen & Heath M-Waves Card User Guide...
-
Page 2: Table Of Contents
Contents INTRODUCTION ................................. 3 HARDWARE AND CONNECTIONS ........................... 4 GETTING STARTED ................................5 Connect the Hardware ..............................5 One I/O..................................5 Add I/Os ..................................6 Download and Install Software ............................7 Configure the System ..............................8 Manual Device Configuration ............................9 Automatic Device Configuration with SoundGrid Studio .................... -
Page 3: Introduction
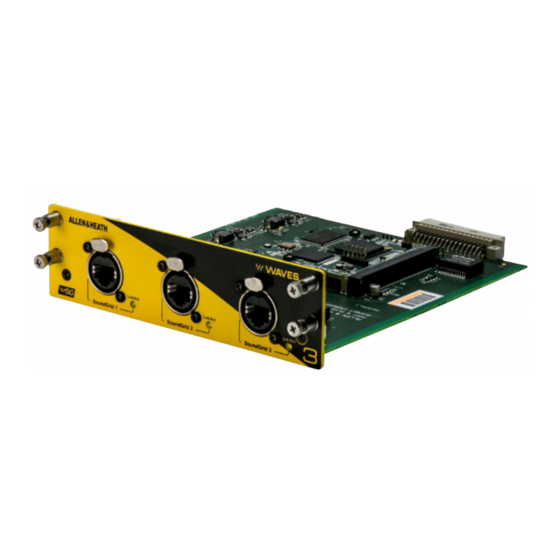
M-Waves cards are available in three versions: • M-Waves V1 or V2 for Allen & Heath iLIVE and GLD consoles - M-Waves V1 and V2 cards provide 64 channels. • M-DL-Waves3 for Allen & Heath dLIVE consoles - Each M-DL-Waves3 card provides 128 channels of bi- directional audio to SoundGrid. -
Page 4: Hardware And Connections
You can use M-Waves V1, V2 (using M-DL-ADAPT card adapter) and M-DL-WAVES3 cards together in a dLive setup. iLive setups can use M-Waves V1 and V2 cards. M-Waves V1 cannot be an Ethernet clock (SOE) slave. It must provide clock sync to an M-Waves V2 or M-DL-WAVES3 card. Setting up the clock master for the network is done in either SuperRack SoundGrid, QRec, SoundGrid Studio, or eMotion LV1. -
Page 5: Getting Started
Getting Started Configure SoundGrid and assign your devices as follows, however large or small your system. Connect the hardware Install the software Configure your system Connect the Hardware One I/O In this example, one Allen & Heath M-Waves expansion card is used to connect a console to the SoundGrid host application SoundGrid ASIO/Core Audio driver for plugin processing and/or DAW playback/recording. -
Page 6: Add I/Os
Add I/Os Adding I/O devices not only increases the number of I/O channels, but lets you have separate devices for stage and FOH, or live room and control room. Use a "star" network configuration with a 1GB Ethernet switch when you need more network ports than the interface card provides. -
Page 7: Download And Install Software
Download and Install Software NSTALLING A OUND YSTEM Installing the Waves SoundGrid host application will also install applicable device drivers and ASIO/Core Audio drivers. Your devices will appear in the Inventory of your host system. If a device is not visible in the Inventory, you may need to install a specific driver from Waves Central—please see below. -
Page 8: Configure The System
Configure the System A SoundGrid network is configured and devices are assigned in a host’s Setup window. At the heart of this window are racks where devices are assigned. Any compatible device that’s part of the host’s SoundGrid network will be available for assignment. -
Page 9: Manual Device Configuration
Manual Device Configuration You can assign, remove, and manage a device manually. Click on the plus or arrow symbol in a device slot to open the Device Menu, then select a device. Any device not already used will be available for assignment. If no other devices are assigned, the current device will become your clock master. -
Page 10: Device Firmware
Device Firmware An I/O that is using outdated or incompatible firmware will not work properly in a SoundGrid network until its firmware is updated. The color of the FW button in a device slot indicates the current firmware status. Grey Compatible firmware Blue Compatible firmware, but a newer version exists... -
Page 11: M-Waves Control Panel
M-Waves Control Panel There are two ways to open the device control panel: ROM THE EVICE Click on the Gear button on a device in the rack slot. SoundGrid Studio SoundGrid QRec ROM THE RIVER ONTROL ANEL Open the driver control panel and then click the Hardware Control Panel button. The driver control panel is located here in the host computer: PC: C:\Program Files (x86)\Waves\SoundGrid\Driver Control Panel Mac: System HD/Applications/Waves/SoundGrid... -
Page 12: Clock Page
Clock Page Use the Clock page to set the clock source and sample rate for the device and to assess clock status. SOURCE sets the requested clock source. The unit itself provides the clock Internal Syncs via the M-Waves connection to the console Digital Syncs to the master I/O of the SoundGrid network Sync over Ethernet... - Page 13 CLOCK STATUS INDICATORS Three windows on the right side of the Clock control panel help you to quickly assess the network status of the device. Status Reports the presence or absence of sync between the unit and the SoundGrid network Current Clock Displays the current sync method.
-
Page 14: System Info Page And About Page
System Info Page and About Page The About page contains a description of the device. The System Info page contains technical details about the device and its firmware. This information can be useful for troubleshooting. Please have this information handy if you contact Waves technical support concerning the device. -
Page 15: Presets
Presets The Top Bar is used to load and save device presets and to identify device hardware. You can save and load presets of device settings. A saved preset includes all Clock panel parameters. Use presets to use on future sessions or copy them to another computer to duplicate a configuration. Click the ID button to indicate which unit belongs to this Control Panel. -
Page 16: Using An I/O Device With A Daw
Using an I/O Device with a DAW Setting up SoundGrid devices with a DAW involves these steps: ASIO/C ATCH THE DEVICE AND THE OUND UDIO DRIVER When using a DAW on a SoundGrid network, the SoundGrid ASIO/Core Audio driver serves as a bridge between the I/O device and the DAW.