
Subscribe to Our Youtube Channel
Related Manuals for PNI SafeHome PT720MW


Summary of Contents for PNI SafeHome PT720MW
- Page 1 PNI SafeHome PT720MW Smart video door phone / Interfon video inteligent User manual ..........Manual de utilizare ........
- Page 2 Tuya Smart APP Download the application Tuya Smart by accessing Google Play or the App Store or scan the QR codes below: Android Add device in Tuya Smart application Open the application, create an account and log in. 2. Add your device by pressing the + icon in the upper right corner of the screen or by pressing the Add device (this button appears when you do not have any devices added to the application).
- Page 3 the door phone . Move the wheel up and down to navigate the menu. 9. Enter the WiFi settings of the phone and connect to the network SmartLife- Doorbell. 10. Return to the application. The app will start scanning the devices. 11.
- Page 4 Device control from the application Options: Image capture: takes an image and saves it in the phone’s memory 2. Intercom: press to talk to the person in front of the door 3. Recording: press to record video. The recording will be saved in the phone memory.
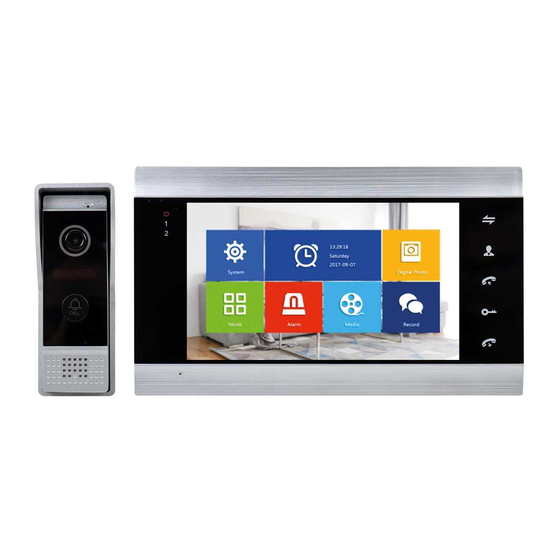
- Page 5 Indoor unit description 9. Power LED 15. Loudspeaker 10. Led door 1 16. Settings menu button 11. Led door 2 17. Micro SD card slot 12. TFT screen 18. Volume + 13. Touch buttons 19. Volume - 14. Microphone User manual...
-
Page 6: Symbols Description
Symbols description In the standby mode, press this button to enter the settings menu. Once you access the menu, push this button up or down to navigate the menu. Press this button to enter a specific menu item and Access the confirm a setting. - Page 7 Connection diagram 1 Power adapter AC/DC External power source for camera not included (AC100V-240V)--optional Power adapter AC/DC for camera not included DOOR1 DOOR2 Power adapter AC/DC (not included) Lock (not included) Power adapter AC/DC (not included) Lock (not included) User manual...
- Page 8 Outdoor unit connection diagram Note: The system supports the connection of a Normal Open (NO) electromagnetic lock. This means that in standby mode, the relay is open and the lock is closed. When the Unlock button on the internal unit is pressed, the relay closes and the lock opens. You must connect electromagnetic lock according to outdoor connection diagram, and power the lock with dedicated AC/DC adapter ( not included).
- Page 9 Cable connections recommendations For connections, use the below cable types: Standard insulated and uninsulated type cable 4C. Distance ≤28 m (4x0.2mm Distance ≤50 m (4x0.3mm Distance ≤80 m (4x0.5mm 2. Standard uninsulated cable type 3C + video cable (75-3) Distance ≤100 m 3.
-
Page 10: Video Source
Note: If no one answers the call, the visitor will hear the message Please leave a message and will have a maximum of 60 seconds to leave a message. 5. If you want to allow the visitor access, press the key Unlock . -
Page 11: Call Transfer
Call transfer This function requires at least two indoor units and one outdoor unit, connected to each other. The visitor presses the call button on the external unit. 2. The image taken by the camera immediately appears on the monitor. 3. - Page 12 this access the menu System). Important: Specialized folders must be created on the SD card: • “ring” - where the audio files will be saved and where the ringtone will be downloaded from • “user” - where photos will be saved and where photos will be taken from for standby mode “music“...
- Page 13 Language - select the menu display language: English, Russian, German, Polish. Time - select date and time. System info - displays firmware version, processor model, micro SD card space (system supports up to 32GB), ID and MAC. Ringtone - select the ring bell for the indoor unit Door1 and Door2: Default or Custom (select one of the songs saved on the micro SD card).
- Page 14 3. Mode Options: Set machine ID - from 01 ltoa 06. 01 is the Master indoor unit. 02 - 06 are the Slave indoor units. Door 2 status - enable or disable the output on Door 2. Door 1 unlock time - between 02 - 10 seconds. Set how long the lock will stay open. Door 2 unlock time - between 02 - 10 seconds.
- Page 15 5. Media Access this menu to play audio (music) and image (photos) files on the micro SD card. Note: save the audio files in the “music” folder on the micro SD card, and the image files in the “user” folder. 6.
-
Page 16: Technical Specifications
Technical specifications Supports 6 indoor units + 2 outdoor units + System 2 CCTV cameras Input video signal CVBS, CVI, TVI, AHD2.0 Monitor 7 inch Monitor resolution 1024 x 600 px Motion detection Call mode Intercom / Duplex Maximum capacity of micro SD 32GB, Classe 10 card 230V (with the power adapter included) - Page 17 Aplicatia Tuya Smart Descarcati aplicatia Tuya Smart accesand Google Play sau App Store sau scanati codurile QR de mai jos: Android Adaugare dispozitiv in aplicatia Tuya Smart Deschideti aplicatia, creati-va cont si autentificati-va. 2. Adaugati dispozitivul dvs. apasand pictograma + din coltul dreapta sus al ecranului sau apasand butonul Add device (acest buton apare atunci cand nu aveti nici un dispozitiv adaugat in aplicatie).
- Page 18 Nota: pentru accesa meniul de setari al interfonului, apasati rotita din partea laterala dreapta a acestuia Miscati rotita in sus si in jos pentru a naviga prin meniu. 9. Intrati in setarile WiFi ale telefonului si conectati-va la reteaua SmartLife- Doorbell.
- Page 19 Control dispozitiv din aplicatie Optiuni: Captura imagine: preia o imagine si o salveaza in memoria telefonului 2. Intercom: apasati pentru a vorbi cu persoana aflata in fata usii 3. Inregistrare: apasati pentru a inregistra video. Inregistrarea va fi salvata in memoria telefonului.
- Page 20 Descriere unitate de interior 9. Led alimentare 10. Led usa 1 11. Led usa 2 12. Ecran TFT 13. Butoane tactile 14. Microfon 15. Difuzor 16. Buton meniu setari 17. Slot card micro SD 18. Volum + 19. Volum - Descriere simboluri In modul standby, apasati acest buton pentru a intra in meniul de setari.
- Page 21 Rotiti acest buton in sus si in jos pentru a regla Volum + / Volum - volumul unitatii de interior. In modul standby, apasati lung pentru a efectua un apel intern. In timpul unui apel extern, apasati pentru a transfera apelul. In modul Intercom, apasati pentru a face Transfer apel urmatoarele setari: luminozitate, contrast,...
- Page 22 Diagrama conexiuni 1 Adaptor alimentare AC/DC Sursa de alimentare externa pentru camera nu este inclus ) (AC100V-240V)--optional Adaptor alimentare AC/DC pentru camera nu este inclus ) USA1 USA2 Adaptor alimentare AC/DC (nu este inclus) Yala (nu este inclusa) Adaptor alimentare AC/DC (nu este inclus) Yala (nu este inclusa) Manual de utilizare...
- Page 23 Unitate de exterior - descriere conexiuni Note: Sistemul suporta conectarea unei yale electromagnetice de tip Normal Open (NO). Asta inseamna ca in modul standby, releul este deschis si yala inchisa. Cand se apasa butonul Deblocare de pe unitatea interna a interfonului, releul se inchide si yala se deschide. Conectati yala electromagnetica( achizitionata separat) connform diagramei de conexiuni de mai sus impreuna cu alimentatorul AC/DC compatibil ( achizitionat separat).
- Page 24 Recomandari cablu conexiuni Pentru conexiuni, folositi tipurile de cablu de mai jos: Cablu standard izolat si neizolat tip 4C. Distanta ≤28 m (4x0.2mm Distanta ≤50 m (4x0.3mm Distanta ≤80 m (4x0.5mm 2. Cablu standard neizolat tip 3C + cablu video (75-3) Distanta ≤100 m 3.
- Page 25 Nota: Daca nu raspunde nimeni la apel, vizitatorul va auzi mesajul Please leave a message (Va rugam sa lasati un mesaj) si va avea la dispozitie maxim 60 de secunde. 5. Daca doriti sa permiteti vizitatorului accesul in incinta, apasati tasta Unlock (Deblocheaza) .
- Page 26 Transfer apel Pentru aceasta functie sunt necesare cel putin doua unitati de interior si o unitate de exterior, conectate intre ele. Vizitatorul apasa butonul de apel de pe unitatea externa. 2. Pe monitor apare imediat imaginea preluata de camera video. 3.
- Page 27 pentru aceasta accesati meniul System). Important: Pe cardul SD trebuie create foldere specializate: • “ring” - in care vor fi salvate fisierele audio si de unde va fi preluata melodia pentru sonerie • “user” - in care vor fi salvate fotografiile si de unde vor fi preluate fotografiile pentru modul standby “music“...
- Page 28 Language - selectati limba de afisare a meniului: engleza, rusa, germana, poloneza. Time - setati data si ora sistemului. System info - afiseaza versiunea firmware-ului, modelul procesorului, spatiul pe cardul micro SD (sistemul suporta maxim 32GB), ID si MAC. Ringtone - selectati melodia pentru soneria unitatii de interior Door1 si Door2: Default sau Custom (selectati una dintre melodiile salvate pe cardul micro SD).
- Page 29 3. Mode Optiuni: Set machine ID - de la 01 la 06. 01 este unitatea de interior Master. 02 - 06 sunt unitatile de interior Slave. Door 2 status - activati sau dezactivati iesirea de pe Door 2. Door 1 unlock time - intre 02 - 10 secunde. Setati timpul cat va ramane deschisa yala.
- Page 30 5. Media Accesati acest meniu pentru a reda fisierele audio (muzica) si imagine (fotografii) de pe cardul micro SD. Nota: salvati fisierele audio in folderul “music“ de pe cardul micro SD, iar fisierele imagine in folderul “user“. 6. Record center •...
-
Page 31: Specificatii Tehnice
Specificatii tehnice Suporta 6 unitati de interior + 2 unitati de Sistem exterior + 2 camere CCTV Semnal video de intrare CVBS, CVI, TVI, AHD2.0 Monitor 7 inch Rezolutie monitor 1024 x 600 px Detectie miscare Mod apel Intercom / Duplex Capacitate maxima card micro SD 32GB, Clasa 10 230V (cu adaptorul de alimentare inclus) Alimentare... - Page 32 EU Simplified Declaration of Conformity SC ONLINESHOP SRL declares that Smart video doorphone PNI SafeHome PT720MW complies with the Directive EMC 2014/30/EU and RED 2014/53/ UE. The full text of the EU declaration of conformity is available at the following Internet address: https://www.mypni.eu/products/7291/download/certifications...
Need help?
Do you have a question about the SafeHome PT720MW and is the answer not in the manual?
Questions and answers