Table of Contents
Advertisement
Quick Links
The Herz 3 F800 55 is a wireless programmable thermostat with
weekly heating schedule. Goal of the designer were to plan a
device which is economic and offers the costumer a high level of
Das HERZ 3 F800 55 Funk-Raumthermostat ist ein Innenraumthermost-
comfort. The thermostat is able to realise a constant increase of
at mit einem programmierbaren wöchentlichen Heizprogramm. Der
the room temperature and will automatically adjust the settings.
Thermostat ist für die Innenraumtemperaturregulierung entworfen, Ziel
In this way it possible advance the comfort level. Begin and end
war es Wirtschaftlichkeit mit Komfort zu verbinden. Das System erlaubt
of heating periods are also automatically calculated, only the
Ihnen den Raumtemperaturmodus (Komfort, Ökonomisch, Urlaub,
Party, AUS) jederzeit zu wechseln. Das Gerät ist fähig anhaltende
temperature profile according to the course of the day has to be
Temperaturzunahme zu erkennen (innerhalb von zwei Tagen) und wird
defined.
die Einstellung dementsprechend anpassen, dadurch wird ein höheres
Komfortniveau realisiert. Beginn und Ende des Heizvorganges werden,
lediglich an Hand davon zu welcher Tageszeit Sie eine gewünschte
Temperatur erreichen wollen, automatisch festgelegt. Durch Betätigung
des Drehknopfes können Sie zwischen den einzelnen Modi wechseln.
TP-155 Wireless programmable indoor thermostat
TP-155 Wireless programmable indoor thermostat
The TP-155 is a wireless programmable indoor thermostat with a weekly heating
schedule.
It
can
regulate
economical or comfort temperature
The TP-155 is a wireless programmable indoor thermostat with a weekly heating
inside residential buildings. It offers a
It
can
regulate
few programmable modes. Every
Drehknopf
mode regulates pre-set temperatures
TP-155 Wireless programmable indoor thermostat
TP-155 Wireless programmable indoor thermostat
(Comfort, Economy, Holiday, and
Party). The thermostat is able to
measure the thermal inertia inside the
Installation
premises and adjust the weekly
The TP-155 is a wireless programmable indoor thermostat with a weekly heating
schedule
for
the
requested
It
can
regulate
It
can
regulate
the
temperature to be reached at the pre-
The Herz 3 F800 50 should be mounted in a dry indoor location.
set time.
for
the
requested
Choose a mounting location about 1.5 meters above the floor in
Montage des Thermostats
an area with good air circulation. Avoid places with draughts, dead
Das 3 F800 55 sollte in einem trockenen Innenraum montiert werden.
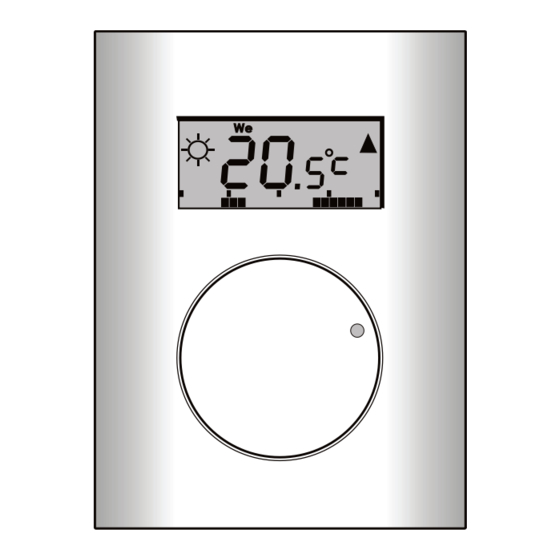
Figure 1: 1- knob (encoder) combined with button; 2- tab
air spots and radiant heat from the sun or appliances. It should not
Wählen Sie einen Montageort mit guter Luftzirkulation, der sich ca. 1,5
be installed close to any metal structure or other objects that may
Thermostat installation
Figure 1: 1- knob (encoder) combined with button; 2- tab
Meter über dem Boden befindet. Vermeiden Sie Plätze mit Luftzug,
obstruct radio signal transmissions.
TP-155 Wireless programmable indoor thermostat
toten Luftpunkten und Strahlungshitze erzeugt durch Sonne oder
The product can only be used in an indoor environment. Install the thermostat 1.5
Thermostat installation
m above the floor in a place where there is good natural air circulation. Don´t install
Gerätehitze. Das Gerät sollte nicht nahe an Metallkonstruktionen oder
for
the
requested
for
the
requested
1.
Release the upper cover by pressing the plastic tab on the
the thermostat where the measuring can be influenced by drafts, sunlight, heaters or
The product can only be used in an indoor environment. Install the thermostat 1.5
anderen Objekten installiert werden, welche die Funksignalübertragung
any other effects. Avoid mounting the thermostat on metal objects or metal bases
bottom side of the housing.
The TP-155 is a wireless programmable indoor thermostat with a weekly heating
beinträchtigen könnten.
which block radio communication.
It
can
regulate
2.
Mount the back part on the desired location
1. Lösen Sie die obere Abdeckung durch Drücken der Plastiklasche
3.
If the thermostat was purchased as a kit along with a receiving
auf der Grundseite des Gehäuses
1. By pressing the tab (by screwdriver for instance) release the front part of the
Figure 1: 1- knob (encoder) combined with button; 2- tab
Figure 1: 1- knob (encoder) combined with button; 2- tab
thermostat.
2. Montieren Sie den rückseitigen Teil auf die gewünschte Stelle.
unit, connect the detector's battery (pull out the red tape to
1. By pressing the tab (by screwdriver for instance) release the front part of the
Thermostat installation
2. Install the rear part of the thermostat at the chosen place (tab down).
3. Setzen Sie die Batterie ein (die Polarität ist am Halter vermerkt).
activate the battery). Otherwise see section "Mounting the
thermostat.
3. Insert the batteries, the polarity is marked on the plastic.
4. Schließen Sie den Thermostat an.
The product can only be used in an indoor environment. Install the thermostat 1.5
receiving unit"
2. Install the rear part of the thermostat at the chosen place (tab down).
4. Put back the front thermostat part and close it.
4.
Close the thermostat
Inbetriebnahme
3. Insert the batteries, the polarity is marked on the plastic.
Enrolling the thermostat
4. Put back the front thermostat part and close it.
Installieren und verbinden Sie die Empfangseinheit mit dem
Mounting the receiving unit
for
the
requested
Install and connect the receiving unit to the heating appliance. If the receiver has
Heizsystem. Wenn die Empfangseinheit eigenständig verkauft worden
Enrolling the thermostat
been bought independently, you have to enroll the thermostat to it first. Open the
ist, dann muss der Thermostat darauf eingestellt werden – geben Sie
enrollment mode on the receiver (see its manual) and insert the batteries into the
Install and connect the receiving unit to the heating appliance. If the receiver has
den Inbetriebnahme-Modus in die Empfangseinheit ein (siehe deren
Install and connect the receiving unit to the heating system. If the
thermostat.
thermostat or press and hold the knob for 5s. In both cases the thermostat will send
Gebrauchsanweisung) und verbinden Sie entweder die Batterie an den
receiving unit was purchased separately then thermostat have to
an enrollment signal. The text LRn appears on the LCD display when the enrolling
Thermostat oder drücken und halten Sie den Knopf 5 Sekunden lang.
be connected - enter connection mode on the receiving unit (see
Figure 1: 1- knob (encoder) combined with button; 2- tab
procedure (with AC-116 only) has been done successfully.
Der Thermostat wird die erfolgreiche Inbetriebnahme durch das
its manual) and connect the battery to the thermostat.
Symbol LRN bestätigen.
Thermostat installation
Symbols on the LCD:
Enrolling the thermostat
Symbol auf der Anzeige
The product can only be used in an indoor environment. Install the thermostat 1.5
Symbols
Install and connect the receiving unit to the heating appliance. If the receiver has
thermostat.
Figure 2: 1 – Symbols for
Settings and programming
comfort
Enrolling the thermostat
and
economical
Do the complete settings using the knob – encoder. By pressing the knob 2 sec
Install and connect the receiving unit to the heating appliance. If the receiver has
temperatures; 2 – The days of
Settings and programming
week;
3 – Locking
the
enter the programming mode.
4 – Alarm
tempe-
Do the complete settings using the knob – encoder. By pressing the knob 2 sec
the
week;
General rules for programming:
Einstellung und Programmieren
–
limits / loss
of
1.
Flashing of any icon on the LCD allows changing the option(s) or choosing a
thermostat;
5 – Heating
Alle erforderlichen Parameter können im Einstellungsmenü durch
General rules for programming:
next item.
Benutzen des Knopfes verändert werden. Das Menü ist aufgeteilt in
Flashing of any icon on the LCD allows changing the option(s) or choosing a
2.
Perform choosing or changing by turning the knob (turning the knob is possible
rature
folgende Teile:
next item.
from left to right and vice versa).
communication;
Perform choosing or changing by turning the knob (turning the knob is possible
3.
Confirm the selection or change by briefly pressing the knob.
Settings and programming
from left to right and vice versa).
MAn
manuelle Temperatur-Einstellung
4.
When the value of an item has been changed, then after this briefly press the
ON / OFF; 6 – Holiday; 7 – Party;
Do the complete settings using the knob – encoder. By pressing the knob 2 sec
Confirm the selection or change by briefly pressing the knob.
knob and the changes are saved. Then the thermostat goes to the next item in
8 – Heating times; 9 – Symbols
When the value of an item has been changed, then after this briefly press the
the programming menu.
The Herz 3 F800 55 wireless thermostat
Funk-Raumthermostat 3 F800 55
the
the
TP-155 Wireless programmable indoor thermos
The TP-155 is a wireless programmable indoor thermostat with a weekly heating
schedule.
It
can
regulate
the
economical or comfort temperature
pressing. The temperatures tLo and tHi determine the regulation range pre-
inside residential buildings. It offers a
programmed in the service menu SE t3, in which you can select the temperature by
Kunststofflasche
few programmable modes. Every
turning the knob. Choose the requested temperature. If the chosen temperature is
mode regulates pre-set temperatures
lower than the required temperature, the thermostat shows the symbol (▲) on its
LCD display. By entering the menu Man and confirming the option OFF, manual
(Comfort, Economy, Holiday, and
mode is terminated.
Party). The thermostat is able to
measure the thermal inertia inside the
2.
LOc – Locking the thermostat
premises and adjust the weekly
To protect the thermostat against unwanted manipulation you
schedule
for
the
can lock the thermostat. Enter the menu and press the knob
temperature to be reached at the pre-
on the item LOc, the options ON/OFF appear. By turning the
set time.
knob select the requested state and confirm by pressing.
Choosing ON enables the function Lock, and blocks thermostat control. To unlock
the
the thermostat choose the option OFF. Locking the thermostat is indicated on the
Figure 1: 1- knob (encoder) combined with button; 2- tab
LCD by the
symbol.
Thermostat installation
3.
OFF – Switching off the thermostat
The product can only be used in an indoor environment. Install the thermostat 1.5
The thermostat can be switched off by the option OFF.
m above the floor in a place where there is good natural air circulation. Don´t install
Enter the menu and press the knob on the item OFF, the
the thermostat where the measuring can be influenced by drafts, sunlight, heaters or
options ON/OFF appear. By turning the knob select the
any other effects. Avoid mounting the thermostat on metal objects or metal bases
requested state and confirm by pressing. Choosing ON
which block radio communication.
enables the function OFF, and switches off the thermostat. This is indicated on the
1. By pressing the tab (by screwdriver for instance) release the front part of the
LCD by the text OFF. Although the thermostat has been switched off, it still
thermostat.
measures and detects the antifreeze temperature (see SE t3, Stby). To unlock the
thermostat enter the menu and choose the option OFF. When the knob is pressed
2. Install the rear part of the thermostat at the chosen place (tab down).
the thermostat will be unlocked.
3. Insert the batteries, the polarity is marked on the plastic.
4. Put back the front thermostat part and close it.
4.
Set1 - Temperature, date and time settings
Enrolling the thermostat
In the Set1 menu the comfort temperature ( ), the economy
Figure 2: 1 – Symbols for
Install and connect the receiving unit to the heating appliance. If the receiver has
temperature ( ), the temperature for Holiday mode ( ), and
comfort
and
been bought independently, you have to enroll the thermostat to it first. Open the
the data and time can be preset. Enter the menu Set1, and
Figure 2: 1 – Symbols for
temperatures; 2 – The days of
enrollment mode on the receiver (see its manual) and insert the batteries into the
on the LCD the symbol of the economy temperature starts
comfort
the
week;
and
3 – Locking
thermostat or press and hold the knob for 5s. In both cases the thermostat will send
flashing. By turning the knob select the requested item ( , or
temperatures; 2 – The days of
thermostat;
4 – Alarm
an enrollment signal. The text LRn appears on the LCD display when the enrolling
knob the symbols for temperature start flashing and again by turning the knob set the
rature
–
the
week;
3 – Locking
procedure (with AC-116 only) has been done successfully.
required temperature and by repeatedly pressing the knob confirm this setting. The
thermostat;
communication;
4 – Alarm
last item serves for setting the current time. It indicates using flashing symbols of the
rature
ON / OFF; 6 – Holiday; 7 – Party;
–
limits / loss
Symbols on the LCD:
days of the week. By pressing you enter the current time setting. It starts with the
communication;
8 – Heating times; 9 – Symbols
year. Pressing gets it flashing, and by turning the knob set the year, by pressing
ON / OFF; 6 – Holiday; 7 – Party;
for showing temperature time
Figure 2: 1 – Symbols for
Figure 2: 1 – Symbols for
again it saves the setting and then you continue the same way in setting the current
8 – Heating times; 9 – Symbols
and texts; 10 – Low battery
comfort
and
comfort
and
economical
month, day, hour and minute. Then by pressing the knob after the minute setting the
for showing temperature time
temperatures; 2 – The days of
temperatures; 2 – The days of
values are saved and the thermostat is back in the menu Set1. Select the item OK to
and
economical
and texts; 10 – Low battery
the
week;
3 – Locking
leave this menu.
the
week;
3 – Locking
thermostat;
4 – Alarm
thermostat;
4 – Alarm
rature
–
limits / loss
rature
–
limits / loss
3 – Locking
communication;
communication;
5 – Heating
ON / OFF; 6 – Holiday; 7 – Party;
ON / OFF; 6 – Holiday; 7 – Party;
4 – Alarm
tempe-
8 – Heating times; 9 – Symbols
8 – Heating times; 9 – Symbols
5.
SEt2 – Weekly schedule setting
for showing temperature time
–
limits / loss
for showing temperature time
and texts; 10 – Low battery
and texts; 10 – Low battery
The heating program for switching the comfort and the economy temperatures can
5 – Heating
Settings and programming
be set for every single day independently (Mo - Monday, Tu - Tuesday, We -
Figure 2: 1 – Symbols for
Do the complete settings using the knob – encoder. By pressing the knob 2 sec
Wednesday, Th - Thursday, Fr - Friday, Sa - Saturday, Su - Sunday) or it can be
comfort
and
enter the programming mode.
split into working days and the weekend. There is one more option - the same
temperatures; 2 – The days of
General rules for programming:
settings for all days with no difference.
the
week;
3 – Locking
3. Insert the batteries, the polarity is marked on the plastic.
4. Put back the front thermostat part and close it.
Enrolling the thermostat
Install and connect the receiving unit to the heating appliance. If the receiver has
been bought independently, you have to enroll the thermostat to it first. Open the
enrollment mode on the receiver (see its manual) and insert the batteries into the
thermostat or press and hold the knob for 5s. In both cases the thermostat will send
an enrollment signal. The text LRn appears on the LCD display when the enrolling
procedure (with AC-116 only) has been done successfully.
Connecting the thermostats
Symbols on the LCD:
Do the complete settings using the knob. The programming mode
is entered by pressing the knob for two seconds.
General rules for programming:
pressing. The temperatures tLo and tHi determine the
1.
Flashing of any icon on the LCD allows changing the option(s)
or choosing a next item.
programmed in the service menu SE t3, in which you can s
2.
Perform choosing or changing by turning the knob
turning the knob. Choose the requested temperature. If th
3.
Confirm the selection or change by briefly pressing the knob
lower than the required temperature, the thermostat show
4.
When the value of an item has been changed, then after this
Settings and programming
briefly press the knob and changes are saved. Then thermostat
LCD display. By entering the menu Man and confirming
Do the complete settings using the knob – encoder. By pressing the knob 2 sec
goes to the next item in the programming menu
mode is terminated.
enter the programming mode.
5.
After the setting of the selected items, choose the parameter
General rules for programming:
2.
"OK" in the menu. By short pressing the system returns back
1.
Flashing of any icon on the LCD allows changing the option(s) or choosing a
to previous menu.
next item.
6.
If there is no manipulation of the knob for 30 seconds, it returns
2.
Perform choosing or changing by turning the knob (turning the knob is possible
from left to right and vice versa).
you back to the previous menu automatically.
3.
Confirm the selection or change by briefly pressing the knob.
pressing. The temperatures tLo and tHi determine the regulation range pre-
4.
When the value of an item has been changed, then after this briefly press the
The basic menu has 7 groups of settings:
programmed in the service menu SE t3, in which you can select the temperature by
knob and the changes are saved. Then the thermostat goes to the next item in
pressing. The temperatures tLo and tHi determine the regulation range pre-
turning the knob. Choose the requested temperature. If the chosen temperature is
the programming menu.
programmed in the service menu SE t3, in which you can select the temperature by
lower than the required temperature, the thermostat shows the symbol (▲) on its
Choosing ON enables the function Lock, and blocks therm
5.
After the setting / change of the chosen items, select the parameter „OK", in the
turning the knob. Choose the requested temperature. If the chosen temperature is
LCD display. By entering the menu Man and confirming the option OFF, manual
menu. By short pressing the system returns back to the previous menu (up to
lower than the required temperature, the thermostat shows the symbol (▲) on its
mode is terminated.
the thermostat choose the option OFF. Locking the therm
the main menu).
LCD display. By entering the menu Man and confirming the option OFF, manual
2.
LOc – Locking the thermostat
6.
If there is no manipulation of the knob for 30 sec, it returns you back to the
LCD by the
mode is terminated.
previous menu automatically.
2.
LOc – Locking the thermostat
The basic menu has 7 groups of settings.
pressing. The temperatures tLo and tHi determine the regulation range pre-
pressing. The temperatures tLo and tHi determine the regulation range pre-
3.
the
programmed in the service menu SE t3, in which you can select the temperature by
programmed in the service menu SE t3, in which you can select the temperature by
turning the knob. Choose the requested temperature. If the chosen temperature is
turning the knob. Choose the requested temperature. If the chosen temperature is
Choosing ON enables the function Lock, and blocks thermostat control. To unlock
lower than the required temperature, the thermostat shows the symbol (▲) on its
lower than the required temperature, the thermostat shows the symbol (▲) on its
the thermostat choose the option OFF. Locking the thermostat is indicated on the
LCD display. By entering the menu Man and confirming the option OFF, manual
LCD display. By entering the menu Man and confirming the option OFF, manual
Choosing ON enables the function Lock, and blocks thermostat control. To unlock
LCD by the
mode is terminated.
mode is terminated.
the thermostat choose the option OFF. Locking the thermostat is indicated on the
3.
OFF – Switching off the thermostat
2.
LOc – Locking the thermostat
LCD by the
2.
LOc – Locking the thermostat
3.
OFF – Switching off the thermostat
MA
- manual mode
1.
n
MAn – manual mode
requested
enables the function OFF, and switches off the thermostat
LCD by the text OFF. Although the thermostat has be
Choosing ON enables the function Lock, and blocks thermostat control. To unlock
enables the function OFF, and switches off the thermostat. This is indicated on the
Choosing ON enables the function Lock, and blocks thermostat control. To unlock
pressing. The temperatures tLo and tHi determine the regulation range pre-
the thermostat choose the option OFF. Locking the thermostat is indicated on the
LCD by the text OFF. Although the thermostat has been switched off, it still
the thermostat choose the option OFF. Locking the thermostat is indicated on the
measures and detects the antifreeze temperature (see SE
programmed in the service menu SE t3, in which you can select the temperature by
LCD by the
enables the function OFF, and switches off the thermostat. This is indicated on the
measures and detects the antifreeze temperature (see SE t3, Stby). To unlock the
LCD by the
symbol.
turning the knob. Choose the requested temperature. If the chosen temperature is
thermostat enter the menu and choose the option OFF. W
thermostat enter the menu and choose the option OFF. When the knob is pressed
LCD by the text OFF. Although the thermostat has been switched off, it still
lower than the required temperature, the thermostat shows the symbol (▲) on its
3.
OFF – Switching off the thermostat
3.
OFF – Switching off the thermostat
measures and detects the antifreeze temperature (see SE t3, Stby). To unlock the
the thermostat will be unlocked.
TP-155 Wireless programmable indoor thermostat
LCD display. By entering the menu Man and confirming the option OFF, manual
the thermostat will be unlocked.
thermostat enter the menu and choose the option OFF. When the knob is pressed
mode is terminated.
LO
- Thermostat lock
4.
Set1 - Temperature, date and time settings
the thermostat will be unlocked.
C
2.
LOc – Locking the thermostat
4.
4.
Set1 - Temperature, date and time settings
enables the function OFF, and switches off the thermostat. This is indicated on the
enables the function OFF, and switches off the thermostat. This is indicated on the
LCD by the text OFF. Although the thermostat has been switched off, it still
LCD by the text OFF. Although the thermostat has been switched off, it still
measures and detects the antifreeze temperature (see SE t3, Stby). To unlock the
measures and detects the antifreeze temperature (see SE t3, Stby). To unlock the
flashing. By turning the knob select the requested item ( , or
Choosing ON enables the function Lock, and blocks thermostat control. To unlock
thermostat enter the menu and choose the option OFF. When the knob is pressed
thermostat enter the menu and choose the option OFF. When the knob is pressed
knob the symbols for temperature start flashing and again by turning the knob set the
the thermostat choose the option OFF. Locking the thermostat is indicated on the
the thermostat will be unlocked.
flashing. By turning the knob select the requested item ( , or
required temperature and by repeatedly pressing the knob confirm this setting. The
the thermostat will be unlocked.
LCD by the
Set1 - Temperature, date and time settings
knob the symbols for temperature start flashing and again by turning the knob set the
last item serves for setting the current time. It indicates using flashing symbols of the
4.
Set1 - Temperature, date and time settings
4.
Set1 - Temperature, date and time settings
required temperature and by repeatedly pressing the knob confirm this setting. The
days of the week. By pressing you enter the current time setting. It starts with the
3.
OFF – Switching off the thermostat
last item serves for setting the current time. It indicates using flashing symbols of the
year. Pressing gets it flashing, and by turning the knob set the year, by pressing
flashing. By turning the knob select the requested item ( ,
days of the week. By pressing you enter the current time setting. It starts with the
again it saves the setting and then you continue the same way in setting the current
year. Pressing gets it flashing, and by turning the knob set the year, by pressing
month, day, hour and minute. Then by pressing the knob after the minute setting the
knob the symbols for temperature start flashing and again b
again it saves the setting and then you continue the same way in setting the current
values are saved and the thermostat is back in the menu Set1. Select the item OK to
economical
required temperature and by repeatedly pressing the knob
month, day, hour and minute. Then by pressing the knob after the minute setting the
leave this menu.
flashing. By turning the knob select the requested item ( , or
flashing. By turning the knob select the requested item ( , or
enables the function OFF, and switches off the thermostat. This is indicated on the
values are saved and the thermostat is back in the menu Set1. Select the item OK to
economical
the
last item serves for setting the current time. It indicates usin
knob the symbols for temperature start flashing and again by turning the knob set the
knob the symbols for temperature start flashing and again by turning the knob set the
LCD by the text OFF. Although the thermostat has been switched off, it still
leave this menu.
required temperature and by repeatedly pressing the knob confirm this setting. The
tempe-
required temperature and by repeatedly pressing the knob confirm this setting. The
measures and detects the antifreeze temperature (see SE t3, Stby). To unlock the
days of the week. By pressing you enter the current time
limits / loss
of
last item serves for setting the current time. It indicates using flashing symbols of the
the
last item serves for setting the current time. It indicates using flashing symbols of the
thermostat enter the menu and choose the option OFF. When the knob is pressed
5 – Heating
tempe-
days of the week. By pressing you enter the current time setting. It starts with the
days of the week. By pressing you enter the current time setting. It starts with the
year. Pressing gets it flashing, and by turning the knob s
the thermostat will be unlocked.
year. Pressing gets it flashing, and by turning the knob set the year, by pressing
of
year. Pressing gets it flashing, and by turning the knob set the year, by pressing
5.
SEt2 – Weekly schedule setting
again it saves the setting and then you continue the same
Set2 - Weekly schedule setting
5 – Heating
again it saves the setting and then you continue the same way in setting the current
again it saves the setting and then you continue the same way in setting the current
4.
Set1 - Temperature, date and time settings
Figure 2: 1 – Symbols for
The heating program for switching the comfort and the economy temperatures can
month, day, hour and minute. Then by pressing the knob after the minute setting the
month, day, hour and minute. Then by pressing the knob after the minute setting the
5.
SEt2 – Weekly schedule setting
comfort
month, day, hour and minute. Then by pressing the knob af
be set for every single day independently (Mo - Monday, Tu - Tuesday, We -
values are saved and the thermostat is back in the menu Set1. Select the item OK to
values are saved and the thermostat is back in the menu Set1. Select the item OK to
economical
In Set2 menu it's possible to program different weekly schedule.
temperatures; 2 – The days of
The heating program for switching the comfort and the economy temperatures can
Wednesday, Th - Thursday, Fr - Friday, Sa - Saturday, Su - Sunday) or it can be
leave this menu.
leave this menu.
values are saved and the thermostat is back in the menu Se
the
week;
The thermostat is able to implement different programs for
be set for every single day independently (Mo - Monday, Tu - Tuesday, We -
split into working days and the weekend. There is one more option - the same
the
the
thermostat;
Wednesday, Th - Thursday, Fr - Friday, Sa - Saturday, Su - Sunday) or it can be
settings for all days with no difference.
leave this menu.
weekdays (Mo, Tu, We, Th, Fr), for weekends (Sa, Su), or for every
tempe-
tempe-
rature
–
split into working days and the weekend. There is one more option - the same
flashing. By turning the knob select the requested item ( , or
single weekday.
of
of
communication;
settings for all days with no difference.
knob the symbols for temperature start flashing and again by turning the knob set the
the
5 – Heating
ON / OFF; 6 – Holiday; 7 – Party;
required temperature and by repeatedly pressing the knob confirm this setting. The
8 – Heating times; 9 – Symbols
5.
SEt2 – Weekly schedule setting
5.
SEt2 – Weekly schedule setting
last item serves for setting the current time. It indicates using flashing symbols of the
for showing temperature time
Enter the menu Set2, and by turning the knob select the combination of days which
days of the week. By pressing you enter the current time setting. It starts with the
The heating program for switching the comfort and the economy temperatures can
The heating program for switching the comfort and the economy temperatures can
of
and texts; 10 – Low battery
is required. Confirm by briefly pressing the knob. It enters the programming of heating
year. Pressing gets it flashing, and by turning the knob set the year, by pressing
be set for every single day independently (Mo - Monday, Tu - Tuesday, We -
be set for every single day independently (Mo - Monday, Tu - Tuesday, We -
Enter the menu Set2, and by turning the knob select the combination of days which
time periods when the thermostat switches between the day temperature and the
again it saves the setting and then you continue the same way in setting the current
Wednesday, Th - Thursday, Fr - Friday, Sa - Saturday, Su - Sunday) or it can be
Wednesday, Th - Thursday, Fr - Friday, Sa - Saturday, Su - Sunday) or it can be
is required. Confirm by briefly pressing the knob. It enters the programming of heating
night temperature.
month, day, hour and minute. Then by pressing the knob after the minute setting the
split into working days and the weekend. There is one more option - the same
split into working days and the weekend. There is one more option - the same
time periods when the thermostat switches between the day temperature and the
values are saved and the thermostat is back in the menu Set1. Select the item OK to
5.
settings for all days with no difference.
settings for all days with no difference.
economical
night temperature.
leave this menu.
the
SEt1
Einstellung der Ökonomischen oder Angenehmen
Temperatur, Zeit-Einstellung
SEt2
wöchentliches Einstellungs-Programmieren
SEt3
Service-Menü
Sie können das Menü durch Drücken und Halten des Knopfes
durchscrollen. Das gewünschte Untermenü wird durch Loslassen des
Knopfes erreicht.
Halten Sie den Drehknopf gedrückt während Sie ihn zur selben Zeit
drehen, um im Menü navigieren zu können. Sie erreichen das ausge-
wählte Untermenü indem Sie den Knopf loslassen. Drücken Sie erneut
kurz den Knopf, um den ausgewählten Parameter zu verändern. Um den
Wert zu ändern, drehen Sie den Knopf, anschließend muss die Eingabe
durch einen Knopfdruck bestätigt werden. Das Einstellungsmenü wird
verlassen, wenn Sie den Menüunterpunkt „OK" auswählen, oder
LOc – Locking the thermostat
automatisch wenn Sie 30 Sek. lange das Thermostat nicht betätigen.
To protect the thermostat against un
1.
MAn – Manueller Modus
can lock the thermostat. Enter the m
Wenn der manuelle Modus eingestellt ist, führt
on the item LOc, the options ON/OF
der
Regulierung
knob select the requested state a
Wochenprogramms.
Temperatur kann innerhalb des Bereichs von (t Lo) bis (t Hi) eingestellt
MA
Manual mode
n
werden.
LO
Locking the thermostat
C
2.
SEt1 – Temperatur- & Zeiteinstellung
symbol.
OF
Switching off the thermostat
To protect the thermostat against unwanted manipulation you
F
Im Untermenü M2 werden Betriebstemperatur ( ), angenehme Tempe-
pressing. The temperatures tLo and tHi determine
can lock the thermostat. Enter the menu and press the knob
SE
Temperature, date and time settings
ratur ( ), sowie der Zeitparameter ( ) festgelegt.
programmed in the service menu SE t3, in which you ca
To protect the thermostat against unwanted manipulation you
on the item LOc, the options ON/OFF appear. By turning the
OFF – Switching off the thermostat
t1
turning the knob. Choose the requested temperature. I
can lock the thermostat. Enter the menu and press the knob
knob select the requested state and confirm by pressing.
MA
SE
Manual mode
Weekly schedule setting
n
t2
lower than the required temperature, the thermostat sh
on the item LOc, the options ON/OFF appear. By turning the
LO
Locking the thermostat
c
SE
Service menu
The thermostat can be switched
LCD display. By entering the menu Man and confirmin
knob select the requested state and confirm by pressing.
OF
Switching off the thermostat
F
t3
mode is terminated.
symbol.
SE
Temperature, date and time settings
OK
Saving the parameters and leaving the
t1
Enter the menu and press the kno
2.
SE
Weekly schedule setting
t2
service menu
symbol.
options ON/OFF appear. By turn
SE
Service menu
Jeder Parameter kann durch kurzen Knopfdruck eingegeben werden.
t3
To protect the thermostat against unwanted manipulation you
The thermostat can be switched off by the option OFF.
OK
To protect the thermostat against unwanted manipulation you
Saving the parameters and leaving the service menu
Wenn
oder
eingegeben wird, dann blinkt die angezeigte
requested state and confirm by
can lock the thermostat. Enter the menu and press the knob
can lock the thermostat. Enter the menu and press the knob
Enter the menu and press the knob on the item OFF, the
Temperatur und kann durch das Drehen des Knopfs eingestellt werden
on the item LOc, the options ON/OFF appear. By turning the
The thermostat can be switched off by the option OFF.
options ON/OFF appear. By turning the knob select the
on the item LOc, the options ON/OFF appear. By turning the
(ein erneuter Knopfdruck bestätigt die Einstellung). Die Einstellung des
knob select the requested state and confirm by pressing.
Enter the menu and press the knob on the item OFF, the
requested state and confirm by pressing. Choosing ON
Choosing ON enables the function Lock, and blocks th
knob select the requested state and confirm by pressing.
The temperature is set manually regardless of the weekly
In this mode the temperature is set manually
Zeitparameters ist ähnlich, aber erfordert drei Schritte – für Tag,
options ON/OFF appear. By turning the knob select the
the thermostat choose the option OFF. Locking the the
schedule and is kept. Enter the menu and press the knob on
regardless of the weekly schedule. The
Stunde und Minuten.
requested state and confirm by pressing. Choosing ON
LCD by the
the item Man, the option ON (switched on) appears. By
temperature can be controlled in the range
symbol.
turning the knob select the requested state and confirm by
3.
SEt2 – Programmieren des wöchentlichen Heizprogramms
3.
between t Lo and t Hi.
Dieser Modus erlaubt es mittels Programmieren zwischen Tagesbetrieb
( ) und Nachtbetrieb ( ) zu wechseln. Das Heizprogramm kann für
The thermostat can be switched off by the option OFF.
The thermostat can be switched off by the option OFF.
jeden Tag einzeln, oder nur für Arbeitstage und nur für das Wochen-
Enter the menu and press the knob on the item OFF, the
Enter the menu and press the knob on the item OFF, the
ende, oder für alle Wochentage programmiert werden.
options ON/OFF appear. By turning the knob select the
Set1 - Temperature, date and time settings
In the Set1 menu the comfort temperature ( ), the economy
options ON/OFF appear. By turning the knob select the
This function protects the device against
To protect the thermostat against unwanted manipulation you
requested state and confirm by pressing. Choosing ON
temperature ( ), the temperature for Holiday mode ( ), and
enables the function OFF, and switches off the thermos
requested state and confirm by pressing. Choosing ON
can lock the thermostat. Enter the menu and press the knob
unwanted manipulation. The key-symbol on the
the data and time can be preset. Enter the menu Set1, and
In the Set1 menu the comfort temperature ( ), the economy
LCD by the text OFF. Although the thermostat has
Mo
Mo Tu We Th Fr
on the item LOc, the options ON/OFF appear. By turning the
PRG
In the Set1 menu the comfort tempe
LCD screen is an indicator for the status of the
temperature ( ), the temperature for Holiday mode ( ), and
on the LCD the symbol of the economy temperature starts
measures and detects the antifreeze temperature (see
knob select the requested state and confirm by pressing.
the data and time can be preset. Enter the menu Set1, and
thermostat enter the menu and choose the option OFF
lock mode.
temperature ( ), the temperature fo
on the LCD the symbol of the economy temperature starts
the thermostat will be unlocked.
Geben Sie das SEt2 Menü ein, scrollen Sie zur gewünschten Option
the data and time can be preset. E
symbol.
4.
durch das Drehen des Knopfs und geben Sie das Programmieren des
on the LCD the symbol of the eco
Zeitplans durch kurzen Knopfdruck ein (dies löscht die aktuelle
Programmeinstellung).
In Set1 menu the comfort ( ), economy ( ) as
In the Set1 menu the comfort temperature ( ), the economy
In the Set1 menu the comfort temperature ( ), the economy
The thermostat can be switched off by the option OFF.
temperature ( ), the temperature for Holiday mode ( ), and
temperature ( ), the temperature for Holiday mode ( ), and
well as the temperature during the holiday mode
Das Programmieren des Zeitplans wird
Enter the menu and press the knob on the item OFF, the
Mo
the data and time can be preset. Enter the menu Set1, and
the data and time can be preset. Enter the menu Set1, and
( ) can be initialised. Additional it's possible to fix
durch
options ON/OFF appear. By turning the knob select the
on the LCD the symbol of the economy temperature starts
on the LCD the symbol of the economy temperature starts
flashing. By turning the knob select the requested item (
vorgenommen, für welche die Tages-Heiz-
requested state and confirm by pressing. Choosing ON
specific times for the different mods.
knob the symbols for temperature start flashing and again
Operation
required temperature and by repeatedly pressing the kn
), by pressing the
kennzeichnende Skala wird am Grund der
Mo
last item serves for setting the current time. It indicates u
Anzeige dargestellt,
days of the week. By pressing you enter the current tim
entweder markiert oder nicht markiert sein.
year. Pressing gets it flashing, and by turning the kno
Sie markieren oder entmarkieren durch das
again it saves the setting and then you continue the sam
Drehen des Knopfs. Der Markierungs-
month, day, hour and minute. Then by pressing the knob
Mo
/Entmarkierungs-Modus
values are saved and the thermostat is back in the menu
and
economical
durch
In the Set1 menu the comfort temperature ( ), the economy
leave this menu.
temperature ( ), the temperature for Holiday mode ( ), and
programmierte Stunde wird angezeigt auf
3 – Locking
the
the data and time can be preset. Enter the menu Set1, and
der Anzeige (00 bis 23). Das Wechseln
4 – Alarm
tempe-
on the LCD the symbol of the economy temperature starts
zwischen
limits / loss
of
Modus wird erreicht durch Knopfdruck (dies
5 – Heating
gilt beim Drehen im Uhrzeigersinn, das
5.
Drehen
The heating program for switching the comfort and the
Uhrzeigersinn
be set for every single day independently (Mo - Mon
Entmarkierungs-Modus).
Wednesday, Th - Thursday, Fr - Friday, Sa - Saturday
split into working days and the weekend. There is on
settings for all days with no difference.
SEt2 – Weekly schedule setting
Programming always starts at 00 hrs. By turning the knob
clockwise, you can move through the time line. Press the
Programming always starts at 00 hrs. By turning the knob
knob at the point from which you want to start with the
Figure 2: 1 – Symbols for
comfort
and
economical
temperatures; 2 – The days of
the
week;
3 – Locking
thermostat;
4 – Alarm
rature
–
limits / loss
communication;
5 – Heating
ON / OFF; 6 – Holiday; 7 – Party;
8 – Heating times; 9 – Symbols
for showing temperature time
and texts; 10 – Low battery
Thermostat
eine
fixierte
durch
ungeachtet
Die
Mo
LOc – Locking the thermostat
To protect the thermostat against
can lock the thermostat. Enter th
on the item LOc, the options ON
knob select the requested state
symbol.
OFF – Switching off the thermostat
The thermostat can be switch
Enter the menu and press the
options ON/OFF appear. By tu
requested state and confirm b
Sa Su
Mo Tu We Th Fr Sa Su
PRG
PRG
), by pressing the
), by pressing the
Set1 - Temperature, date and time setting
In the Set1 menu the comfort tem
temperature ( ), the temperature
the data and time can be preset
on the LCD the symbol of the e
das
Markieren
der
), by pressing the
), by pressing the
erforderlich
jede
Stunde
wird
/
Symbole,
Markierungs-/Entmarkierungs-
), by pressing the
SEt2 – Weekly schedule setting
des
Knopfs
wechselt
immer
flash
knob
requ
last
days
year
aga
mon
valu
leav
the
tempe-
of
5.
The
be s
Wed
split
sett
Ente
is re
time
nigh
Temperatur-
des
gewünschte
6.
The
nece
by s
prog
pres
1 / 2
PRG
Zeitperioden
ist.
Die
kann
angezeigt
die
aktuell
gegen
den
zum
Advertisement
Table of Contents

Related Manuals for Herz 3 F800 55


Summary of Contents for Herz 3 F800 55
- Page 1 Choosing ON enables the function Lock, and blocks thermostat control. To unlock on the item LOc, the options ON/OFF appear. By turning the The Herz 3 F800 50 should be mounted in a dry indoor location. Locking the thermostat economical or comfort temperature economical or comfort temperature inside residential buildings.
- Page 2 ss programmable indoor thermostat Enrolling the thermostat Symbols on the LCD: mable indoor thermostat split into working days and the weekend. There is one more option - the same temperature can be set. well Locking the thermostat Install and connect the receiving unit to the heating appliance. If the receiver has The t Hi item is the upper limit to which the comfort settings for all days with no difference.
- Page 3 übergeben Sie es einer Sammelstelle für programming of the whole day has been finished, the elektronischen Abfall. Ausführliche ettings thermostat shows you OK. When the knob is pressed, all Information unter www.herz.eu Sektion settings are saved. Beratung. aving the service menu SEt3 – Service menu The service parameters can be pre-programmed here.
Need help?
Do you have a question about the 3 F800 55 and is the answer not in the manual?
Questions and answers