Advertisement
Quick Links
THIS DOCUMENT CONTAINS INFORMATION OF PROPRIETARY NATURE TO FENDER
MUSICAL INSTRUMENTS AND IS SUBMITTED TO YOU IN CONFIDENCE AND SHALL NOT
BE DISCLOSED OR TRANSMITTED TO OTHERS WITHOUT AUTHORIZATION FROM
FENDER MUSICAL INSTRUMENTS
DO NOT PRINT
Preliminary
ANY PART SUPPLIED FOR USE
IN ANY FENDER PRODUCT
MUST CONFORM TO THE
EUROPEAN RoHS DIRECTIVE.
COPYRIGHT -8/29/2018 -
FENDER MUSICAL
INSTRUMENTS CORP.
TITLEBLOCK REVISION: 2.1
THIS PAGE
05/29/2020 12:45:44 PM
PROJECT ENGINEER
PROJECT MANAGER
PRODUCT MANAGER
REV.
DESCRIPTION
DATE
TITLE
DATE
DATE
SIZE
A
REVISIONS
BY
FENDER MUSICAL INSTRUMENTS CORP.
RESEARCH & DEVELOPMENT
CORONA, CALIFORNIA U.S.A.
PART NUMBER
DATE
REV
Advertisement

Related Manuals for Fender Mustang Micro


Summary of Contents for Fender Mustang Micro
- Page 1 REVISIONS THIS DOCUMENT CONTAINS INFORMATION OF PROPRIETARY NATURE TO FENDER MUSICAL INSTRUMENTS AND IS SUBMITTED TO YOU IN CONFIDENCE AND SHALL NOT REV. DESCRIPTION DATE BE DISCLOSED OR TRANSMITTED TO OTHERS WITHOUT AUTHORIZATION FROM FENDER MUSICAL INSTRUMENTS DO NOT PRINT...
- Page 2 OWNER’S MANUAL...
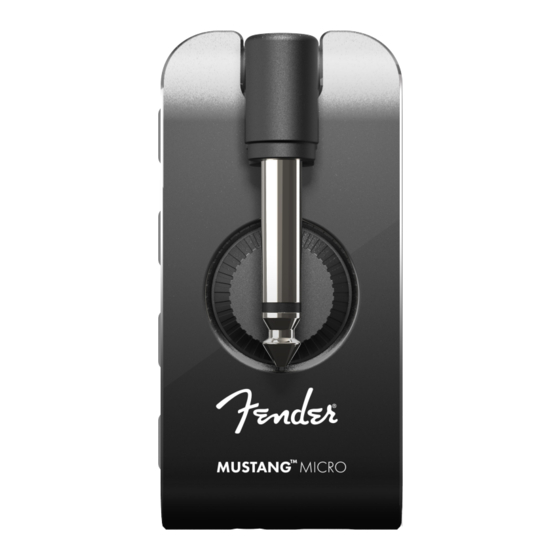
- Page 3 Mustang Micro is simple and intuitive. Plug into any popular instrument model using the rotating 1/4” jack. Choose an amp. Choose an effect and effect level. Set volume and tone controls. Turn Bluetooth on and stream music to play along with. Mustang Micro delivers it all straight to your earbuds, headphones or digi- tal recording software.
- Page 4 F. FX LEVEL BUTTONS/LED: Buttons (+/-) increase or decrease mix level of one particular parameter of the se- lected effect (page 6). LED color indicates effect level in use. G. POWER/BLUETOOTH SWITCH/LED: Three-position slider switch turns Mustang Micro on and off and acti- vates Bluetooth (page 7). LED indicates power/Bluetooth/charging status.
- Page 5 CONNECTING TO A GUITAR AND POWERING UP Connecting Mustang Micro to your guitar couldn’t be easier—simply rotate the 1/4” INPUT PLUG (A) out from the unit, and plug it into the guitar’s input jack. (image of MM plugged into a guitar) Slide the POWER SWITCH (G) to the center “on”...
- Page 6 CAB SIM CAB DESCRIPTION Cyan Studio Preamp None Based on a prized mid-’60s Fender classic with two 12” ceramic-mag- ’65 Twin + Compressor ’65 Twin net Jensen® speakers. Based on a popular mid-’60s Fender mainstay with a single 12” Green ’65 Deluxe...
- Page 7 SELECTING AN EFFECTS MODEL Mustang Micro has 12 different effects models to choose among (including combined effects). To choose an effect, use the +/- FX BUTTONS (E) on the side of the unit. FX LED color indicates effects model in use; LED will illuminate for 10 seconds and then extin- guish until any button is pressed.
-
Page 8: Master Volume
SETTING EFFECTS LEVEL For each Mustang Micro effects model, five different level settings of one particular effect parameter can be chosen using the +/- FX LEVEL BUTTONS (F) on the side of the unit. These consist of a middle default setting, two progressively weaker level settings (- and --) and two progressively stronger level settings (+ and ++). - Page 9 If power is on but no instrument input is detected for 15 minutes, Mustang Micro will automatically switch to a low-power “sleep mode. ” Press any button to “wake up” from sleep mode.
-
Page 10: Firmware Update
RECORDING Mustang Micro can be used as digital recording software output by using a USB cable to con- nect the USB-C jack (H) on the bottom of the unit to the USB port on the user’s Mac or PC. FIRMWARE UPDATE To perform a Mustang Micro firmware update, follow these three steps: 1. -
Page 11: Specifications
SPECIFICATIONS TYPE PR ____ SPEC 1 __________ SPEC 2 __________ SPEC 3 __________ SPEC 4 __________ SPEC 5 __________ SPEC 6 __________ DIMENSIONS AND WEIGHT Width: __” (__ cm) Height: __” (__ cm) Depth: __” (__ cm) Weight: __ lbs. (__ kg) Product specifications subject to change without notice. - Page 12 311 CESSNA CIRCLE CORONA, CALIF. 92880 U.S.A. AMPLIFICADOR DE AUDIO IMPORTADO POR: Fender Ventas de México, S. de R.L. de C.V. Calle Huerta #279, Int. A. Col. El Naranjo. C.P. 22785. Ensenada, Baja California, México. RFC: FVM-140508-CI0 Servicio al Cliente: 01(800) 7887395, 01(800) 7887396, 01(800) 7889433 Fender®...
Need help?
Do you have a question about the Mustang Micro and is the answer not in the manual?
Questions and answers
steps to make it work Mustang Micro
1. Connect to Guitar or Bass: Plug the Mustang Micro directly into your instrument using the 1/4" rotating input plug.
2. Power On: Turn on the Mustang Micro.
3. Select Settings:
- Choose an amp model.
- Select an effect and adjust the effect parameter.
- Set volume and tone controls.
4. Use Bluetooth (Optional): Enable Bluetooth to stream music for play-along practice or online instruction.
5. Monitor or Record:
- Use headphones or earbuds to listen.
- Connect via USB to a Mac, PC, or mobile device for recording.
6. Recording Setup:
- Connect the Mustang Micro to a computer using a USB-C cable.
- No external driver is needed for Apple computers.
- Use digital recording software and set the Mustang Micro as the input device.
7. Firmware Update (if needed):
- Connect the Mustang Micro to a computer via USB.
- Hold the AMP “-” button while turning the unit on.
This setup allows for practice, recording, and Bluetooth streaming.
This answer is automatically generated