Table of Contents
Advertisement
Available languages
Available languages
Quick Links
Advertisement
Chapters
Table of Contents

Subscribe to Our Youtube Channel
Related Manuals for Nature's Generator Power Pod


Summary of Contents for Nature's Generator Power Pod
- Page 1 Nature's Generator Power Pod User Manual...
-
Page 2: Table Of Contents
Using Your Nature's Generator Power Pod How to Recharge Your Nature's Generator Power Pod How to Install Your Nature's Generator Power Pod on Top of Nature’s Generator How to Connect Your Nature's Generator Power Pod to the Nature’s Generator How to Maintain and Store Your Nature's Generator Power Pod Troubleshooting Technical Specifications... -
Page 3: Important Safety Instructions
Do not use near flammable gases or fumes or other apparatus that produces large amounts of heat. Energy and burn hazard Nature's Generator Power Pod has a sealed lead acid battery, which can present a risk of burn from high current because of short-circuit. -
Page 4: Caution
Stop using the Nature's Generator Power Pod and refer servicing to qualified service personnel under the following conditions: • If liquid has been spilled or objects have fallen into your Nature's Generator Power Pod. • If your Nature's Generator Power Pod has been exposed to rain or water. -
Page 5: Introduction
Introduction Congratulations on your new Nature's Generator Power Pod, a great expansion to your Nature’s Generator. Unpacking Your Nature's Generator Power Pod 1. Nature's Generator Power Pod 2. Accessory Box 3. This user guide Visit Naturesgenerator.com for More Information... -
Page 6: Get To Know Your Nature's Generator Power Pod
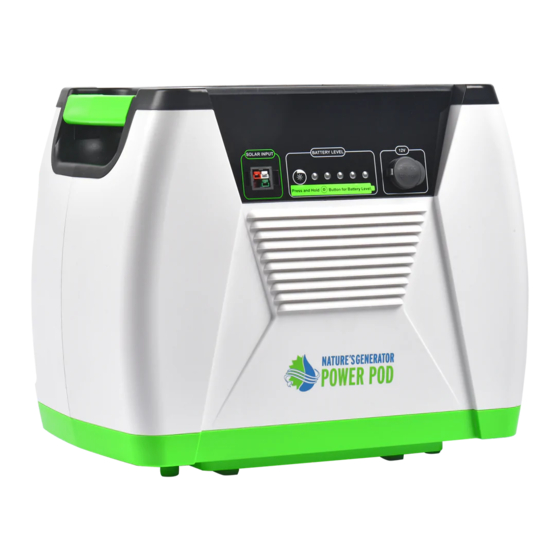
Get to Know Your Nature's Generator Power Pod Front Panel LED Light Button: Press it to show the battery charge l evel. LED Lights: When facing the front of the Nature's Generator Power Pod, from left to right: the first light will show green, which indicates a 20% charge. - Page 7 Top Compartment Expansion cable: 35 inch long expansion cable. Visit Naturesgenerator.com for More Information...
-
Page 8: Using Your Nature's Generator Power Pod
3. It takes about 15 to 20 hours to recharge Nature's Generator Power Pod if using 100 watt solar panel, and also depends on the the strength of the sunlight. -
Page 9: How To Install Your Nature's Generator Power Pod On Top Of Nature's Generator
How to Install Your Nature's Generator Power Pod on Top of Nature’s Generator What is in the accessory box 1. Brackets 2. Bolts and nuts A: 16mm x 2pcs B: 25mm x 2pcs 3. Power Pod Bar 4. Tools Visit Naturesgenerator.com for More Information... - Page 10 Installing Procedures Step 1: Lift Nature's Generator Power Pod and set it on top of Nature’s Generator. Make sure the feet of Nature's Generator Power Pod sit between the handle and top case of Nature’s Generator. Visit Naturesgenerator.com for More Information...
- Page 11 Step 2: Remove two bolts from Nature's Generator Power Pod with included the Allen wrench. Put these two bolts aside for now as they will be reused in step 5 below. Visit Naturesgenerator.com for More Information...
- Page 12 Step 3: Put the brackets on the cart. Bracket will match up with the shape of the cart frame. The curved part of the bracket should be placed on the back of the cart and the straight part of the bracket should be placed on the front of the cart.
- Page 13 Step 4: Use type A bolts and nuts to secure the two brackets. Use wrench to hold the nuts the Allen wrench to tighten the bolts. Visit Naturesgenerator.com for More Information...
- Page 14 Step 5: Place power pod on the top of Nature's Generator Power Pod. Insert the bolts that were removed in step 2 by the Allen wrench. Visit Naturesgenerator.com for More Information...
- Page 15 Step 6: Use the type B bolts and nuts to secure the brackets and power pod bar. Use the wrench to hold the nuts and the Allen wrench to tighten the bolts. Visit Naturesgenerator.com for More Information...
-
Page 16: How To Connect Your Nature's Generator Power Pod To The Nature's Generator
2. Check the cable connection on your Nature's Generator Power Pod and make sure it is properly connected. 3. If the LEDs light up, but are not running. It means Nature's Generator Power Pod is being fully charged by the solar panel or solar panel does not have high enough voltage to recharge the Nature's Generator Power Pod. -
Page 17: Technical Specifications
Technical Specifications Battery: Type: AGM Sealed Lead Acid Capacity: 100Ah (1200Wh) Self-discharge: Recommend to recharge it every 4 months Ports: 12V DC Port: up to 20A (240W max) Expansion Cable: 45 inches Charges: Solar Charger: 200watt Battery Level LED lights: 5 LED lights General: Dimensions: 18 x 12 x 15 in (47 x 30 x 38 cm) Operating temperature: 32-104 °F (0-40 °C) -
Page 18: Limited Warranty
Limited Warranty One Year Limited Warranty Huntkey USA Inc. warrants to you, the original purchaser of this new product, that the product shall be free of defects in the original manufacture of the material or workmanship for a period of one (1) year from the original date of your purchase of the product (“Warranty Period”). This product must be purchased from an authorized dealer and packaged with this warranty statement. - Page 19 What does the Warranty not Cover? This warranty does not cover: • Cosmetic damage • Damage due to force majeure, such as lightning strikes, fire, flood, etc.. • Accident • Misuse • Abuse • Negligence • Commercial use • Modification of any part of the product •...
- Page 20 Power Pod de Nature's Generator Manual del Usuario...
- Page 21 Usando el Power Pod de Nature's Generator Cómo Cargar el Power Pod Nature's Generator Cómo instalar el Power Pod de Nature's Generator encima del Nature's Generator Cómo conectar el Power Pod de Nature's Generator al Nature's Generator Cómo mantener y almacenar el Power Pod de Nature's Generator Solución de Problemas...
-
Page 22: Instrucciones De Seguridad Importantes
Verificación de seguridad Después de completar cualquier servicio o reparación de este dispositivo, pídele al técnico de servicio que realice las verificaciones de seguridad de rutina para determinar si el Power Pod de Nature's Generator está en las condiciones operativas correctas. -
Page 23: Precaución
Precaución Daños que requieren servicio Deja de usar el Power Pod de Nature's Generator y remite el servicio al personal de servicio calificado bajo las siguientes condiciones: • Si se ha derramado líquido o han caído objetos en el Power Pod de Nature's Generator. -
Page 24: Introducción
Introducción Felicidades por tu nuevo Power Pod de Nature's Generator, una gran adición a tu Nature's Generator. Desempacando el Power Pod de Nature's Generator 1. El Power Pod de Nature's Generator 2. Caja de accesorios 3. Esta Guía del Usuario... - Page 25 Conociendo el Power Pod de Nature's Generator Panel Frontal Botón de luz LED: Presiónalo para mostrar el nivel de la batería. Luces LED: Viendo de frente Power Pod de Nature's Generator, de izquierda a derecha: la primera luz se mostrará...
- Page 26 Compartimento Superior Cable de expansión: Cable de expansión de 35 pulgadas de largo. Visita naturesgenerator.com para obtener más información...
-
Page 27: Usando El Power Pod De Nature's Generator
Las luces LED permanecen encendidas cuando la batería está llena o no hay suficiente energía del panel solar. 3. Se tarda entre 10 y 15 horas en recargar el Power Pod de Nature's Generator si se usa un panel solar de 100 vatios, y también depende de la fuerza de la luz solar. -
Page 28: Cómo Instalar El Power Pod De Nature's Generator Encima Del Nature's Generator
Cómo instalar el Power Pod de Nature's Generator encima del Nature's Generator Qué está incluido en la caja de accesorios 1. Soportes 2. Tornillos y tuercas B: 25mm x 2 piezas A: 16mm x 2 piezas 3. Barra del Power Pod 4. - Page 29 Procedimientos de instalación Paso 1: levanta el Power Pod de Nature's Generator y colócalo sobre el Nature's Generator. Asegúrate de que los pies del Power Pod de Nature's Generator se encuentren entre el asa y la cubierta superior del Nature's Generator.
- Page 30 Paso 2: Retira los dos pernos del Power Pod de Nature's Generator con la llave Allen incluida. Deja a un estos dos tornillos por ahora, ya que se reutilizarán en el paso 5 a continuación. Visita naturesgenerator.com para obtener más información...
- Page 31 Paso 3: Coloca los soportes en el carrito. El soporte coincidirá con la forma del marco del carro. La parte curva del soporte debe colocarse en la parte posterior del carrito y la parte recta del soporte debe colocarse en la parte frontal del carrito. Visita naturesgenerator.com para obtener más información...
- Page 32 Paso 4: Utiliza tornillos y tuercas tipo A para asegurar los dos soportes. Usa una llave para sujetar las tuercas de la llave Allen para apretar los pernos. Visita naturesgenerator.com para obtener más información...
- Page 33 Paso 5: Coloca la cápsula de poder en la parte superior del Power Pod de Nature's Generator. Inserta los tornillos que se quitaron en el paso 2 con la llave Allen. Visita naturesgenerator.com para obtener más información...
- Page 34 Paso 6: Usa los pernos y tuercas tipo B para asegurar los soportes y la barra de la cápsula de poder. Usa la llave para sujetar las tuercas y la llave Allen para apretar los pernos. Visita naturesgenerator.com para obtener más información...
-
Page 35: Cómo Conectar El Power Pod De Nature's Generator Al Nature's Generator
Limpia el Power Pod de Nature's Generator con un paño suave y sin pelusas. Si el Power Pod de Nature's Generator está especialmente sucio, humedece un paño suave y sin pelusa en una solución de detergente débil, exprime el exceso de humedad del paño y luego limpia el gabinete... -
Page 36: Especificaciones Técnicas
Especificaciones técnicas Batería: Batería: Tipo: AGM Sealed Acid Capacidad: 100Ah (1200Wh) Autodescarga: Se recomienda recargar cada 4 meses Puertos: 12V Puerto DC: hasta 20A (240W máximo) Cable de Expansión: 35 pulgadas Cargas: Cargador solar: 200watt Luces LED del Nivel de la Batería: 5 luces LED General: Dimensiones: 18 x 12 x 15 pulgadas (47 x 30 x 38 cm) Temperatura de funcionamiento: 32-104 °... -
Page 37: Garantía Limitada
Los productos y las piezas reemplazadas bajo esta garantía se convierten en propiedad de Nature's Generator y no se te devuelven. Si se requiere el servicio de productos o piezas después del vencimiento del período de garantía, debes pagar todos los cargos por mano de obra y piezas. - Page 38 ¿Qué es lo que no cubre la garantía? Esta garantía no cubre: • Daños cosméticos • Daños debidos a causas de fuerza mayor, tal como rayos • Accidentes • Uso inapropiado • Abuso • Negligencia • Uso comercial • Modificación de alguna parte del Producto •...
- Page 39 V2.0 ENGLISH 19-0603 V1.0 ESPAÑOL 19-0618...
Need help?
Do you have a question about the Power Pod and is the answer not in the manual?
Questions and answers