
Related Manuals for AEG HGB64301UM


Summary of Contents for AEG HGB64301UM
- Page 1 HGB64301UM User Manual Istruzioni per l’uso Piano cottura USER MANUAL...
-
Page 2: Table Of Contents
11. ENVIRONMENTAL CONCERNS..............20 FOR PERFECT RESULTS Thank you for choosing this AEG product. We have created it to give you impeccable performance for many years, with innovative technologies that help make life simpler – features you might not find on ordinary appliances. Please spend a few minutes reading to get the very best from it. - Page 3 ENGLISH instructions in a safe and accessible location for future reference. 1.1 Children and vulnerable people safety This appliance can be used by children aged from 8 • years and above and persons with reduced physical, sensory or mental capabilities or lack of experience and knowledge if they have been given supervision or instruction concerning the use of the appliance in a safe way and understand the hazards involved.
-
Page 4: Safety Instructions
CAUTION: The cooking process has to be supervised. • A short term cooking process has to be supervised continuously. WARNING: Danger of fire: Do not store items on the •... - Page 5 ENGLISH 2.1 Installation • Make sure the appliance is installed correctly. Loose and incorrect WARNING! electricity mains cable or plug (if Only a qualified person must applicable) can make the terminal install this appliance. become too hot. • Use the correct electricity mains WARNING! cable.
- Page 6 2.3 Gas connection WARNING! Risk of fire and explosion CAUTION! When using a gas cylinder, • Fats and oil when heated can release always keep it on a flat flammable vapours. Keep flames or horizontal surface (with the heated objects away from fats and gas valve on top).
-
Page 7: Installation
ENGLISH window, or more effective ventilation, • Clean the appliance with a moist soft for example increasing the level of cloth. Use only neutral detergents. Do mechanical ventilation where present. not use abrasive products, abrasive • This appliance is for cooking cleaning pads, solvents or metal purposes only. - Page 8 Also be 2. Remove the caps and crowns of the careful when the hob is put together with burner. an oven. 3. With a socket spanner 7 remove the injectors and replace them with the...
- Page 9 ENGLISH a correct plug which can hold the load that the rating plate rates. Make sure that you install the plug in a correct socket. • Always use a correctly installed shockproof socket. • Make sure that there is an access to the mains plug after the installation.
- Page 10 650 mm 100 mm min. 55 mm 30 mm 480 mm 560 mm 1. Connect the green and yellow (earth) wire to the terminal which is marked with the letter 'E', or the earth symbol , or coloured green and yellow.
-
Page 11: Product Description
ENGLISH access in case a technical assistance intervention is necessary. Kitchen unit with door 30 mm min 20 mm (max 150 mm) 60 mm CAUTION! Install the appliance only on a worktop with flat surface. 3.8 Installing hob under the hood A. -
Page 12: Daily Use
5. DAILY USE WARNING! WARNING! Refer to Safety chapters. Be very careful when you use open fire in the kitchen environment. The 5.1 Burner overview manufacturer declines any responsibility in case of the flame misuse. 1. Push the control knob down and turn... -
Page 13: Hints And Tips
ENGLISH The spark generator can WARNING! start automatically when you Always turn the flame down switch on the mains, after or switch it off before you installation or a power cut. It remove the pans from the is normal. burner. 5.3 Turning the burner off To put the flame out, turn the knob to the off position... - Page 14 Food categories Recipes Burner type Power level Pasta - Rice - other Ce‐ Mushrooms rice Multi Crown reals Couscous Rapid Ravioli Auxiliary Soup - Legumes Vegetable soup Semi-rapid Mushrooms and pota‐ Semi-rapid toes soup Fish soup Multi Crown Meat...
-
Page 15: Care And Cleaning
ENGLISH The settings suggested in For an optimal delicate the cooking table should cooking use the auxiliary only serve as guidelines and burner. be adjusted depending on the rawness of food, its weight and quantity as well as on the type of gas used and the material of the cookware used to prepare the dish. -
Page 16: Troubleshooting
7.3 Removing pan supports The shape of pan supports and the amount of burners can be different in To keep the pan supports in the correct other models of the appliance. position, they are put on metal pins installed in the rear and lateral sides of 7.4 Cleaning the hob... - Page 17 ENGLISH 8.1 What to do if... Problem Possible cause Remedy There is no spark when you The hob is not connected to Check if the hob is correctly try to activate the spark gen‐ an electrical supply or it is connected to the electrical erator.
-
Page 18: Technical Data
8.3 Labels supplied with the accessories bag Stick the adhesive labels as indicated below: MOD. MOD. MOD. TYPE PROD.NO. IP20 PROD.NO. PROD.NO. SER.NO. 0049 SER.NO SER.NO 03 IT DATA DATA MADE IN ITALY A. Stick it on Guarantee Card and send C. -
Page 19: Energy Efficiency
NOMINAL GAS FLOW g/h POWER POWER kW MARK G30 28-30 G31 37 mbar mbar Multi Crown 3,55 Semi-rapid Auxiliary 0,33 10. ENERGY EFFICIENCY 10.1 Product information according to EU 66/2014 Model identification HGB64301UM Type of hob Built-in hob Number of gas burners... -
Page 20: Environmental Concerns
Left rear - Semi-rapid 57.1% Right rear - Semi-rapid 57.1% Energy efficiency per gas burner (EE gas burner) Left front - Multi Crown 57.3% Right front - Auxiliary not applicable Energy efficiency for the gas hob 57.2% (EE gas hob) -
Page 21: Informazioni Di Sicurezza
11. CONSIDERAZIONI SULL'AMBIENTE.............. 40 PER RISULTATI PERFETTI Grazie per aver scelto di acquistare questo prodotto AEG. Lo abbiamo creato per fornirvi prestazioni impeccabili per molti anni, grazie a tecnologie innovative che vi semplificheranno la vita - funzioni che non troverete sulle normali apparecchiature. - Page 22 Conservare sempre le istruzioni in un luogo sicuro e accessibile per poterle consultare in futuro. 1.1 Sicurezza dei bambini e delle persone vulnerabili Quest’apparecchiatura può essere usata da bambini a •...
- Page 23 ITALIANO Non tentare MAI di spegnere un incendio con • dell'acqua; spegnere l'apparecchiatura e coprire le fiamme ad es. con un coperchio o una coperta di protezione dal fuoco. AVVERTENZA: L'apparecchiatura non deve essere • alimentata tramite un commutatore esterno, come un timer, o collegata a un circuito regolarmente acceso e spento da un'azienda.
-
Page 24: Istruzioni Di Sicurezza
Utilizzare protezioni inadeguate aumenta il rischio di incidenti. 2. ISTRUZIONI DI SICUREZZA • La base dell'apparecchiatura può Questa apparecchiatura è adatta ai surriscaldarsi. Installare un pannello seguenti mercati: IT divisorio in materiale non infiammabile al di sotto dell'apparecchiatura per 2.1 Installazione... - Page 25 ITALIANO Contattare il nostro Centro Assistenza • La presente apparecchiatura non è autorizzato o un elettricista qualificato collegata a un dispositivo per per sostituire un cavo danneggiato. l’evacuazione dei residui di • I dispositivi di protezione da scosse combustione. Assicurarsi di collegare elettriche devono essere fissati in l'apparecchiatura conformemente alle modo tale da non poter essere...
- Page 26 • Non appoggiare o tenere liquidi o ambiente. materiali infiammabili, né oggetti • Non lasciare che sostanze acide, facilmente infiammabili come per esempio aceto, succo di sull’apparecchiatura, al suo interno o...
-
Page 27: Installazione
ITALIANO • Staccare la spina dall'alimentazione • Avvolgere i tubi del gas esterni. elettrica. • Tagliare il cavo elettrico dell'apparecchiatura e smaltirlo. 3. INSTALLAZIONE AVVERTENZA! Accertarsi che la pressione Fare riferimento ai capitoli del gas di alimentazione sulla sicurezza. dell'apparecchiatura sia conforme ai valori consigliati. - Page 28 3.3 Sostituzione degli AVVERTENZA! iniettori Prestare attenzione a non danneggiare la guarnizione. 1. Rimuovere i supporti pentole. Non usare attrezzi affilati per 2. Rimuovere gli spartifiamma e le toglierla. corone del bruciatore. 4. Con un cacciavite sottile, regolare la 3.
- Page 29 ITALIANO 3.5 Collegamento elettrico Accertarsi che il cavo sia di sezione idonea alla tensione e alla temperatura di • Verificare che la tensione nominale e esercizio. Il cavo di terra giallo/verde il tipo di corrente della rete di deve essere circa 2 cm più lungo del distribuzione corrispondano ai valori cavo di fase marrone (o nero).
- Page 30 B) staffe in dotazione ATTENZIONE! Installare l'apparecchiatura esclusivamente su un piano min. min. 650 mm 100 mm di lavoro dalla superficie min. piatta. 55 mm 30 mm 3.8 Installazione del piano di 480 mm 560 mm cottura sotto la cappa da...
-
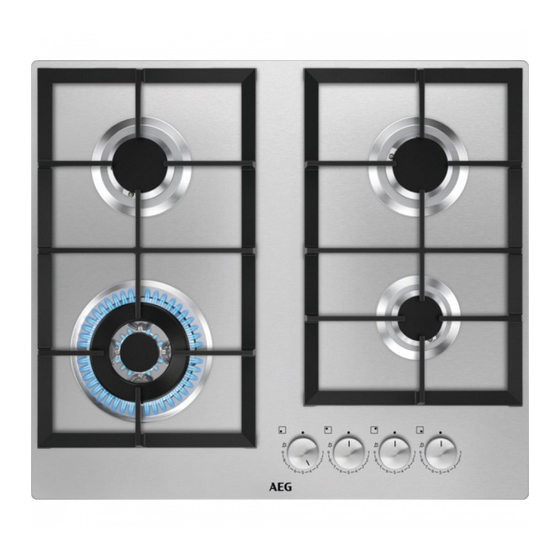
Page 31: Descrizione Del Prodotto
ITALIANO Mobile da incasso con forno oltre che per consentire una facile Il collegamento elettrico del piano di rimozione del forno dall'unità. cottura e del forno deve essere eseguito separatamente per questioni di sicurezza 4. DESCRIZIONE DEL PRODOTTO 4.1 Disposizione della superficie di cottura Bruciatore semirapido Bruciatore Multi Corona Bruciatore ausiliario... - Page 32 AVVERTENZA! Non tenere la manopola di regolazione premuta per oltre 15 secondi. Se il bruciatore non si accende dopo 15 secondi, rilasciare la manopola di regolazione, ruotarla in posizione di spento e attendere almeno 1 minuto prima di tentare di riaccendere il bruciatore.
-
Page 33: Consigli E Suggerimenti Utili
ITALIANO AVVERTENZA! Ridurre o spegnere sempre la fiamma prima di rimuovere le pentole dal bruciatore. 6. CONSIGLI E SUGGERIMENTI UTILI AVVERTENZA! ATTENZIONE! Fare riferimento ai capitoli Assicurarsi che i manici delle sulla sicurezza. pentole non si trovino al di sopra del bordo anteriore del 6.1 Pentole piano di cottura. - Page 34 Categorie cibo Ricette Tipo di bruciatore Livello di po‐ tenza Pasta - Riso - altri Ce‐ Riso ai funghi Multi corona reali Couscous Rapido Ravioli Ausiliario Zuppa - Verdura Zuppa vegetale Semi rapido Zuppa di funghi e pata‐ Semi rapido...
-
Page 35: Pulizia E Cura
ITALIANO Le impostazioni consigliate Per una cottura delicata nella tabella di cottura ottimale usare il bruciatore dovrebbero fungere solo da ausiliario. linee guida ed essere regolate a seconda della crudezza del cibo, del peso e della quantità oltre che del tipo di gas usato e del materiale dei tegami usati per preparare il pesce. - Page 36 7.3 Rimozione dei supporti pentole Per mantenere i supporti pentole nella posizione corretta, questi vengono posizionati su dei perni metallici ai lati e sul retro del piano di cottura. Per consentire una migliore pulizia, è possibile rimuovere i supporti pentole dal piano di cottura.
-
Page 37: Risoluzione Dei Problemi
ITALIANO • Per pulire gli elementi smaltati, lo elettrodo di metallo. Tenere questi spartifiamma e la corona, lavarli con componenti ben puliti per evitare acqua calda saponata e asciugarli difficoltà di accensione e controllare che i attentamente prima di sistemarli fori spartifiamma non siano ostruiti. -
Page 38: Dati Tecnici
8.3 Etichette fornite con il garanzia. Le istruzioni relative al Centro di Assistenza e alle condizioni di sacchetto degli accessori garanzia sono contenute nel libretto della garanzia. Attaccare le etichette adesive come indicato di seguito: MOD. MOD. MOD. TYPE PROD.NO. -
Page 39: Efficienza Energetica
MINIMA kW INIETTORE G30 28-30 G31 37 mbar mbar Multi corona 3,55 Semi rapido Ausiliario 0,33 10. EFFICIENZA ENERGETICA 10.1 Informazioni prodotto conformi alla norma UE 66/2014 Identificativo modello HGB64301UM Tipo di piano di cottura Piano di cottura da incasso... -
Page 40: Considerazioni Sull'ambiente
Numero di bruciatori a gas Posteriore sinistro - Semirapido 57.1% Efficienza energetica per bruciatore Posteriore destro - Semirapido 57.1% a gas Anteriore sinistro - Multi Corona 57.3% (EE gas burner) Anteriore destro - Ausiliario non applicabile Efficienza energetica per il piano di 57.2%... - Page 44 www.aeg.com/shop...
Need help?
Do you have a question about the HGB64301UM and is the answer not in the manual?
Questions and answers