Table of Contents
Advertisement
Quick Links
Advertisement
Table of Contents

Related Manuals for Philips NeoPix Ultra 2


Summary of Contents for Philips NeoPix Ultra 2
- Page 1 User Manual NeoPix Ultra 2 Home projector...
-
Page 2: Table Of Contents
Table of contents Introduction �������������������������������������������������3 7 Wireless projection �������������������������� 17 Dear customer ...............3 Screen mirroring for iOS devices and Mac ..17 About this user manual ..........3 Cast video for iOS devices........17 What’s in the box ............3 Screen mirroring for Android devices/Windows PC .................. -
Page 3: Introduction
Introduction What’s in the box NeoPix Ultra 2 projector (NPX642/INT) Remote control with 2 AAA batteries Dear customer A/C power adapter Thank you for purchasing this projector. Lens cover We hope you enjoy this product and the many Quick Start Guide... -
Page 4: General Safety Information
If the product gets too hot or emits smoke, shut it down immediately and unplug the power cable. Have your product checked by an authorised service centre. Keep the product Philips · NeoPix Ultra 2... -
Page 5: Power Supply
2 Overview Power supply Use only a power adapter which is certified for this product (see Technical data, page 23). Top view Check whether the mains voltage of the power supply matches the mains voltage available at the setup location. This product complies with the voltage type specified on the product. -
Page 6: Front View
Blue light indicates the remote control is Bluetooth paired with the projector and the on-screen pointer can be enabled. • Red light indicates the remote control works with the projector via infrared signals only, and the on-screen pointer cannot be enabled. Philips · NeoPix Ultra 2... -
Page 7: Initial Operation
3 Initial operation • Access and select an input source. • Quick access to settings options (e.g. picture and sound options). Placement Confirm a selection or entry. You can install the projector in four different configuration. Follow the guidelines below for •... -
Page 8: Connect Power Supply
Avoid deforming, dismantling or projection screen is required. charging the batteries. Avoid exposure to open fire and water. Replace empty batteries immediately. Remove the batteries from the remote control if not in use for long periods of time. Philips · NeoPix Ultra 2... -
Page 9: Power On And Setup
Open the battery compartment. Setting - Digital Zoom. Insert the supplied batteries (type AAA) Press / to adjust screen size with 60- with correct polarity (+/- ) indicated. 100% scaling range. Close the battery compartment. Screen height adjustment To adjust the screen height when placing the projector on the table, turn the angle adjustment knob located on the bottom of the projector. -
Page 10: Basic Setup
Android keyboard. options. Then select the icon on the upper right of the home screen and press OK, and go to Projection Image Setting - Keystone Advanced - Side (not Front). Philips · NeoPix Ultra 2... - Page 11 Use the "Philips AirMote" is displayed under the Navigation button on the remote control to paired devices list of the Bluetooth setting. select WiFi to access WiFi setting. Enable •...
-
Page 12: Use Home Screen
Use the buttons on the mouse for sure the projector is connected to Internet. navigation and selection. On the home screen, press once or more to display the shortcut options then use the Navigation buttons to select WiFi. Philips · NeoPix Ultra 2... -
Page 13: Connect To Playback Devices
5 Connect to Use Bluetooth Keyboard/mouse/ gamepad playback devices Pair your Bluetooth keyboard, mouse or gamepad with the projector as follows: Notice • On the home screen, press once or Make sure all devices are disconnected more to display the shortcut options. from the power outlet before establishing Use the Navigation button on the or changing any connections. -
Page 14: Connecting To A Computer Through Vga
(3.5 mm jack, or red and white jacks) on the external speakers. Or connect connector on the projector to headphones. • The speakers of the projector are deactivated automatically when the external speakers or headphones are connected to the projector. Philips · NeoPix Ultra 2... -
Page 15: Browse Storage Devices
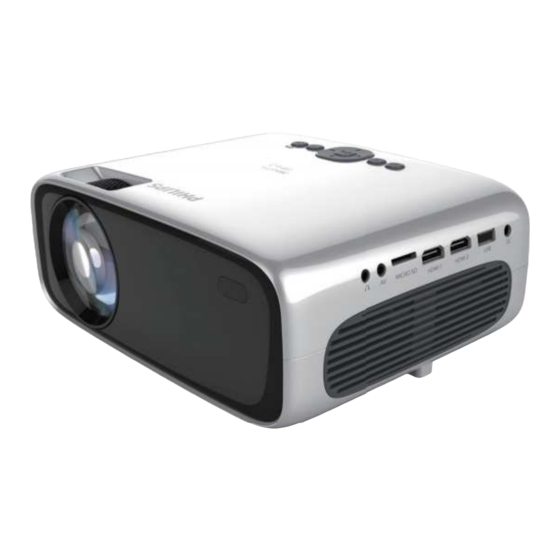
6 Browse storage devices MICRO SD HDMI 1 HDMI 2 Through the projector, you can access and play the pictures, audio and video files stored on the local storage and the networked device. Connect a USB storage device to the USB port on the projector. -
Page 16: Play Music From Storage Devices
OK to confirm. The control playback bar offers various functions, such as: • Pause/resume play • Select a previous/next playback file • Repeat and shuffle play • Select sound effect. Philips · NeoPix Ultra 2... -
Page 17: Wireless Projection
7 Wireless On the home screen, press once or more to display the shortcut options. Use the Navigation button on the remote control to projection access AirPlay to check whether AirPlay is enabled. Once enabled, you do not need to This projector allows you to wirelessly mirror enable it again later. -
Page 18: Change Settings
Picture settings Go to Projection Image Setting to access the following settings. • Gyro Horizon: Automatically calibrate the horizontal projection to the optimal. Perform calibration before you enable auto keystone correction (Auto Keystone) of the Philips · NeoPix Ultra 2... -
Page 19: Projector System Settings
Go to Application Setting to access the projector. following settings. • Select Philips OS when a USB storage • Check an app version, app size and cache device is connected or no other external size. -
Page 20: Service
USB flash drive during the update. Update SW through Internet Connect the projector to the Internet. On the home screen, press once or more to display the shortcut options. Then select icon on the upper right of the home Philips · NeoPix Ultra 2... -
Page 21: Troubleshooting
Update SW through USB Troubleshooting Check the latest software version on www. Power cycling philips.com/support. Find your product (model number: NPX642/INT), and locate If a problem occurs that cannot be corrected ‘Software and drivers’. with the instructions in this user manual, follow Download the software into the USB flash the steps given here. - Page 22 What to do if the projector does not work • Check that the HDMI cable is plugged in correctly. when connecting to a notebook PC? • Make sure that the notebook PC has been switched to projector display. Philips · NeoPix Ultra 2...
-
Page 23: Appendix
Aspect ratio ............16:9 Throw ratio .............. 1.4:1 Package content Screen size (diagonal)......20" to 65" NeoPix Ultra 2 projector, remote control with 2 AAA batteries, AC adapter, power cables (EU, Screen distance UK, US, CH), lens cover, Quick Start Guide ........80 cm - 200 cm / 24”- 60”... -
Page 24: Ce Statement
15�21 Information to the user� Any changes or modifications not expressly approved by the party responsible for compliance could void the user’s authority to operate the equipment. Philips · NeoPix Ultra 2... -
Page 25: Other Notice
Packaging: The presence of the logo (green other than those designated as original dot) means that a contribution is paid to an Screeneo Innovation SA/PHILIPS products or approved national organisation to improve Screeneo Innovation SA/PHILIPS approved package recovery and recycling infrastructures. - Page 26 PHILIPS and the PHILIPS’ Shield Emblem are registered trademarks of Koninklijke Philips N.V. used under license. This product was brought to the market by Screeneo Innovation SA., further referred to in this document as Screeneo Innovation SA., and is the manufacturer of the product.
Need help?
Do you have a question about the NeoPix Ultra 2 and is the answer not in the manual?
Questions and answers