Philips POCKET MEMO Manual
Hide thumbs
Also See for POCKET MEMO:
- User manual (33 pages) ,
- Quick reference manual (6 pages) ,
- Manual (184 pages)

Related Manuals for Philips POCKET MEMO


Summary of Contents for Philips POCKET MEMO
- Page 1 Register your product and get support at www.philips.com/dictation DPM8200 DPM8300 PSE8200 English Italiano Deutsch Français Nederlands Español...
-
Page 3: Table Of Contents
Connect the docking station Hands-free recording Install the recorder Hands-free transcription Insert and eject the memory card Use Philips SpeechExec software Charge the battery Advanced configuration Charge using the docking station Download recordings to the computer Charge using the USB cable... - Page 4 File information Record menu Profile Line-in Record notification beep Edit mode Encryption Voice activation Display menu Brightness Backlight Appearance Record lamp Language Device menu Beep Acoustic feedback Power save Date & time Slide switch Auto backspace Device information Format card USB charge USB audio Hands-free mode...
-
Page 5: Important
1 Important • Only Philips rechargeable Li-ion batteries ACC8100 (and no others) can be charged in the device. Replace only with the same or equivalent type. • Remove the battery from the device if it will not be used for an extended period of time. -
Page 6: Legal Restrictions On Recording
About this user manual temporarily discontinue use. • Do not use headphones while operating a motorized vehicle, cycling, or skateboarding, etc. You could be a hazard to your- You can find a quick overview of your device in the following self and other road users, and possibly be breaking the law. -
Page 7: Your Digital Dictation Recorder
2 Your digital dictation What's in the box recorder We are delighted that you have chosen a Philips device. Visit our website for comprehensive support such as user manuals, software downloads, warranty information and more: www . philips . com / dictaton. -
Page 8: Overview Of The Recorder
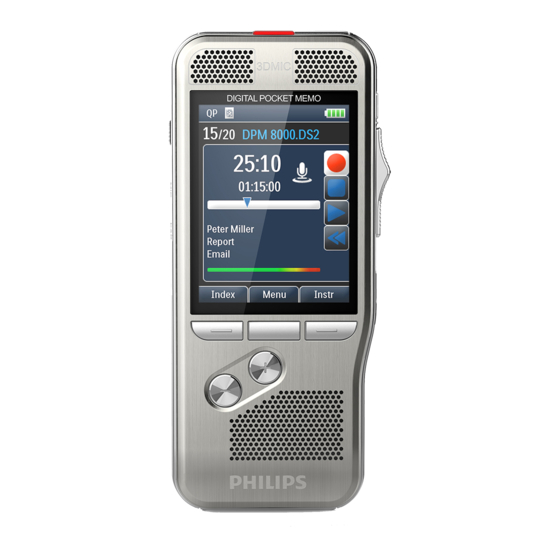
Overview of the recorder a LED light • Red: device is recording in overwrite or append mode • Green: device is recording in insert mode • Yellow: data is being transferred to/from the computer b Microphones c Screen d Function keys F1, F2, F3 •... -
Page 9: Start-Up Screen
File is encrypted ( Encryption, p. 25) A foot switch is connected to the docking station • The recorder can be used for hands-free recording and transcription by connecting the optional Philips foot switch to the docking station. Hands-free recording and transcription, p. 20. -
Page 10: Overview Of The Docking Station
Current file number/Total number of files • Micro USB connection for the computer e Foot switch connector • Connect the Philips foot control LFH2210 (optional) for hands-free dictation and transcription. Hands-free recording and transcription, p. 20. f Power supply connector... -
Page 11: Get Started
3 Get started Insert and eject the memory card The device operates with a SD/SDHC memory card and supports cards with storage capacities of up to 32 GB. Your recorder is packaged with a memory card already inserted and Caution formatted. -
Page 12: Charge The Battery
• Do not remove the memory card while recording is in progress. Data may be damaged or lost. Place the recorder in the docking station. • Philips uses approved industry standards for memory cards, X The recorder starts charging. but some brands may not be fully compatible with your device. -
Page 13: Initial Installation Process
Initial installation process Power-save mode The initial installation process starts when first using the device By default, the recorder will enter power-save mode after 5 or possibly if there has been a long interruption to the power minutes of inactivity. Lift up the recorder or press any button to supply. -
Page 14: Use Your Recorder
Voice-acti- vated recording, p. 18. The recorder can be used for hands-free recording by con- necting the optional Philips foot switch to the docking station. • For best recording results, speak clearly and keep the Hands-free recording, p. 20. -
Page 15: Add To Or Overwrite A Recording
Add to or overwrite a recording Note You can edit an existing recording by overwriting a part of it or inserting additional recording. • When you edit, the recording quality of the original While the recorder is in stop mode, press F2 (Menu) and recording is used. -
Page 16: Playback
Playback Adjusting playback speed Press F3 (Speed) repeatedly during playback to toggle Selecting a file between faster, slower and normal playback speed. X Playback speed becomes faster (+30 %) and the D icon Press + while the device is in stop mode. will be displayed. -
Page 17: Delete
Delete Delete all files You can delete individual files from the device, part of a file or While the recorder is in stop mode, press F2 (Menu) and delete all files simultaneously. select File > Delete all. Press F2 (OK) to confirm the deletion. Note X All files are deleted. -
Page 18: Use More Of Your Recorder
5 Use more of your Index marks recorder Index marks can be used to mark certain points in a recording as points of reference. To add an index mark, press F1 (Index) during recording or playback. Voice-activated recording X The index number is displayed for one second. X Up to 32 index marks can be set per file. -
Page 19: Assign Keywords (Author Id And Work Type)
Note tion bar. To locate an instructions, press + / – while the recorder is in • Keywords must first be set up with Philips Speech Exec software. Advanced configuration, p. 22. stop mode ( Selecting a file, p. 16). • By default, the keyword category Author with the To delete an instruction, follow the steps for deleting a part keywords ‘DPM8200’... -
Page 20: File Lock And Priority
The recorder can be used for hands-free recording and tran- ing accidentally deleted and mark them as finished. With the scription by connecting the optional Philips foot pedal LFH2210 priority-setting option, urgent recordings can be prioritized to the docking station. In this operating mode, you can control during transcription. -
Page 21: Hands-Free Transcription
• T (Toggle) position: Press and release the right pedal to start recording. For short pauses, press the right pedal Connect the optional Philips foot pedal to the food pedal of the foot pedal again. To continue recording, press the... -
Page 22: Use Philips Speechexec Software
Connect the recorder to the computer using the USB cable Advanced configuration or the docking station. Philips SpeechExec software provides a wizard that guides users By default, the recordings on the recorder will be down- through the configurations and settings of the device. The wizard... -
Page 23: Settings
Slide switch Note Auto backspace Device information • Some settings, such as defining keywords, file encryption or Format card device lock, are available only through Philips SpeechExec USB charge software. Advanced configuration, p. 22. USB audio Hands-free mode Menu list... -
Page 24: File Menu
Keywords can be controlled by the integrated motion sensor. The motion used to identify recordings and automatic file routing in Philips sensor senses when the device is placed on the desk SpeechExec software. Assign keywords (author ID and work or held in the hand and sets the microphone mode type), p. -
Page 25: Line-In
• All recording profiles can be customized with Philips • Encrpyted files can only be played with Philips Speech Exec SpeechExec software. Advanced configuration, p. 22. software. -
Page 26: Display Menu
Set the date and time, p. 13 up screen, p. 9. Slide switch Record lamp You can customize the functionality of the slide switch. By default, Enable/disable the LED light. the slide switch is set to Philips. Position Interna- Philips Philips German... -
Page 27: Device Information
Hands-free mode The recorder can be used for hands-free recording and tran- scription by connecting the optional Philips foot switch LFH2210 to the docking station. In this operating mode, you can control the recording and playback functions with the foot switch. -
Page 28: Service
Failure to properly update the firmware may result in the device malfunctioning. • Press F1 (Back) to cancel the operation. • Firmware updates can be performed automatically via Philips SpeechExec software. Use Philips SpeechExec software, p. 22. -
Page 29: Troubleshooting
Troubleshooting Problem Possible cause/solution The device does not turn on • Battery is empty. X Recharge the battery. • The device is turned off. X Turn the power on. Power on/off, p. 12. • The device is in power-save mode. X Lift up the recorder or press any button to reactivate it. -
Page 30: Technical Data
• Speaker output power: 200 mW • Docking connector • Memory card slot Power • Battery type: Philips rechargeable Li-ion battery ACC8100 • Battery lifetime: up to 30 hours of recording (QP mode), up Display • Type: color TFT to 200 hours standby •... - Page 33 Freihändige Aufnahme und Transkription Anschließen der Dockingstation Freihändige Aufnahme Installieren des Diktiergerätes Freihändige Transkription Einsetzen und Auswerfen der Speicherkarte Philips SpeechExec verwenden Aufladen der Batterie Weitergehende Konfiguration Aufladen über die Dockingstation Aufnahmen auf den PC herunterladen Aufladen über das USB-Kabel...
- Page 34 Dateiinformation Aufnahmemenü Profil Line-in Signalton bei Aufnahme Bearbeitungsmodus Verschlüsselung Sprachaktivierung Anzeigemenü Helligkeit Beleuchtung Erscheinungsbild Aufnahmelampe Language Gerätemenü Signalton Akust. Rückmeldung Energiesparmodus Datum & Uhrzeit Schiebeschalter Autom. Rücksprung Geräteinformation Karte formatieren USB-Laden USB-Audio Freihandmodus Diagnosedatei Werkseinstellungen Rauschminderung 7 Service Geräteinformation anzeigen Speicher formatieren Firmware aktualisieren Fehlerbehebung...
-
Page 35: Wichtig
Handbuch beschrieben werden. Befolgen Sie alle • Halten Sie die Batterie trocken. Sicherheitsanweisungen, um den ordnungsgemäßen Betrieb • Im Gerät dürfen ausschließlich Philips Li-Ion-Akkus ACC8100 des Gerätes sicherzustellen. Der Hersteller übernimmt keine (keine anderen) geladen werden. Ersetzen Sie die Batterie nur Haftung für Schäden, die sich aus der Nichteinhaltung der... -
Page 36: Gehörschutz
Gehörschutz Über dieses Benutzerhandbuch Halten Sie bei Verwendung der Kopfhörer folgende Richtlinien ein: Auf den folgenden Seiten finden Sie eine kurze Übersicht • Stellen Sie die Lautstärke moderat ein und hören Sie nicht zu der Bedienungselemente und Anschlüsse Ihres Gerätes. Eine lange über Kopfhörer. -
Page 37: Ihr Digitales Diktiergerät
2 Ihr digitales Diktiergerät Packungsinhalt Wir freuen uns, dass Sie sich für ein Gerät von Philips entschieden haben. Auf unserer Website finden Sie umfangreiche Informationen wie Benutzerhandbücher, Software-Downloads, Garantieinformationen und vieles mehr: www . philips . com / dictaton. Produkt-Highlights •... -
Page 38: Übersicht Der Bedienungselemente Und Anschlüsse
Übersicht der Bedienungselemente und a LED • Rot: Gerät nimmt im Überschreib- oder Anhängemodus auf Anschlüsse • Grün: Gerät nimmt im Einfügemodus auf • Gelb: Daten werden an den oder vom Computer übertragen b Mikrofone c Bildschirm d Funktionstasten F1, F2, F3 •... -
Page 39: Displaysymbole
S. 45) Datei ist verschlüsselt ( Verschlüsselung, S. 55) Ein Fußschalter ist an die Dockingstation angeschlossen • Durch den Anschluss eines optionalen Philips Fußschalters an die Dockingstation kann das Diktiergerät für eine freihändige Aufnahme oder Transkription verwendet werden. Freihändige Aufnahme und Transkription, S. 50. -
Page 40: Übersicht Der Dockingstation
• Micro-USB-Anschluss für den Computer q Anzeige der Anweisungen ( Anweisungen, S. 49) e Fußschalter-Anschluss r Positionsanzeiger der aktuellen Wiedergabe/Aufnahme • Hier können Sie den Philips Fußschalter LFH2210 s Dateilänge (optional) für freihändiges Diktieren und Transkriptionen anschließen. Freihändige Aufnahme und Transkription, t Aktuelle Aufnahme-/Wiedergabedauer S. -
Page 41: Erste Schritte
3 Erste Schritte Einsetzen und Auswerfen der Speicherkarte Das Gerät kann mit SD/SDHC-Speicherkarten verwendet Vorsicht werden. Es werden Karten mit einer Kapazität von bis zu 32 GB unterstützt. Bei Ihrem Diktiergerät ist eine Speicherkarte im • Vergewissern Sie sich, dass Sie die Sicherheitsanweisungen Lieferumfang enthalten, die bereits eingesetzt und formatiert ist. -
Page 42: Aufladen Der Batterie
Stellen Sie das Diktiergerät in die Dockingstation. werden oder verloren gehen. X Die Batterie im Diktiergerät wird geladen. • Philips wendet anerkannte Industriestandards für Speicherkarten an, doch sind die Produkte einiger Marken möglicherweise nicht mit Ihrem Gerät kompatibel. Das Hinweise Verwenden einer nicht kompatiblen Speicherkarte kann das Gerät oder die Speicherkarte und die darauf gespeicherten... -
Page 43: Erstinstallation
Erstinstallation Energiesparmodus Die Erstinstallation startet bei der ersten Verwendung des Standardmäßig wechselt das Gerät nach fünf Minuten Inaktivität Gerätes oder möglicherweise nach einer langen Unterbrechung in den Energiesparmodus. Durch Anheben des Gerätes oder der Stromversorgung. Die Eingaben zu Datum und Uhrzeit Drücken einer beliebigen Taste wird das Gerät wieder aktiviert. -
Page 44: Verwenden Des Diktiergerätes
Aufnahme, S. 48. Speicherkarte oder schließen Sie das Gerät an einen Computer an, um die Dateien zu übertragen. Durch den Anschluss eines optionalen Philips Fußschalters an die Dockingstation kann das Diktiergerät für eine freihändige Auf- nahme verwendet werden. Freihändige Aufnahme, S. 50. -
Page 45: Hinzufügen Zu Oder Überschreiben Einer Aufnahme
Hinzufügen zu oder Überschreiben einer Aufnahme Um die Aufnahme zu beenden, schieben Sie den Schiebeschalter in die Position H PAUSE und drücken Sie Sie können eine bestehende Aufnahme bearbeiten, indem Sie auf die Taste AUFNAHME/STANDBY. einen Abschnitt überschreiben oder eine weitere Aufnahme einfügen. -
Page 46: Wiedergabe
Wiedergabe Tipp Auswählen einer Datei • Schalten Sie die Funktion ‚Rauschminderung‘ für eine höhere Wiedergabequalität ein. Die Rauschminderung reduziert Drücken Sie im Stoppmodus auf +. Hintergrundgeräusche und verbessert die Verständlichkeit X Der Positionsanzeiger springt zum Ende einer Datei. von leiseren Stimmen. ( Rauschminderung, S. 57). X Der Positionsanzeiger springt zum Anfang der nächsten Datei. -
Page 47: Löschen
Löschen eines Abschnitts einer Datei Tipp Drücken Sie im Stoppmodus auf F2 (Menü) und wählen Sie • Der Wiedergabeton kann während der Schnellsuche ein- Datei > Abschnitt löschen. oder ausgeschaltet sein. So können Sie sich die Aufnahme Nutzen Sie die Funktionen Wiedergabe, Vorlauf oder beim Vor- oder Rücklauf anhören. -
Page 48: Weitergehende Funktionen
5 Weitergehende Indexmarkierungen Funktionen Indexmarkierungen können verwendet werden, um bestimmte Stellen einer Aufnahme als Referenzpunkte zu markieren. Um eine Indexmarkierung hinzuzufügen, drücken Sie während der Aufnahme oder Wiedergabe auf F1 (Index). Sprachaktivierte Aufnahme X Die Indexnummer wird eine Sekunde lang angezeigt. X Pro Datei können bis zu 32 Indexmarkierungen gesetzt Bei einer sprachaktivierten Aufnahme startet die Aufnahme, werden. -
Page 49: Schlüsselwörter Zuweisen (Autoren-Id Und Arbeitstyp)
Informationen, die für das Verständnis der Aufnahme wichtig Die Schlüsselwörter können zur Identifizierung von Aufnahmen sind, aber nicht schriftlich festgehalten werden. und für das automatische Datei-Routing der Software Philips SpeechExec verwendet werden. Drücken Sie während der Aufnahme auf F3 (Anweisungen) und halten Sie die Taste gedrückt. -
Page 50: Dateisperre Und Priorität
Um Änderungen an der Datei vorzunehmen, heben Sie die Sperre durch Drücken der Schaltfläche EOL auf. Hinweise • Die Software Philips SpeechExec kann so konfiguriert Stellen Sie sicher, dass die Dockingstation NICHT per USB werden, dass nur als abgeschlossen gekennzeichnete Dateien mit einem Computer verbunden ist. -
Page 51: Freihändige Transkription
• N (Neutral): Für die Aufnahme treten Sie auf das rechte stellen Sie das Diktiergerät in die Dockingstation. Pedal und halten es gedrückt. Wenn Sie den Fuß vom X Das Symbol wird in der Informationsleiste am oberen Pedal heben, wird die Aufnahme pausiert. Bildschirmrand angezeigt. -
Page 52: Philips Speechexec Verwenden
Hinweis um den Assistenten zu öffnen und befolgen Sie die angezeigten Anweisungen, um die gewünschten Einstellungen • Sie können im Menü „Einstellungen“ der Philips SpeechExec- vorzunehmen. Software oder mit Hilfe des Konfigurationsassistenten Klicken Sie auf die Schaltfläche Fertig stellen, um den festlegen, wie und welche Dateien nach dem Anschluss des Diktiergerätes an einen Computer heruntergeladen werden. -
Page 53: Einstellungen
Datum & Uhrzeit Schiebeschalter Hinweis Autom. Rücksprung Geräteinformation • Einige Einstellungen (für Schlüsselwörter, die Karte formatieren Dateiverschlüsselung oder Gerätesperre) sind nur über die USB-Laden Philips SpeechExec-Software möglich. Weitergehende USB-Audio Konfiguration, S. 52. Freihandmodus Diagnosedatei Menüliste Werkseinstellungen Rauschminderung Datei Datei löschen Abschnitt löschen... -
Page 54: Dateimenü
Autorname oder ein Arbeitstyp zugewiesen werden. Die › Besprechung: hohe Empfindlichkeit Schlüsselwörter können zur Identifizierung von Aufnahmen › Diktat: mittlere Empfindlichkeit und für das automatische Datei-Routing der Software Philips › Persönlich: niedrige Empfindlichkeit SpeechExec verwendet werden. Schlüsselwörter zuweisen » Mikrofonmodus: Der Mikrofonmodus kann über den (Autoren-ID und Arbeitstyp), S. -
Page 55: Line-In
Persönlich; Mikrofonmodus auf dem Handgebrauch: Gerichtet; Mikrofonmodus auf demTisch: 360 Grad). Hinweis Hinweis • Die Verschlüsselung muss in der Software Philips SpeechExec eingestellt werden. Weitergehende • Alle Aufnahmeprofile können mit der Philips SpeechExec- Konfiguration, S. 52. Software benutzerdefiniert angepasst werden. -
Page 56: Anzeigemenü
Wählen Sie einen Display-Modus: Modern (Standard), Uhrzeit, S. 43 Klassisch. Displaysymbole, S. 39. Schiebeschalter Aufnahmelampe Sie können die Funktionalität des Schiebeschalters Aktivieren/deaktivieren Sie die LED. benutzerdefiniert anpassen. Standardmäßig ist der Schiebeschalter auf Philips eingestellt. Position Internati- Philips Philips Deutsch Language onal classic* Stellen Sie die Sprache für die Benutzeroberfläche des Gerätes... -
Page 57: Autom. Rücksprung
Autom. Rücksprung Freihandmodus Schieben Sie den Schiebeschalter kurz in die Position Durch den Anschluss eines optionalen Philips Fußschalters B Rücklauf, um die konfigurierte Anzahl an Sekunden in der LFH2210 an die Dockingstation kann das Diktiergerät für eine Aufnahme zurückzuspringen: Aus (Standard), 1 sek, 2 sek, freihändige Aufnahme oder Transkription verwendet werden. -
Page 58: Service
Wird das Update der Firmware nicht ordnungsgemäß durchgeführt, kann dies zu Gerätestörungen führen. Tipp • Drücken Sie auf F1 (Zurück), um den Vorgang Tipp abzubrechen. • Firmware-Updates können mit der Philips SpeechExec- Software automatisch durchgeführt werden. Philips SpeechExec verwenden, S. 52. -
Page 59: Fehlerbehebung
Fehlerbehebung Problem Mögliche Ursache / Lösung Das Gerät lässt sich nicht einschalten • Die Batterie ist leer. X Laden Sie die Batterie auf. • Das Gerät ist ausgeschaltet. X Schalten Sie es ein. Ein-/Ausschalten, S. 42. • Das Gerät befindet sich im Energiesparmodus. X Durch Anheben des Gerätes oder Drücken einer beliebigen Taste wird das Gerät wieder aktiviert. -
Page 60: Technische Daten
• USB: Highspeed USB 2.0 • Ausgangsleistung des Lautsprechers: 200 mW • Dockingstation-Anschluss • Speicherkarteneinschub Stromversorgung • Batterietyp: Philips Li-Ion-Akku ACC8100 • Batterielebensdauer: bis zu 30 Stunden Aufnahme (im Modus Display • Typ: Farbe TFT QP), bis zu 200 Stunden im Standby-Modus • Bildschirmdiagonale: 6,1 cm •... - Page 63 Handenvrij opnemen en transcriberen 3 Aan de slag Handenvrij opnemen Docking station aansluiten Handenvrij transcriberen Recorder installeren Philips SpeechExec-software gebruiken Geheugenkaart plaatsen en verwijderen Geavanceerde configuratie Batterij opladen Opnames downloaden op de computer Opladen met het docking station 6 Instellingen...
- Page 64 Opnamemenu (Record) Profiel (Profile) Lijningang (Line-in) Pieptoon start opname (Record notification beep) 87 Bewerkingsmodus (Edit mode) Versleuteling (Encryption) Stemactivering (Voice Activation) Schermmenu (Display) Helderheid (Brightness) Achtergrondverlichting (Backlight) Uiterlijk (Appearance) Opnamelampje (Record lamp) Language Apparaatmenu (Device) Piep (Beep) Akoestische feedback (Acoustic feedback) Energiebesparing (Power save) Datum &...
-
Page 65: Belangrijk
• In dit apparaat kunnen alleen de oplaadbare lithium-ion- kershandleiding zijn beschreven. Voor een goede werking van batterijen ACC8100 van Philips (en geen andere) worden het apparaat moet u alle veiligheidsinstructies in acht nemen. opgeladen. Deze mogen uitsluitend worden vervangen door De fabrikant kan niet aansprakelijk worden gesteld voor schade dezelfde of vergelijkbare batterijen. -
Page 66: Gehoorbescherming
Over deze gebruikershandleiding Gehoorbescherming Bij gebruik van hoofdtelefoons moet u de volgende richtlijnen Op de volgende bladzijden vindt u beknopte informatie over uw aanhouden: apparaat. Gedetailleerde beschrijvingen vindt u in de volgende • Stel het volume niet te hoog in en luister niet te lang met een hoofdstukken van deze gebruikershandleiding. -
Page 67: Uw Digitale Dicteerrecorder
2 Uw digitale Inhoud van de verpakking dicteerrecorder Het doet ons genoegen dat u voor een Philips-apparaat hebt gekozen. U kunt op onze website terecht voor uitgebreide ondersteuning in de vorm van handleidingen, software- downloads, informatie over uw garantie en meer: www.philips.com/dictation. -
Page 68: Overzicht Van De Recorder
Overzicht van de recorder a Ledlampje • Rood: apparaat neemt op in overschrijf- of toevoegmodus • Groen: apparaat neemt op in invoegmodus • Geel: gegevensoverdracht tussen het apparaat en de computer b Microfoons c Scherm d Functietoetsen F1, F2, F3 •... -
Page 69: Startscherm
Er is een voetschakelaar aangesloten op het docking station • De recorder kan worden gebruikt voor handenvrij opnemen en transcriberen door de optionele Philips- voetschakelaar aan te sluiten op het docking station. Handenvrij opnemen en transcriberen, blz. 81. Oplaadniveau van de batterij •... -
Page 70: Overzicht Van Het Docking Station
79) • Micro-USB-aansluiting voor de computer q Instructie-indicator ( Instructies, blz. 80) e Connector voor de voetschakelaar • Sluit het Philips voetpedaal LFH2210 (optioneel) aan r Positie-indicator van het huidige afspeel-/opnamebestand voor handenvrij dicteren en transcriberen. Handenvrij s Bestandslengte opnemen en transcriberen, blz. 81. -
Page 71: Aan De Slag
3 Aan de slag Geheugenkaart plaatsen en verwijderen Het apparaat werkt met een SD-/SDHC-geheugenkaart en ondersteunt kaarten met een opslagcapaciteit tot 32 GB. Bij het verpakken van uw recorder is er een geformatteerde geheugen- Let op kaart in geplaatst. • Lees alle veiligheidsinstructies voordat u uw recorder Plaatsen en verwijderen van een geheugenkaart: aansluit en installeert. -
Page 72: Batterij Opladen
Plaats de recorder in het docking station. beschadigen of kwijtraken. X De recorder begint met opladen. • Philips maakt gebruik van goedgekeurde industriële normen voor geheugenkaarten, maar sommige merken zijn mogelijk niet geheel compatibel met uw apparaat. Het gebruik Opmerkingen... -
Page 73: Eerste Installatie
Eerste installatie Energiebesparingsmodus De eerste installatie start wanneer u het apparaat voor het De recorder schakelt na 5 minuten inactiviteit standaard over eerst gebruikt of als de stroomtoevoer langdurig onderbroken is naar de energiebesparingsmodus. Til de recorder op of druk geweest. -
Page 74: Uw Recorder Gebruiken
De recorder kan worden gebruikt voor handenvrij opnemen door de optionele Philips-voetschakelaar aan te sluiten op het docking station. Handenvrij opnemen, blz. 81. Let op • Voor de beste resultaten, spreekt u duidelijk en houdt u de microfoon op een afstand van ongeveer 5 tot 15 centimeter •... -
Page 75: Opname Toevoegen Of Overschrijven
Opname toevoegen of overschrijven Om te stoppen met opnemen beweegt u de schuifschakelaar naar de H PAUSE-stand en drukt u op de REC STAND- U kunt een bestaande opname bewerken door een deel ervan BY-knop. te overschrijven of door een extra opname in te voegen. Terwijl de recorder in de stopmodus staat, drukt u op Opmerking F2 (Menu) en selecteert u Record (opnemen) >... -
Page 76: Afspelen
Afspelen Een bestand selecteren • Aanzetten van de ruisverminderingsfunctie voor een betere afspeelkwaliteit. Ruisvermindering vermindert Druk op + terwijl het apparaat in de stopmodus staat. het achtergrondgeluid en verbetert de hoorbaarheid van X De positie-indicator springt naar het einde van een zachtere stemmen. -
Page 77: Verwijderen
Verwijderen Opmerking U kunt afzonderlijke bestanden, een deel van een bestand of alle • Als het bestand indexmarkeringen of opgenomen bestanden tegelijk van het apparaat verwijderen. instructies bevat, stopt het apparaat tijdens het vooruit- of terugspoelen 1 seconde bij de indexmarkering of instructie. Opmerkingen •... -
Page 78: Alle Bestanden Verwijderen
Terwijl de recorder in de stopmodus staat, drukt u op F2 (Delete) (verwijderen) om de verwijdering van het gemarkeerde deel te bevestigen. Alle bestanden verwijderen Terwijl de recorder in de stopmodus staat, drukt u op F2 (Menu) en selecteert u File (bestand) > Delete all (alles verwijderen). -
Page 79: Meer Uit Uw Recorder Halen
5 Meer uit uw recorder Indexmarkeringen halen Indexmarkeringen kunnen worden gebruikt om bepaalde punten in een opname te markeren als referentiepunt. Druk tijdens het opnemen of afspelen op F1 (Index) om een indexmarkering toe te voegen. Opnemen met stemactivering X Het indexnummer wordt één seconde getoond. X Per bestand kunt u tot 32 indexmarkeringen plaatsen. -
Page 80: Trefwoorden Toewijzen (Auteursnaam En Werktype)
X De instructie wordt weergegeven als een blauwe lijn op Opmerking de bestandspositiebalk. • Trefwoorden moeten eerst worden ingesteld met de Philips Om een instructie terug te vinden, drukt u op + / – terwijl de SpeechExec-software. Geavanceerde configuratie, blz. 83. -
Page 81: Bestandsvergrendeling En Prioriteit
De recorder kan worden gebruikt voor handenvrij opnemen belangrijke bestanden per ongeluk worden verwijderd en ze als door de optionele Philips-voetpedaal LFH2210 aan te sluiten op voltooid markeren. Met de prioriteitsinstelling kunnen urgente het docking station. In deze bedieningsmodus kunt u de opname- opnames tijdens het transcriberen prioriteit krijgen. -
Page 82: Handenvrij Transcriberen
4. (transcriberen). Voor snel terugspoelen drukt u op het linkerpedaal van de Sluit het optionele Philips-voetpedaal aan op de voetpedaal- voetpedaal en houdt u het ingedrukt. Wanneer u op de poort aan de achterkant van het docking station en plaats gewenste plaats bent aangekomen, laat u het pedaal los. -
Page 83: Philips Speechexec-Software Gebruiken
Sluit de recorder aan op uw computer met de USB-kabel of het docking station. Start de Philips SpeechExec Pro-software en klik op Instel- lingen > Algemene instellingen op de menubalk en selecteer DPM-configuratie > DPM-wizard uit de lijst op het linkerpaneel. -
Page 84: Opnames Downloaden Op De Computer
U kunt het eenvoudig met elk programma openen, net als een gewoon station. U kunt de Philips SpeechExec-software gebruiken voor automa- tisch downloaden, converteren en routeren van bestanden. Maak een opname met de recorder. -
Page 85: Instellingen
Device information (apparaatinformatie) • Sommige instellingen, zoals het instellen van trefwoorden, Format card (kaart formatteren) bestandsversleuteling en apparaatvergrendeling, zijn USB charge (USB-opladen) alleen toegankelijk via de Philips SpeechExec-software. USB audio Geavanceerde configuratie, blz. 83. Hands-free mode (handenvrije modus) Diagnosis file (diagnosebestand) -
Page 86: Bestandsmenu (File)
› Dictate (dicteren): gemiddelde gevoeligheid worden gebruikt om opnames te herkennen en voor automa- › Private (privé): lage gevoeligheid tische bestandsroutering in de Philips SpeechExec-software. » Microfoonmodus: de microfoonmodus kan worden Trefwoorden toewijzen (auteursnaam en werktype), blz. 80. bestuurd door de geïntegreerde bewegingssensor. De... -
Page 87: Lijningang (Line-In)
Speech recognition (spraakherkenning): geoptimaliseerd Opmerking voor latere bewerking met behulp van spraakherkenningssoft- • De versleuteling moet worden ingesteld met de Philips ware (Opnamekwaliteit: DSS QP, Microfoongevoeligheid: Privé SpeechExec-software. Geavanceerde configuratie, blz. 83. (laag), Modus microfoon in de hand: Richtingsgevoelig, Modus •... -
Page 88: Schermmenu (Display)
Een displaymodus selecteren: Advanced (geavanceerd, stan- daard), Classic (klassiek). Startscherm, blz. 69. Schuifschakelaar (Slide switch) U kunt de functionaliteit van de schuifschakelaar naar wens Opnamelampje (Record lamp) instellen. De schuifschakelaar is standaard ingesteld op Philips. Activeren/deactiveren van het ledlicht. Stand Internationaal Philips Philips... -
Page 89: Automatische Backspace (Auto Backspace)
USB-kabel. Handenvrije modus De recorder kan worden gebruikt voor handenvrij opnemen door de optionele Philips-voetschakelaar LFH2210 aan te sluiten op het docking station. In deze bedieningsmodus kunt u de opname- en afspeelfuncties met de voetschakelaar bedienen. Handenvrij opnemen en transcriberen, blz. 81. -
Page 90: Service
• Druk op F1 (Back) (terug) om het proces te annuleren. • Firmware-updates kunnen automatisch worden uitgevoerd via de Philips SpeechExec-software. Philips SpeechExec- software gebruiken, blz. 83. -
Page 91: Storingen Verhelpen
Storingen verhelpen Probleem Mogelijke oorzaak/oplossing Het apparaat gaat niet aan • De batterij is leeg. X Batterij opladen. • Het apparaat is uitgeschakeld. X Apparaat aanzetten. Apparaat in- en uitschakelen, blz. 72. • Het apparaat staat in de energiebesparingsmodus. X Recorder optillen of op een willekeurige knop drukken om de recorder te activeren. -
Page 92: Technische Gegevens
• USB: hoge snelheid USB 2.0 • Uitgangsvermogen van de luidspreker: 200 mW • Dockconnector • Geheugenkaartsleuf Vermogen • Batterijtype: Oplaadbare lithium-ionbatterij, Philips ACC8100 Scherm • Batterijduur: tot 30 uur opnemen (QP-modus), tot 200 uur • Type: TFT-kleurenscherm standby • Diagonale schermgrootte: 6,1 cm •... - Page 93 Collegare la docking station Registrare in vivavoce Installare il registratore Trascrivere in vivavoce Inserire ed estrarre la scheda di memoria Utilizzare il software Philips SpeechExec Caricare la batteria Configurazione avanzata Caricare utilizzando la docking station Trasferire le registrazioni sul computer...
- Page 94 Informazioni sul file Menu registrazione Profili Line-in Segnale acustico di registrazione Modifica Crittografia Attivazione vocale Menu display Luminosità Illuminazione Aspetto del display LED registrazione Lingua Menu dispositivo Segnale acustico Feedback acustico Modalità risparmio energetico Data & ora Interruttore scorrevole Ritorno automatico Informazioni sul dispositivo Formattare la scheda di memoria Carica USB...
-
Page 95: Importante
32 GB. dell’utente. • Philips adotta gli standard industriali approvati per le schede di • Non effettuate operazioni di manutenzione non descritte dal memoria, tuttavia alcune marche possono non essere del tutto presente manuale. -
Page 96: Limitazioni Legali All'uso Della Registrazione
Il manuale utente • Ponete particolare attenzione a regolare il volume a un livello sopportabile dal vostro udito. • Non alzate il volume tanto da non poter sentire ciò che Nelle pagine che seguono potrete trovare una rapida panoramica avviene intorno a voi. del vostro dispositivo. -
Page 97: Il Tuo Registratore Dittafono Digitale
2 Il tuo registratore Contenuto della confezione dittafono digitale Siamo lieti che abbiate scelto un prodotto Philips. Visitate il nostro sito web per ricevere un’assistenza completa, ad esempio manuali utente, download del software, informazioni sulla garanzia e altro ancora: www.philips.com/dictaton. -
Page 98: Prospetto Del Registratore
Prospetto del registratore a Luce LED • Rosso: registrazione in modalità sovrascrittura o aggiungere • Verde: registrazione in modalità inserimento • Giallo: i dati sono in corso di trasferimento al/dal computer b Microfoni c Schermo d Tasti funzione F1, F2, F3 •... -
Page 99: Schermata Di Avvio
Un comando a pedale è collegato alla docking station • Il registratore può essere utilizzato per la registrazione e la trascrizione in vivavoce collegando il comando a pedale opzionale Philips alla docking station. Registrare e trascrivere in vivavoce, p. 110. Livello di carica della batteria •... -
Page 100: Prospetto Della Docking Station
• Connessione micro USB per il computer t Ora registrazione/riproduzione e Connettore per comando a pedale • Collega il comando a pedale Philips LFH2210 (opzionale) u Nome del file per la dettatura e la trascrizione in vivavoce. Registrare v Numero file corrente/Numero totale file e trascrivere in vivavoce, p. -
Page 101: Introduzione
3 Introduzione Inserire ed estrarre la scheda di memoria Il dispositivo funziona con schede di memoria SD/SDHC e supporta schede con una capacità di memoria fino a 32 GB. Il vostro registratore è fornito con una scheda di memoria già Attenzione inserita e formattata. -
Page 102: Caricare La Batteria
• Non rimuovete la scheda di memoria durante la registrazione. I dati potrebbero danneggiarsi o essere persi. Posizionate il registratore nella docking station. • Philips adotta gli standard industriali approvati per le schede X Il registratore inizierà a caricarsi. di memoria, tuttavia alcune marche possono non essere del tutto compatibili con il dispositivo. -
Page 103: Procedimento Di Installazione Iniziale
Procedimento di installazione iniziale Modalità risparmio energetico Il procedimento di installazione iniziale si effettua al primo Per impostazione predefinita, il registratore entra in modalità utilizzo del dispositivo o in caso vi sia stata una lunga interruzione risparmio energetico dopo 5 minuti di inattività. Per riattivarlo, dell’alimentazione. -
Page 104: Come Utilizzare Il Registratore
• Per risultati ottimali, parlare chiaramente e tenere il Il registratore può essere utilizzato per la registrazione in microfono a circa 5 – 15 cm dalla bocca. vivavoce collegando il comando a pedale opzionale Philips alla docking station. Registrare in vivavoce, p. 110. Aggiungi/sovrascrivi una registrazione... -
Page 105: Riproduzione
Riproduzione • Modalità aggiungere: aggiungere un’ulteriore registrazione dopo una registrazione esistente in un file. X Il simbolo viene visualizzato sulla barra delle Selezionare un file informazioni nella parte alta dello schermo quando è attiva la modalità aggiungere e durante la registrazione il Premete + mentre il dispositivo è... -
Page 106: Regolare La Velocità Di Riproduzione
Suggerimento Note • Attiva la funzione di riduzione del rumore per una • Se il file contiene indici o istruzioni registrate, la scansione riproduzione ottimale. La riduzione del rumore abbassa il indietro o avanti si arresta per 1 secondo all’indice rumore di fondo e migliora la chiarezza delle voci più... -
Page 107: Eliminare
Eliminare Eliminare tutti i file Potete eliminare dal dispositivo file individuali, parti di file o tutti i Con il registratore in modalità stop, premete F2 (Menu) file contemporaneamente. e selezionate File > Cancella tutto. Premete F2 (OK) per confermare l’eliminazione. Note X Tutti i file sono cancellati. -
Page 108: Altre Funzioni Del Registratore
5 Altre funzioni del Indici registratore Gli indici possono essere usati per contrassegnare alcuni punti di riferimento nella registrazione. Per aggiungere un indice, premete F1 (Indice) durante la registrazione o la riproduzione. Registrazione ad attivazione vocale X Il numero dell’indice sarà visualizzato dal display per un secondo. -
Page 109: Inserire Parole Chiave (Autore O Tipo Di Lavoro)
• Le parole chiave devono prima essere impostate con il software in modalità stop ( Selezionare un file, p. 105). Philips Speech-Exec. Configurazione avanzata, p. 112. • Per impostazione predefinita, sono disponibili la categoria Per eliminare un’istruzione, seguite i passaggi indicati per di parole chiave Autore con le parole chiave ‘DPM8200’... -
Page 110: Blocco E Priorità Dei File
è possibile assegnare la Philips LFH2210 alla docking station. Con questa modalità potete priorità alle registrazioni urgenti da trascrivere. controllare la registrazione e le funzioni di riproduzione con il Con il registratore in modalità... -
Page 111: Trascrivere In Vivavoce
Per continuare la registrazione, ripetete il passaggio 4. Trascrivere. Premete e tenete premuto il pedale sinistro per un Collegate il comando a pedale opzionale Philips alla porta riavvolgimento veloce. Quando il riavvolgimento raggiunge corrispondente sul retro della docking station e inserite il la posizione desiderata, rilasciate il pedale. -
Page 112: Utilizzare Il Software Philips Speechexec
Collegate il registratore al computer utilizzando il cavo USB o la docking station. Avviate il software Philips SpeechExec Pro e fate clic su Settings > General Settings (Impostazioni > Impostazioni generali) sulla barra del menu e selezionate DPM Configuration >... -
Page 113: Trasferire Le Registrazioni Sul Computer
Finished dictations (Dettati terminati) dell’elenco dei lavori. Note • Come e quali file vengono scaricati dopo il collegamento tra registratore e computer può essere configurato tramite il menu settings del software Philips SpeechExec o con la procedura guidata di configurazione. -
Page 114: Impostazioni
• Alcune impostazioni, come la definizione delle parole Informazioni sul dispositivo chiave, la crittografia dei file o il blocco del dispositivo Formattare la scheda di memoria sono disponibili solo con il software Philips SpeechExec. Carica USB Configurazione avanzata, p. 112. Audio USB Modalità... -
Page 115: Menu File
Menu File Informazioni sul file Visualizza le informazioni del file corrente come il numero, il Elimina file nome, le parole chiave assegnate, il codice a barre, data e ora di registrazione. Elimina file individuali dal dispositivo. Eliminare un file, p. 107. Menu registrazione Canc. -
Page 116: Line-In
Note (Qualità registrazione: DSS QP, Sensibilità microfono: Privato (bassa), Microfono in mano: Direzionale, Modalità microfono • La crittografia deve essere impostata con il software Philips in piano: 360°). Speech-Exec. Configurazione avanzata, p. 112. • La crittografia è supportata solo per file in formato DSS Pro. -
Page 117: Menu Display
Per impostazione predefinita, l’interruttore è impostato su Lingua Philips. Imposta la lingua per l’uso dell’interfaccia utente del dispositivo: Posizione Internazionale Philips Philips classico* Tedesco English, Deutsch, FranÇais, Español, Italiano. Impostare la lingua, p. 103 * Funzionalità commutabile tra i pulsanti EOL e REC STANDBY. -
Page 118: Informazioni Sul Dispositivo
Il registratore può essere utilizzato per la registrazione e la trascrizione in vivavoce collegando il comando a pedale opzionale Philips LFH2210 alla docking station. Con questa modalità potete controllare la registrazione e le funzioni di riproduzione con il comando a pedale. Registrare e trascrivere in vivavoce, p. -
Page 119: Manutenzione
Premete F1 (Indietro) per tornare in modalità stop. o la docking station. Effettuate il download dell’aggiornamento del firmware per il Formattazione della memoria vostro modello dal sito www.philips.com/dictation sul vostro computer. Attenzione Copiate il nuovo file del firmware sulla cartella principale del dispositivo. -
Page 120: Risoluzione Dei Problemi
Risoluzione dei problemi Problema Possibile causa/soluzione Il dispositivo non si accende • La batteria è scarica. X Ricaricate la batteria. • Il dispositivo è spento. X Accendete il dispositivo. Accensione e spegnimento, p. 102. • Il dispositivo è in modalità risparmio energetico. X Per riattivarlo, sollevatelo o premete un tasto qualsiasi. -
Page 121: Specifiche Tecniche
• Potenza in uscita altoparlante: 200 mW • Connettore docking station • Slot scheda di memoria Potenza • Tipo batteria: Batteria Philips ricaricabile Li-ion ACC8100 Display • Durata batteria: fino a 30 ore di registrazione • Tipo: TFT a colori (Modalità... - Page 122 122 IT...
- Page 123 Enregistrement en mode mains libres Charger la batterie Transcription en mode mains libres Charger à l’aide de la station d’accueil Utiliser le logiciel Philips SpeechExec Charger à l’aide du câble USB Configuration avancée Allumer et éteindre l’appareil Télécharger des enregistrements sur l’ordinateur 143 Processus d’installation initiale...
- Page 124 Auteur, Type de travail Supprimer tout Inform. sur le fichier Enregistrement Profils Entrée en ligne Bip lors de l’enregistrement Mode d’insertion Chiffrement Déclenchement vocal Affichage Luminosité Éclairage Apparence de l’affichage Lamp témoin enreg. Language Appareil Signal sonore Rétroaction acoustique Mode économique Date &...
-
Page 125: Important
Ne démontez maximale de 32 Go. pas l’appareil pour effectuer des réparations. Confiez les • Philips utilise des normes de l’industrie approuvées pour réparations de votre appareil à un centre de service agréé. les cartes mémoire, mais certaines marques ne sont pas entièrement compatibles avec votre appareil. -
Page 126: Protection De L'ouïe
À propos de ce manuel de l’utilisateur Protection de l’ouïe Respectez les consignes suivantes concernant l’utilisation du casque : Les pages suivantes vous donnent un aperçu rapide de votre • Réglez le volume à un niveau modéré et ne portez pas le appareil. -
Page 127: Votre Enregistreur De Dictée Numérique
2 Votre enregistreur Contenu de dictée numérique Nous vous félicitons d’avoir choisi un appareil Philips. Consultez notre site Web pour profiter d’une assistance complète sous la forme de manuels de l’utilisateur, de téléchargements logiciels, d’informations sur la garantie et bien plus encore : www . philips . com / dictation. -
Page 128: Présentation Du Produit
Présentation du produit a Voyant LED • Rouge : l’appareil enregistre en mode remplacement ou ajout • Vert : l’appareil enregistre en mode insertion • Jaune : transfert de données vers/de l’ordinateur b Microphones c Écran d Touches de fonction F1, F2, F3 • Sélection de la fonction affichée à l’écran située directement au-dessus de la touche e +/–... -
Page 129: Écran De Démarrage
• L’enregistreur peut être utilisé pour effectuer un enregistrement et une transcription en mode mains libres en branchant la pédale de commande Philips disponible en option à la station d’accueil. Enregistrement et transcription en mode mains libres, p. 140. -
Page 130: Présentation De La Station D'accueil
139. p Indicateur d’index-repère ( Index-repères, p. 138) e Connecteur de la pédale de commande • La pédale de commande Philips LFH2210 (disponible q Indicateur d’instructions ( Instructions, p. 139) en option) permet d’effectuer des dictées et des r Indicateur de position de lecture/d’enregistrement en cours transcriptions en mode mains libres. -
Page 131: Premiers Pas
3 Premiers pas Insérer et éjecter la carte mémoire Cet appareil fonctionne avec une carte mémoire SD/SDHC. Il prend également en charge les cartes possédant une capacité de stockage maximale de 32 Go. Votre enregistreur est fourni avec Attention une carte mémoire mise en place et formatée. •... -
Page 132: Charger La Batterie
• Ne retirez pas la carte mémoire si un enregistrement est en cours. Cela pourrait endommager ou effacer les données. Poser l’enregistreur sur la station d’accueil. • Philips utilise des normes de l’industrie approuvées pour X L’enregistreur initialise le cycle de charge. les cartes mémoire, mais certaines marques ne sont pas entièrement compatibles avec votre appareil. -
Page 133: Processus D'installation Initiale
Processus d’installation initiale Mode économique Le processus d’installation initiale démarre lors de la première Par défaut, l’enregistreur passe en mode économique après mise en service ou éventuellement après une longue période 5 minutes d’inactivité. Soulevez l’appareil ou appuyez sur un hors alimentation secteur. La date et l’heure saisies sont bouton pour le réactiver enregistrées avec chaque enregistrement. -
Page 134: Utiliser L'appareil
à nouveau. Activation de l’enregistrement par la voix, p. 138. L’enregistreur peut être utilisé en mode mains libres en branchant Astuce la pédale de commande Philips disponible en option à la station d’accueil. Enregistrement en mode mains libres, p. 140. • Pour obtenir les meilleurs résultats possibles, parlez clairement et maintenez le microphone à... -
Page 135: Ajouter Ou Écraser Un Enregistrement
Pour arrêter l’enregistrement, placez l’interrupteur à curseur Ajouter ou écraser un enregistrement sur H PAUSE et appuyez sur le bouton ENR VEILLE. Vous pouvez modifier un enregistrement existant en écrasant une partie de celui-ci ou en insérant un enregistrement Remarque supplémentaire. •... -
Page 136: Lecture
Lecture Réglage de la vitesse de lecture Appuyez plusieurs fois sur F3 (Vitesse) pendant la lecture Sélectionner un fichier pour alterner entre une vitesse de lecture rapide, lente et normale. En mode arrêt, appuyez sur +. X La vitesse de lecture augmente (+30 %) et l’icône X L’indicateur de position se place à... -
Page 137: Supprimer
Supprimer Supprimer tous les fichiers Vous pouvez supprimer des fichiers individuels de l’appareil, En mode arrêt, appuyez sur F2 (Menu) et sélectionnez une partie de fichier ou tous les fichiers simultanément. Fichier > Supprimer tout. Appuyez sur F2 (OK) pour confirmer la suppression. Remarques X Tous les fichiers sont supprimés. -
Page 138: Utiliser Les Autres Fonctions Du Produit
5 Utiliser les autres Index-repères fonctions du produit Les index-repères permettent de marquer certains points d’un enregistrement comme points de référence. Pour insérer un index-repère, appuyez sur F1 (Index) pendant l’enregistrement ou la lecture. Activation de l’enregistrement par X Le numéro de l’index s’affiche pendant une seconde. la voix X Vous pouvez insérer jusqu’à... -
Page 139: Attribuer Des Mots-Clés (Identifiant Auteur Et Type De Travail)
Pour rechercher des instructions, appuyez sur + / – en mode • Les mots-clés doivent être configurés au préalable avec le logiciel Philips Speech Exec. Configuration avancée, p. 142. arrêt ( Sélectionner un fichier, p. 136). • Par défaut, la catégorie de mot-clé Auteur avec les mots- Pour supprimer une instruction, suivez la procédure de... -
Page 140: Verrouillage De Fichiers Et Priorité
Appareil > Retour automatique. Remarques Enregistrement en mode mains libres • Le logiciel Philips SpeechExec peut être configuré pour télécharger uniquement les fichiers terminés de l’appareil sur l’ordinateur. • Les fichiers verrouillés sont supprimés lorsque la carte mémoire est formatée ou lorsque la fonction de... -
Page 141: Transcription En Mode Mains Libres
> Transcrire. pédale droite de la pédale de commande. Connectez la pédale de commande Philips, disponible en Pour arrêter l’enregistrement, appuyez sur la pédale gauche option, au port prévu à cet effet à... -
Page 142: Utiliser Le Logiciel Philips Speechexec
1 seconde environ. Configuration avancée Le logiciel Philips SpeechExec fournit une assistance qui guide les utilisateurs dans les procédures de configurations et de réglages du dispositif. L’assistant offre une assistance lors de la configuration du format de l’heure, de la réaction sonore, du... -
Page 143: Télécharger Des Enregistrements Sur L'ordinateur
Dictées terminées de la liste de travail. Remarque • Le mode et la détermination des types de fichiers à télécharger après le branchement de l’enregistreur à l’ordinateur peuvent être configurés dans le menu Réglages du logiciel Philips SpeechExec ou à l’aide de l’assistant de configuration. -
Page 144: Réglages
Interrupteur à curseur • Certains réglages comme la définition des mots-clés, le Retour automatique chiffrement des fichiers ou le verrouillage du dispositif, sont uniquement disponibles via le logiciel Philips SpeechExec. Information périphérique Configuration avancée, p. 142. Formater mémoire Charge USB... -
Page 145: Fichier
être attribués à chaque enregistrement. Les mots-clés peuvent être utilisés pour identifier des enregistre- ments et effectuer un routage automatique des fichiers dans le logiciel Philips SpeechExec. Attribuer des mots-clés (identi- fiant auteur et type de travail), p. 139. -
Page 146: Enregistrement
› DSS SP : .dss, mono, 13,7 kbit/s • Tous les profils d’enregistrement peuvent être personnalisés › DSS QP : .ds2, mono, 28 kbit/s à l’aide du logiciel Philips SpeechExec. Configuration › MP3 Stereo : .mp3, stereo, 192 kbit/s avancée, p. 142. › PCM Voice : .wav, mono, 353 kbit/s ›... -
Page 147: Mode D'insertion
• 8 sec (valeur par défaut) • 20 sec Remarque • On (Marche) • Le chiffrement doit être configuré à l’aide du logiciel Philips Apparence de l’affichage Speech-Exec. Configuration avancée, p. 142. • Le chiffrement est uniquement pris en charge pour les Permet de sélectionner un mode d’affichage : Moderne (valeur... -
Page 148: Appareil
à curseur. Par défaut, l’interrupteur à curseur est défini sur Philips. Audio USB Position International Philips Philips classique* Allemand Si la valeur Marche est définie, l’appareil peut être utilisé comme un périphérique de sortie audio pour l’ordinateur s’il est relié à celui-ci au moyen d’un câble USB. -
Page 149: Mode Mains Libres
L’enregistreur peut être utilisé pour effectuer un enregistrement et une transcription en mode mains libres en branchant la pédale de commande Philips LFH2210 disponible en option à la station d’accueil. Ce mode d’utilisation permet de contrôler les fonctions d’enregistrement et de lecture avec la pédale de commande. -
Page 150: Maintenance
Appuyez sur F1 (Retour) pour revenir au mode arrêt. Téléchargez la mise à jour du logiciel correspondant à votre modèle à partir du site Web www.philips.com/dictation sur Formater la mémoire votre ordinateur. Copiez le fichier du micrologiciel dans le répertoire racine Attention de l’appareil. -
Page 151: Résolution Des Problèmes
Résolution des problèmes Problème Cause possible/Solution L’appareil ne s’allume pas • La batterie est vide. X Rechargez la batterie. • L’appareil est éteint. X Allumez l’appareil. Allumer et éteindre l’appareil, p. 132. • L’appareil est en mode économique. X Soulevez l’appareil ou appuyez sur un bouton pour le réactiver. L’appareil ne lit pas les enregistrements •... -
Page 152: Caractéristiques Techniques
• Puissance de sortie du haut-parleur : 200 mW • Connecteur de station d’accueil • Emplacement de la carte mémoire Alimentation • Type de batterie : Batterie rechargeable Philips Li-ion ACC8100 Écran • Durée de vie de la batterie : jusqu’à 30 heures d’enregistre- • Type : TFT couleur ment (mode QP), jusqu’à... - Page 153 Grabación en modo manos libres Insertar y extraer la tarjeta de memoria Transcripción en modo manos libres Cargar la batería Cómo utilizar el software SpeechExec de Philips Cargar la grabadora en la base de conexión Configuración avanzada Cargar la grabadora con un cable USB...
- Page 154 Eliminar todos Información del archivo Menú Grabación Perfiles Entrada de línea Señal sonora de grabado Modo de edición Cifrado Activación por voz Menú Pantalla Brillo Iluminación Apariencia de la pantalla LED grabar Language Menú Dispositivo Señal sonora Reacción acústica Ahorro de energía Fecha y hora Interruptor deslizante Retroceso automático...
-
Page 155: Importante
32 GB de capacidad. • Haga copias de seguridad de los datos y las grabaciones. • Philips utiliza tarjetas de memoria estándar aprobadas por el La garantía del fabricante no cubre la pérdida de datos sector, pero algunas marcas pueden no ser completamente causada por acciones del usuario. -
Page 156: Protección Auditiva
Sobre este manual de usuario Protección auditiva Tenga en cuenta las siguientes pautas al utilizar auriculares: En las próximas páginas le ofrecemos una visión general rápida • Fije el volumen a un nivel moderado y no utilice auriculares de su dispositivo. Para ver una descripción más detallada, vea los durante un periodo de tiempo excesivamente largo. -
Page 157: Su Grabadora De Dictado Digital
2 Su grabadora de dictado Contenido de la caja digital Nos complace que haya elegido un dispositivo de Philips. Visite nuestro sitio web para encontrar soporte técnico completo como manuales de usuario, descargas de software, información sobre garantías y mucho más: www.philips.com/dictation. -
Page 158: Visión General De La Grabadora
a Luz LED Visión general de la grabadora • Roja: el dispositivo está grabando en modo sobrescribir o adjuntar • Verde: el dispositivo está grabando en modo insertar • Amarilla: se están transfiriendo datos a/desde el ordenador b Micrófonos c Pantalla d Teclas de función F1, F2, F3 •... -
Page 159: Pantalla De Inicio
Un interruptor de pie está conectado a la base de conexión • La grabadora se puede utilizar con un interruptor de pie de Philips opcional conectado a la base de conexión para grabar y transcribir en modo manos libres. Grabación y transcripción en modo manos libres, p. 171. -
Page 160: Visión General De La Base De Conexión
• Conexión micro USB para el ordenador s Longitud del archivo e Conector de interruptor de pie • Conecte el control de pie LFH2210 de Philips (opcional) t Tiempo de la grabación/reproducción en curso para realizar dictados y transcripciones en modo manos u Nombre de archivo libres. -
Page 161: Cómo Empezar A Utilizar La Grabadora
3 Cómo empezar a utilizar Insertar y extraer la tarjeta de memoria la grabadora El dispositivo funciona con una tarjeta de memoria SD/SDHC y admite tarjetas de hasta 32 GB de capacidad. La grabadora viene con una tarjeta de memoria insertada y formateada. Para insertar y extraer la tarjeta de memoria: Precaución Localice la ranura de la tarjeta de memoria en la parte... -
Page 162: Cargar La Batería
• No retire la tarjeta de memoria mientras esté grabando. Los datos se podrían dañar o perder. Ponga la grabadora en la base de conexión. • Philips utiliza tarjetas de memoria estándar aprobadas por el X La grabadora comienza a cargarse. sector, pero algunas marcas pueden no ser completamente compatibles con el dispositivo. -
Page 163: Proceso De Instalación Inicial
Proceso de instalación inicial Modo de ahorro de energía El proceso de instalación inicial comienza la primera vez que De forma predeterminada, la grabadora entrará en modo se usa el dispositivo o, posiblemente, si se ha producido una de ahorro de energía tras 5 minutos de inactividad. Coja la interrupción larga del suministro de energía. -
Page 164: Cómo Utilizar La Grabadora
Grabación activada por voz, p. 169. Sugerencia La grabadora se puede utilizar con un interruptor de pie de Philips opcional conectado a la base de conexión para grabar en modo • Para obtener mejores resultados, hable de manera clara manos libres. -
Page 165: Agregar A O Sobrescribir Una Grabación
Agregar a o sobrescribir una grabación Nota Para editar una grabación que ya existe puede sobrescribir una parte de ella o añadirle más grabación. • Al editar, se utiliza la calidad de la grabación original para la Con la grabadora parada, pulse F2 (Menú) y seleccione nueva grabación. -
Page 166: Reproducir
Reproducir Sugerencia Seleccionar un archivo • Active la función de reducción de ruido para obtener una calidad de reproducción mejor. La reducción de ruido Pulse + con el dispositivo parado (en modo detenido). disminuye el ruido de fondo y mejora la inteligibilidad de las X El indicador de posición salta al final de un archivo. -
Page 167: Eliminar
Eliminar Nota Puede eliminar archivos individuales, parte de un archivo o todos • Si el archivo contiene marcas de índice o instrucciones los archivos simultáneamente. grabadas, al buscar hacia atrás o hacia delante, el dispositivo se detiene un segundo en la marca de índice o instrucción. Notas •... -
Page 168: Eliminar Todos Los Archivos
Eliminar todos los archivos Con la grabadora parada, pulse F2 (Menú) y seleccione Archivo > Eliminar todos. Pulse F2 (OK) para confirmar la eliminación. X Se eliminan todos los archivos. 168 ES... -
Page 169: Utilizar Más Funciones De Su Grabadora
5 Utilizar más funciones de Marcas de índice su grabadora Las marcas de índice se pueden utilizar para marcar puntos determinados en una grabación como puntos de referencia. Para insertar una marca de índice, pulse F1 (Marca) durante la grabación o reproducción. Grabación activada por voz X El número de marca se ve durante un segundo. -
Page 170: Asignar Palabras Clave (Identificador De Autor Y Tipo De Trabajo)
Las grabación pero que no es necesario escribir. palabras clave se utilizan para identificar las grabaciones y enrutar automáticamente los archivos en el software SpeechExec de Philips. Para grabar una instrucción, pulse y mantenga pulsada F3 (Instr) durante la grabación. -
Page 171: Bloqueo Y Prioridad De Archivo
La grabadora se puede utilizar con un pedal de control LFH2210 como terminados. Con la opción de configuración de prioridad, de Philips opcional conectado a la base de conexión para se puede dar prioridad a las grabaciones urgentes durante la grabar y transcribir en modo manos libres. -
Page 172: Transcripción En Modo Manos Libres
Para continuar grabando, repita el paso 4. Transcribir. Pulse y mantenga pulsado el pedal de la izquierda del pedal Conecte el pedal de control opcional de Philips al puerto de control para utilizar la función de rebobinado rápido. para pedales de control de la parte trasera de la base de Cuando llegue al lugar que desee, suelte el pedal. -
Page 173: Cómo Utilizar El Software Speechexec De Philips
Conecte la grabadora al ordenador con un cable USB o la base de conexión. Inicie el software SpeechExec Pro de Philips y haga clic en Settings (Ajustes) > General settings (Ajustes generales) en la barra de menú y seleccione DPM Configuration (Configuración DPM) >... -
Page 174: Descargar Grabaciones Al Ordenador
Finished dictations (Dictados terminados) de la lista de trabajo. Nota • Es posible configurar en el menú de ajuste del software SpeechExec de Philips, cómo y qué archivos se descargan después de conectar la grabadora al ordenador. 174 ES... -
Page 175: Ajustes
Interruptor deslizante • Algunos ajustes, como definir palabras claves, cifrado de Retroceso automático archivos o bloqueo del dispositivo, solo están disponibles a Información del dispositivo través del software SpeechExec de Philips. Configuración Formatear memoria avanzada, p. 173. Carga USB Audio USB Lista de menús... -
Page 176: Menú Archivo
» Modo de micrófono: se puede controlar con automáticamente los archivos en el software SpeechExec de el sensor de movimiento integrado. El sensor de Philips. Asignar palabras clave (identificador de autor y tipo de movimiento detecta si el dispositivo está posado sobre trabajo), p. 170. -
Page 177: Entrada De Línea
• Todos los perfiles de grabación se pueden personalizar • Cuando el cifrado está activado, se ve el símbolo en la con el software SpeechExec de Philips. Configuración barra de información en la parte superior de la pantalla. avanzada, p. 173. -
Page 178: Menú Pantalla
Interruptor deslizante Habilite/deshabilite el LED. Puede personalizar la funcionalidad del interruptor deslizante. De forma predeterminada, el interruptor deslizante está fijado en Philips . Language Posición Internacional Philips Philips clásico* Alemán Fije el idioma para la interfaz de usuario del dispositivo: English, Deutsch, Français, Español, Italiano. -
Page 179: Retroceso Automático
La grabadora se puede utilizar con un interruptor de pie B REBOBINAR para saltar hacia atrás al número de segundos LFH2210 de Philips opcional conectado a la base de conexión configurados en la grabación: Desactivado (predeterminado), para grabar y transcribir en modo manos libres. En este modo de 1 s, 2 s, 3 s, 4 s. -
Page 180: Mantenimiento
Sugerencia Sugerencia • Pulse F1 (Volver) para cancelar la operación. • Las actualizaciones del firmware se pueden realizar automáticamente a través del software SpeechExec de Philips. Cómo utilizar el software SpeechExec de Philips, p. 173. 180 ES... -
Page 181: Solución De Problemas
Solución de problemas Problema Posible causa/solución El dispositivo no se enciende • La batería está agotada. X Recargue la batería. • El dispositivo está apagado. X Enciéndalo. Encender/Apagar, p. 162. • El dispositivo está en modo de ahorro de energía. X Coja la grabadora o pulse algún botón para reactivarla. -
Page 182: Datos Técnicos
• Conector de base • Ranura de tarjeta de memoria Energía • Tipo de baterías: Batería de Li-ion recargable ACC8100 de Philips Pantalla • Tipo: color TFT • Duración de la batería: hasta 30 horas de grabación • Tamaño de pantalla en diagonal: 6,1 cm (modo QP), hasta 200 horas en modo de espera... - Page 183 Canadian interference-causing equipment regulations. 2006/95/EC, 2004/108/EC and 2009/125/EC. A complete declaration of conformity for this product is available at www . philips . com / dictation. Avis Canadien Cet appareil numérique de la classe B respecte toutes les exi- Neither Speech Processing Solutions GmbH nor its affiliates shall gences du règlement sur le matériel brouilleur du Canada.
- Page 184 Specifications are subject to change without notice. © 2017 Speech Processing Solutions GmbH. All rights reserved. All trademarks are the property of their respective owners. Document version 1.6, 2017/10/25. Document number 5103 109 9768.7...
Need help?
Do you have a question about the POCKET MEMO and is the answer not in the manual?
Questions and answers