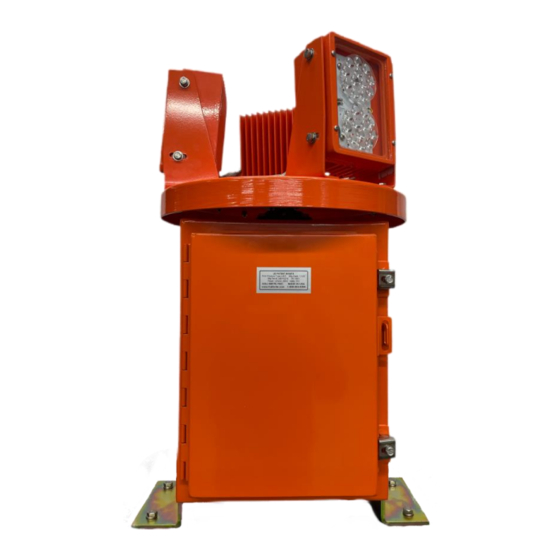
Summary of Contents for Hali-Brite L-801H
- Page 1 Installation and Maintenance Manual Hali-Brite® L-801H(L) LED Heliport Rotating Beacon ® Copyright © 2020 Hali-Brite Inc., Brainerd, MN, U.S.A. Printed in U.S.A. Rev 1...
-
Page 2: Table Of Contents
Maintenance Procedures ................... 12 Repair ........................14 Timing Belt ....................... 14 Mercotac rotary electrical connector ..............14 Lamp Power Supply ..................15 Motor and Gearhead ..................15 Troubleshooting Chart, Replacement Parts and Wiring Diagrams ......17 Hali-Brite® L-801H(L) Installation and Maintenance Manual... -
Page 3: Introduction
Hali-Brite further reserves the right to require the return of such goods to establish any claim. Hali-Brite’s obligation under this guarantee is limited to making repair or replacement within a reasonable time after receipt of such written notice and does not include any other... -
Page 4: Disclaimers
® If further information is required, Hali-Brite Inc. should be contacted. Sale of the product shown in this manual is subject to Hali-Brite’s terms and conditions ® including, but not limited to, the Hali-Brite Warranty. Such terms and conditions are available upon request. -
Page 5: Safety Precautions
Always use proper tools (as mentioned in this manual) to perform installation and maintenance. • Use proper hand and eye protection as needed when installing or maintaining this equipment. • Make sure you have adequate first aid supplies available when installing this equipment. Hali-Brite® L-801H(L) Installation and Maintenance Manual... -
Page 6: Electrical Practices
• Always use rated electrical tools when performing electrical work. • Always make sure electrical connections are tight. • Make sure electrical covers are in place after installation. Hali-Brite® L-801H(L) Installation and Maintenance Manual... -
Page 7: Qualified Personnel
Do not make any modifications that have not been recommended by Hali- ® Brite • ® Do not use any replacement parts that are not purchased from Hali-Brite • ® Hali-Brite cannot be responsible for injuries or damages resulting from nonstandard, unintended applications of its equipment. -
Page 8: Specifications
Operating Temperature (Class I) ....-55C (-67F) to +55C (+131F) Heater (Class II only) ........400W (heating element) Turns On ..........Below 0°C (+32°F) Humidity ............0% to 100% Altitude ............Sea level to 10,000 feet (3000 m) Wind..............Velocities to 100 mph (161 km/h) Hali-Brite® L-801H(L) Installation and Maintenance Manual... -
Page 9: Installation
AWG 12, S0-3 power cord. 4.3.1 Mounting Open the front door on the cabinet. Inspect the interior to make sure all parts are tight and have not been loosened in shipment. Close the door and tighten the latches. Hali-Brite® L-801H(L) Installation and Maintenance Manual... - Page 10 See Figure 2 to locate the power connection point. The power cord enters the beacon chassis through the hole in the base, and attaches to the white terminal block in the lower right corner. Power Terminal Block Figure 2 Hali-Brite® L-801H(L) Installation and Maintenance Manual...
- Page 11 (ground) to the terminal marked G. 4.3.4 Beam Angle Adjustment All beacons are shipped from the factory preset at an elevation angle of 5 degrees, per FAA requirements. To adjust to a different angle, refer to Section 5.2.2. Hali-Brite® L-801H(L) Installation and Maintenance Manual...
-
Page 12: Maintenance
(See figure 3) 2. Locate the beam elevation label on the right side of the beacon head. (See figure 3) 3. Locate the sight window at the bottom of the right support bracket. (See figure 3) Hali-Brite® L-801H(L) Installation and Maintenance Manual... - Page 13 5.2.3 Lens Cleaning Clean lenses periodically with alcohol or glass cleaner and soft cloth. Wipe dry with a clean soft cloth. 5.2.4 Lubrication All moving parts are permanently lubricated and will not require further attention. Hali-Brite® L-801H(L) Installation and Maintenance Manual...
-
Page 14: Repair
11. Connect the two wires to the control panel. Make sure they are connected to the original terminals. (NOTE: The black wire connects to the upper terminal, and white wire connects to the lower terminal.) Hali-Brite® L-801H(L) Installation and Maintenance Manual... -
Page 15: Lamp Power Supply
(NOTE 1: Make sure the shaft of the gearbox is to the right.) b. (NOTE 2: Make sure the wires of the motor are facing out.) 13. Reinstall the gear on the shaft of the gearbox, and tighten the setscrews. Hali-Brite® L-801H(L) Installation and Maintenance Manual... - Page 16 15. Reconnect the wires to the motor capacitor. Red wire on the left side, and the two white wires on the right side. 16. Reconnect the black wire to the neutral on control panel. 17. Reconnect the power to the beacon. Hali-Brite® L-801H(L) Installation and Maintenance Manual...
-
Page 17: Troubleshooting Chart, Replacement Parts And Wiring Diagrams
Beacon Troubleshooting Chart This chart will help you to locate over 99% of beacon problems. Detailed repair procedures are located in chapter 6 of this manual. If you are still unable to solve the problem, call Hali-Brite at 800-553-6269. Start Beacon rotates? - Page 18 Drive Belt 4100-0000-1A Motor 120VAC 4100-0006-2 Motor 230VAC 5000-0003 Pulley, Main Shaft 5000-0004 Pulley, Motor 9100-0015 1/2 in CONDUIT Cover & Gasket 9200-0049 Head Assembly, White 9200-0050 Head Assembly, Green 9200-0051 Head Assembly, Amber Hali-Brite® L-801H(L) Installation and Maintenance Manual...
- Page 19 MERCOTAC CONNECTOR RECYCLING Thank you for returning your used Mercotac connectors for recycling and not disposing them in the trash or landfill. The used connectors will be sent to a licensed mercury recycling facility where the liquid mercury is retrieved for future use through an environmentally safe distillation process.


Need help?
Do you have a question about the L-801H and is the answer not in the manual?
Questions and answers