Table of Contents
Advertisement
Quick Links
Advertisement
Table of Contents

Related Manuals for Hali-Brite HBM 150/2


Summary of Contents for Hali-Brite HBM 150/2
- Page 1 Hali-Brite ® Installation and Maintenance Manual HBM 150/2 L-801A Airport Rotating Beacon ® Hali-Brite Inc. 1119 Madison St Brainerd, MN 56401 Tel: 800.553.6269 Fax: 218.454.0972 www.halibrite.com Inc., Brainerd, MN, U.S.A. Printed in U.S.A. ® Copyright © 2020 Hali-Brite Rev. 9...
-
Page 2: Table Of Contents
Cover Lenses ..................... 14 Fuses ......................... 14 Timing Belt ....................... 14 Mercotac rotary electrical connector ..............14 Lamp Ballast ..................... 15 Motor and Gearhead ..................15 Troubleshooting Chart, Replacement Parts and Wiring Diagrams ......17 HBM 150/2 Installation and Maintenance Manual... -
Page 3: Introduction
1.1 About this Manual The information in this manual is provided to assist installation and maintenance personnel in the proper installation, upkeep, and maintenance of the HBM 150/2 Airport Rotating Beacon. This manual also includes installation and maintenance instructions for all equipment sold as options to the basic unit. -
Page 4: Disclaimers
® If further information is required, Hali-Brite Inc. should be contacted. Sale of the product shown in this manual is subject to Hali-Brite’s terms and conditions ® including, but not limited to, the Hali-Brite Warranty. Such terms and conditions are available upon request. -
Page 5: Safety Precautions
Always use proper tools (as mentioned in this manual) to perform installation • and maintenance. Use proper hand and eye protection as needed when installing or maintaining • this equipment. Make sure you have adequate first aid supplies available when installing this • equipment. HBM 150/2 Installation and Maintenance Manual... -
Page 6: Electrical Practices
Always use rated electrical tools when performing electrical work. • Always make sure electrical connections are tight. • Make sure electrical covers are in place after installation. • HBM 150/2 Installation and Maintenance Manual... -
Page 7: Qualified Personnel
Do not make any modifications that have not been recommended by Hali- • ® Brite ® Do not use any replacement parts that are not purchased from Hali-Brite • ® Hali-Brite cannot be responsible for injuries or damages resulting from •... -
Page 8: Specifications
Operating Temperature (Class I) ....-55°C (-67°F) to +55°C (+131°F) Heater (Class II only)........400W (heating element) Turns On ..........Below 0°C (+32°F) Humidity ............0% to 100% Altitude ............Sea level to 10,000 feet (3000 m) Wind..............Velocities to 100 mph (161 km/h) HBM 150/2 Installation and Maintenance Manual... -
Page 9: Installation
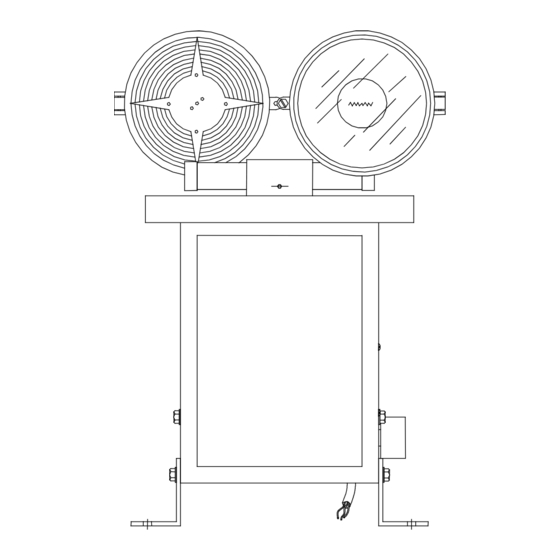
Liquid Glass Cleaner S0-3 Cable, AWG 12, liquid-tight conduit and connectors 4.3 Installation The HBM 150/2 rotating beacon comes completely assembled except for installation of a customer-supplied AWG 12, S0-3 power cord. 4.3.1 Mounting Open the front door on the cabinet. Inspect the interior to make sure all parts are tight and have not been loosened in shipment. - Page 10 See Figure 2 to locate the power connection point. The power cord enters the beacon chassis through the hole in the base, and attaches to the white terminal block in the lower right corner. Figure 2 HBM 150/2 Installation and Maintenance Manual...
- Page 11 (ground) to the terminal marked G. 4.3.4 Beam Angle Adjustment All beacons are shipped from the factory preset at an elevation angle of 5 degrees, per FAA requirements. To adjust to a different angle, refer to Section 5.2.2. HBM 150/2 Installation and Maintenance Manual...
-
Page 12: Maintenance
1. The beacon head cover has either (a) one screw and a hinge, or (b) two screws. Loosen the head cover screw(s) located at the edge of the head cover, and open or remove the head cover. HBM 150/2 Installation and Maintenance Manual... - Page 13 5.2.3 Lens Cleaning Clean lenses periodically with alcohol or glass cleaner and soft cloth. Wipe dry with a clean soft cloth. 5.2.4 Lubrication All moving parts are permanently lubricated and will not require further attention. HBM 150/2 Installation and Maintenance Manual...
-
Page 14: Repair
5. Install the four metal clips at the edges of the lens. 6.2 Fuses The HBM 150/2 has a lamp fuse, and a motor fuse. The fuses are located on the Control Panel, directly inside the door of the chassis. -
Page 15: Lamp Ballast
2. Refer to the wiring diagrams in Section 7 for component connections. 3. Loosen the four cap screws that hold the motor in place, and slide the motor to the right. 4. Remove the timing belt. HBM 150/2 Installation and Maintenance Manual... - Page 16 15. Reconnect the wires to the motor capacitor. Red wire on the left side, and the two white wires on the right side. 16. Reconnect the black wire to the neutral on control panel. 17. Reconnect the power to the beacon. HBM 150/2 Installation and Maintenance Manual...
-
Page 17: Troubleshooting Chart, Replacement Parts And Wiring Diagrams
Beacon Troubleshooting Chart This chart will help you to locate over 99% of beacon problems. Detailed repair procedures are located in chapter 6 of this manual. If you are still unable to solve the problem, call Hali-Brite at 800-553-6269. Start Beacon rotates? - Page 18 Mercotac rotary electrical connector 4100-0000-1A HBM150 MOTOR 9 9 9 9 Airport Equipment Qualified to FAA QUALITY CONTROL, ACCEPTANCE Specification HALI-BRITE. INC. Intertek Testing Services N.A., Inc. PRODUCT: DESCRIPTION: SERIAL #: INSPECTED BY: __________________________ DATE: HBM 150/2 Installation and Maintenance Manual...
- Page 19 WHITE Thermostat 400W Heater Cartridge (OPTIONAL) YELLOW GREEN BLUE GREEN CHASSIS Ø Ø SWITCHED UNSWITCHED FILE NAME: HB_2000_0012_R3 HALI-BRITE, INC. NAME: HBM 150/2 120/240V60HZ P.O. Box 10 2000-0012 Crosby, MN 56441 Drawn By: Lori Cross 1 OF 1 DATE 3/4/04...
- Page 21 MERCOTAC CONNECTOR RECYCLING Thank you for returning your used Mercotac connectors for recycling and not disposing them in the trash or landfill. The used connectors will be sent to a licensed mercury recycling facility where the liquid mercury is retrieved for future use through an environmentally safe distillation process.
Need help?
Do you have a question about the HBM 150/2 and is the answer not in the manual?
Questions and answers