Table of Contents
Advertisement
Available languages
Available languages
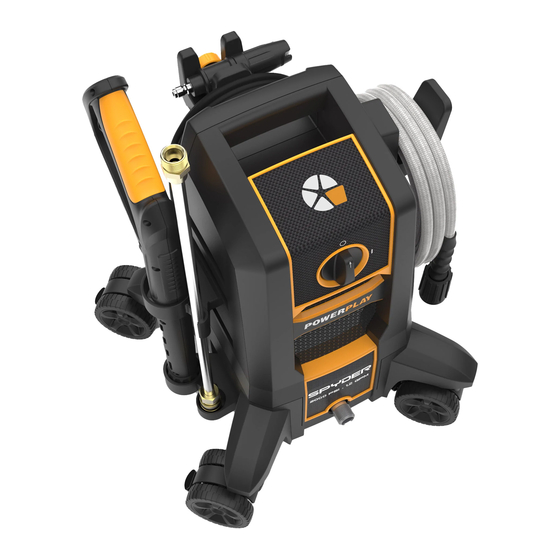
SPYDER
Electric Pressure Washer
Assembly, Care and Use Instructions
SPY2KCOS
Read carefully. Retain these instructions and
attach receipt to manual for future reference.
IMPORTANT: NEVER use an extension cord with this
unit. It may cause damage to the motor and VOID the
warranty.
ALWAYS WEAR EYE PROTECTION TO
PREVENT INJURY TO EYES WHEN
OPERATING THE POWER WASHER.
Questions, problems, missing parts?
Before returning to your retailer, call our customer service department at 1-855-770-7529,
9:00 a.m. - 4:00 p.m., EST, Monday - Friday. www.powerplaypro.com
SPY-17
Advertisement
Chapters
Table of Contents

Subscribe to Our Youtube Channel
Related Manuals for Powerplay SPYDER SPY2KCOS


Summary of Contents for Powerplay SPYDER SPY2KCOS
- Page 1 SPYDER Electric Pressure Washer Assembly, Care and Use Instructions SPY2KCOS Read carefully. Retain these instructions and attach receipt to manual for future reference. IMPORTANT: NEVER use an extension cord with this unit. It may cause damage to the motor and VOID the warranty.
-
Page 2: Table Of Contents
Table of Contents Package Contents ..........................Product Specifications ........................Safety Information ..........................Preparation ............................Assembly Instructions........................Important Initial Startup ......................... Operating Instructions ........................Care and Maintenance ........................Troubleshooting ..........................One Year Limited Consumer Warranty ..................Accessories ............................. -
Page 3: Package Contents
Package Contents O-Ring Soap – Black 0˚ – Red 15˚ – Yellow 25˚ – Green Part Description Quantity Part Description Quantity Hose Upper Spray Gun Holder Spray Gun Lower Spray Gun Holder Spray Gun Safety Lock Casters Lance Power Washer Unit Hose Holder Spray Tips O-Ring Replacement Kit... -
Page 4: Safety Information
Safety Information IMPORTANT SAFETY INSTRUCTIONS • Watch your balance and footing while using your power washer. Surfaces become slippery when wet Please read and understand this entire manual before and are extra slippery when using a detergent or attempting to assemble, operate, or install the product. cleaner. - Page 5 • • NEVER use lances or other parts that are not necessary when a product is used near children. compatible for this specific Powerplay unit. • Know how to stop the product and bleed pressures • NEVER spray any electrical outlet with your power quickly.
-
Page 6: Preparation
Safety Information IMPORTANT SAFETY INSTRUCTIONS SERVICING OF A DOUBLE-INSULATED APPLIANCE In a double-insulated product, two systems of insulation are provided instead of grounding. No grounding means is provided on a double-insulated product, nor should a means for grounding be added to the product. Servicing a double-insulated product requires extreme care and knowledge of the system, and should be done only by qualified service personnel. -
Page 7: Assembly Instructions
Assembly Instructions Slide caster (C) tab into slot on bottom corner of power washer unit (D). Repeat for the remaining casters. Slide hose holder (E) onto tab on the left side of power washer unit (D). Slide foam cannon bracket (M) onto tab on back of power washer unit (D). - Page 8 Assembly Instructions Slide upper spray gun holder (A) tab into slot on left side of power washer unit (D). From below, slide lower spray gun holder (B) tabs into slots on bottom left side of power washer unit (D). Hold back the collar at one end of the end of the hose (G).
- Page 9 Assembly Instructions Hold back the collar at the other end of the hose (G). Push firmly to connect hose fitting to spray gun (H). Twist collar clockwise to secure. Confirm hose is locked into spray gun by slightly pulling on them. To remove the hose, twist collar counter clockwise then pull back to release the hose (G) connection from the spray gun (H).
- Page 10 Assembly Instructions Insert lance (J) into spray gun (H) and turn clockwise to tighten (DO NOT overtighten). Note: ALWAYS engage the safety lock (I) when changing lances and spray tips to ensure that they do not accidentally eject with force during removal. Attach spray tips (K) or foam cannon (L) into end of lance (J) by pressing selected tip into place.
-
Page 11: Important Initial Startup
Assembly Instructions Attach a garden hose to the garden hose adapter on the back of the power washer unit (D). Note: Flush out garden hose before connecting to garden hose adapter. Assembly is now complete. Read and observe all safety instructions before turning on the power washer. - Page 12 Operating Instructions Operation Tips Using the Foam Cannon • When using detergent, fill bottle with a properly 1. Unscrew fluid tank from foam cannon valve assembly. formulated detergent-to-water ratio, following 2. Fill fluid tank with water (for best results, use warm instructions on the container.
-
Page 15: Care And Maintenance
Care and Maintenance Moving and Storage Instructions 1. When the pressure washing session is complete, turn off the power switch. 2. Unplug the power cord from the outlet. 3. Turn off the water supply. Pull the trigger on the spray gun 2-3 times to drain out excess water and to release any remaining water pressure. -
Page 16: Troubleshooting
Troubleshooting If you have any questions regarding the product, please call customer service at 1-855-770-7529. Problem Corrective Action Unit will not turn on. 1. Make sure the power washer is OFF. Plug the electrical cord into a grounded 120 volt outlet (no electrical extension cord should be used). - Page 17 Warranty The one year limited consumer warranty of this product is covered by Powerplay Corporation. This product has a 1 (one) year limited consumer warranty. Please read the following carefully to understand what the warranty entails: This product is under warranty to the original retail consumer against defects in material and workmanship for a period 1(one) year.
- Page 18 Replacement Parts 1-855-770-7529. For replacement parts, call our customer service department at 9:00 a.m. - 4:00 p.m., EST, Monday - Friday or order online at www.powerplaypro.com. Soap – Black 0˚ – Red 15˚ – Yellow 25˚ – Green O-Ring Part Description Part # Part...
- Page 19 SPYDER Laveuse à pression électrique Instructions d’assemblage, d’entretien et d’utilisation SPY2KCOS Veuillez lire attentivement. Conservez ces instructions et brochez le reçu au manuel pour référence ultérieure. IMPORTANT : N’utilisez JAMAIS de rallonge avec cette unité. Celle-ci pourrait endommager le moteur et ANNULER la garantie.
- Page 20 Table des matières Contenu de l’emballage ......................... Spécifications du produit ......................Informations sur la sécurité ......................Préparation ............................Instructions de montage ........................ Instructions importantes de démarrage initial ................Instructions de fonctionnement ....................Entretien général et maintenance ....................Dépannage ............................Garantie ............................
-
Page 21: Contenu De L'emballage
Contenu de l’emballage O-Ring Savon – Noir 0˚ – Rouge 15˚ – Jaune 25˚ – Vert Pièce Description Quantité Pièce Description Quantité Tuyau Support supérieur à pistolet pulvérisateur Pistolet pulvérisateur Support inférieur à pistolet Verrouillage de sécurité du pulvérisateur pistolet pulvérisateur Roulettes Lance Unité... -
Page 22: Informations Sur La Sécurité
Informations sur la sécurité • Attention de bien maintenir votre équilibre lorsque vous CONSIGNES DE SÉCURITÉ IMPORTANTES utilisez votre laveuse à pression. Les surfaces deviennent Veuillez lire et comprendre l’intégralité de ce manuel avant de glissantes lorsqu’elles sont mouillées et très glissantes lors tenter d’assembler, d’utiliser ou d’installer le produit. - Page 23 Informations sur la sécurité • Examinez le tuyau régulièrement. Remplacez-le s’il est • Ouvrez TOUJOURS l’alimentation en eau avant de mettre la endommagé. En raison de la haute pression utilisée, il ne laveuse à pression sous tension. Faire fonctionner la pompe sans eau endommagera les composants internes et rendra doit pas être réparé...
-
Page 24: Préparation
Informations sur la sécurité CONSIGNES DE SÉCURITÉ IMPORTANTES ENTRETIEN D'UN APPAREIL À DOUBLE ISOLATION AVERTISSEMENT - Pour réduire le risque d'électrocution, mettez tous les branchements à sec et hors tension. Ne touchez pas la Dans un produit à double isolation, deux systèmes d'isolation prise avec les mains mouillées. -
Page 25: Instructions De Montage
Instructions de montage Glissez la languette de la roulette (C) dans le coin inférieur droit de la laveuse à pression (D). Répétez cette étape pour les autres roulettes. Glissez le support de tuyau (E) dans la languette du côté gauche du châssis de la laveuse à pression (D). Glissez le support du pistolet à... - Page 26 Instructions de montage Glissez le support supérieur du pistolet pulvérisateur (A) sur le côté gauche du châssis de la laveuse à pression (D). À partir du dessous, glissez le inférieur supérieur du pistolet pulvérisateur (B) sur le côté gauche du châssis de la laveuse à...
- Page 27 Instructions de montage Retenez la bague à l’autre extrémité du tuyau (G). Poussez fermement pour connecter le raccord du tuyau au pistolet (H). Tournez la bague dans le sens des aiguilles d’une montre pour la fixer. Assurez-vous que le tuyau est bien fixé...
- Page 28 Instructions de montage Insérez la lance (J) dans le pistolet (H) et tournez dans le sens des aiguilles d’une montre pour resserrer (ne serrez pas trop). Remarque : Poussez toujours le verrouillage de sécurité (I) lors du changement de lance et de buses pour vous assurer qu’ils ne soient pas éjectés accidentellement avec force lors du retrait.
-
Page 29: Instructions Importantes De Démarrage Initial
Instructions de montage Fixez le boyau d’arrosage à l’adaptateur pour boyau d’arrosage à l’arrière du châssis de la laveuse à pression (D). Remarque : Purgez le tuyau d’arrosage avant de le brancher à l’adaptateur du tuyau d’arrosage. L’assemblage est maintenant terminé. Lisez et observez toutes les instructions de sécurité... - Page 30 Instructions de fonctionnement Conseils d’utilisation Utilisation du Pistolet à mousser • Lorsque vous utilisez du détergent, remplissez 1. Détachez la bande en acier du pistolet haute pression. la bouteille avec un détergent ou un nettoyant 2. Dévissez le réservoir du liquide de l’ensemble de la correctement formulé...
- Page 31 30 30...
-
Page 32: Entretien Général Et Maintenance
Entretien général et maintenance Détergents Nettoyage des buses de vaporisation • Utilisez des détergents conçus pour les laveuses Une buse obstruée peut réduire considérablement la à pression. Les quincailleries ou les centres de pression d’eau ou entraîner une pulsation lors de la rénovation peuvent offrir des détergents pour différents vaporisation. - Page 33 Entretien général et maintenance Instructions de déplacement et de stockage 1. Lorsque votre séance de nettoyage à pression est terminée, fermez l’interrupteur d’alimentation. 2. Débranchez le cordon d’alimentation de la prise. 3. Coupez l’alimentation en eau. Tirez sur la gâchette du pistolet 2 ou 3 fois pour faire évacuer l’excès d’eau et pour purger la pression restante.
-
Page 34: Dépannage
Dépannage Si vous avez des questions sur le produit, veuillez appeler le service à la clientèle au 1 (855) 770-7529. Problème Mesures correctives L’appareil ne s’allume 1. Assurez-vous que l’interrupteur de la laveuse à pression est à la position hors tension. pas. -
Page 35: Garantie
Garantie La garantie limitée d’un an pour le consommateur de ce produit est couverte par Powerplay Corporation. Ce produit a une garantie limitée de 1 (un) an pour le consommateur. Veuillez lire ce qui suit attentivement pour comprendre ce que chaque garantie signifie : Ce produit est protégé... - Page 36 Pièces de rechange Pour obtenir des pièces de remplacement, appelez le service à la clientèle au 1 (855) 770-7529. 9 h 00 à 16 h 00, HNE, du lundi au vendrediou commandez en ligne sur www.powerplaypro.com Savon – Noir 0˚ – Rouge 15˚...
- Page 37 Notes...
Need help?
Do you have a question about the SPYDER SPY2KCOS and is the answer not in the manual?
Questions and answers
What is the recommended ratio of detergent to water. I assume this is added to the tank in the machine. When using the bottle/sprayer, do you put detergent in there. There are no specific instructions about these questions in the manual.