DRY AGER DX 500 Premium Use And Care Manual
Hide thumbs
Also See for DX 500 Premium:
- Manual (44 pages) ,
- Operating instructions manual (17 pages) ,
- User manual (14 pages)

Related Manuals for DRY AGER DX 500 Premium


Summary of Contents for DRY AGER DX 500 Premium
- Page 1 Gebrauchsanweisung DRY AGER DX 500 Premium ® Sind Sie bereit für professionelles Dry Aging? ® Perfekt - starten Sie mit DRY AGER...
-
Page 2: Table Of Contents
Sicherheits- und Warnhinweise Schluss mit dem Geheimnis ums Dry Aging, ab sofort produ- zieren Sie das geschmacklich beste Fleisch der Welt selbst zu Klimaklasse Hause, mit dem DRY AGER DX 500 Premium. ® Energie sparen Beim Dry Aging entsteht eine sehr gute charaktervolle Fleisch- Elektrischer Anschluss qualität und der natürlich harmonische Eigengeschmack des... -
Page 3: Sicherheits- Und Warnhinweise
Sicherheits- und Warnhinweise WARNUNG Zum Beschleunigen des Abtauvorgangs kei- • U m Personen- und Sachschäden zu vermeiden, sollte das ne anderen mechanischen Einrichtungen Gerät von zwei Personen ausgepackt und aufgestellt werden. oder sonstige Mittel als die vom Hersteller empfohlenen benutzen. • Bei Schäden am Gerät umgehend - vor dem Anschließen - beim Lieferanten rückfragen. -
Page 4: Klimaklasse
Klimaklasse Entsorgungshinweis Die Klimaklasse gibt an, bei welcher Umgebungstemperatur das Das Gerät enthält wertvolle Materialien und ist einer Gerät betrieben werden darf, um die volle Kälteleistung zu er- vom unsortierten Siedlungsabfall getrennten Erfas- reichen. sung zuzuführen. Die Entsorgung von ausgedienten Geräten muss fach- und sachgerecht nach den ört- •... -
Page 5: Schnellstarter Tipps
Die Schnellstarter Tipps ersetzen nicht die ausführlichen Bedien,- Warn- und Gefahrenhinweise in den weiteren Kapiteln der Gebrauchsanweisung. Innenraum des Gerätes reinigen. Beladungskapazität mit Gehänge: Maximal 2 x Rücken- Tipp: DRY AGER Spezialreiniger, Art. Nr. Z33145 strang mit je 0,5 m Länge. ®... -
Page 6: Abmessung
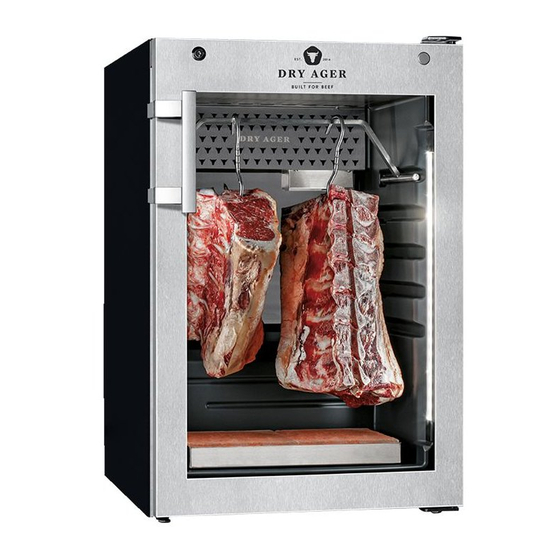
Abmessungen Gerätebeschreibung Bedien- und Kontrollelemente Türkontaktschalter °C Türgriff Gehänge (optional) (Art. Nr. DX0013) Einschieberost(optional) Fleischablagerost, Art. Nr. DX0026 UVC System Wurstrost, Art. Nr. DX0023 Innenbeleuchtung (LED) Typenschild Aktivkohlefilter Salzwanne (optional) Art. Nr. DX0075 Bodenrost Stellfüße Integrierte Systeme Humicontrol Abtauautomatik, automatische Tauwasserverdunstung ©... -
Page 7: Einbauzeichnungen
. Auch seitlich oder an der Rückseite 2. Gehänge einsetzen möglich. Gesamtmaß bei offener Tür: 615 mm. Gesamtmaß Korpus + Tür (hervorstehend): 610 mm. Verkleidung des Abstandes durch DRY AGER Blende möglich. ® Als Zubehör erhältlich unter www.dry-ager.com/shop. Gehänge Gerät aufstellen •... -
Page 8: Bedien- Und Kontrollelemente
Bedien- und Kontrollelemente Überblick Regler Symbole und Zeichen Led 2 Led 3 Temperatur Anzeige Feuchte Anzeige Steuertasten Led 4 Einen Vorgabewert erhöhen. Ein- / Austaste UVC Entkeimung, Led / Symbol Mode Funktion dafür Taste min. 5 s gedrückt halten. Gerät in Stand-by, Led 4 Einen Vorgabewert verringern. -
Page 9: Starten Des Betreiebs
Starten des Betriebs 6. Temperatur einstellen 1. Drücken Sie die Taste set temp: Der Temperatur- 1. Stromanschluss Sollwert wird angezeigt und blinkt. 2. Mit den Pfeiltasten Lesen Sie sorgfältig den Abschnitt Elektrischer Anschluss ( kann der eingestell- Seite 4), bevor Sie das Gerät an die Netzsteckdose anschließen. te Wert geändert werden. -
Page 10: Beladen Des Gerätes Mit Lebensmitteln
Beladen des Geräts mit Lebensmitteln Option 1: Lebensmittel liegend lagern 1. Lebensmittel auswählen WICHTIG Verwenden Sie nur Lebensmittel mit eingehaltener Kühlkette, die unter einwandfreien hygienischen Bedingungen gehandhabt wurden. Hinweise für geeignetes Fleich: • Verwenden Sie frisches Fleisch am Knochen spätestens 5 Tage nach der Schlachtung oder max. -
Page 11: Reifezeit Berücksichtigen
Option 2: Lebensmittel hängend lagern 4. Reifezeit berücksichtigen Die optimale Reifezeit hängt von mehreren Parametern ab. Typische Reifezeiten, die als grober Anhaltspunkt betrachtet werden können, sind für Frisches Rindfleisch: ~ 21-28 Tage Frisches Schweinefleisch: ~ 14-21 Tage Vakuumverpacktes Fleisch (Folie vor dem Dry Aging entfernen): bis zu ~ 14-18 Tage Während des Betriebs WICHTIG... -
Page 12: Reinigung
Sicherung auslösen bzw. herausschrauben. 3. Reinigung des Innenraums • V erwenden Sie ein feuchtes (lauwarmes Wasser + geeignetes Nicht mit Dampfreinigungsgeräten arbeiten! Reinigungsmittel wie den DRY AGER Spezialreiniger) wei- ® Beschädigungs- und Verletzungsgefahr. ches Tuch oder einen Schwamm um das Innere des Geräts zu reinigen. -
Page 13: Alarmmeldungen
Halten Sie sich unbedingt an diese Wartungsrichtlinien. Wenn die Stärke des UVC-Lichts nicht ausreicht, bedeutet dies, dass das Gerät nicht richtig funktioniert. Maßnahme Bestellen Sie nur die original DRY AGER UVC-Ersatzbirne ® (Art. DX0101) und den Aktivkohlefilter (Art. Nr. DX0110) und wechseln Sie beide Teile gemäß... -
Page 14: Türanschlag Wechseln
Türanschlag wechseln Der Wechsel des Türanschlags sollte nur von ausgebildetem 6. Stellen Sie die Scharniere und Fachpersonal durchgeführt werden. Für den Umbau sind zwei Abdeckplatten auf die gegen- Personen erforderlich. überliegende Seite ein. Entfernen Sie die Abdeckplatte. 7. Schrauben Sie die Schrau- be mit dem beiliegenden Wichtig Schraubenschlüssel heraus. - Page 15 11. Schrauben Sie den Scharnierwinkel an. 12. Ziehen Sie die Schraube fest. Achtung die Tür muss von einer zwei- ten Person gehalten werden! 13. Setzen Sie die Tür auf den Riegel und führen Sie sie bis zur Oberkante des Scharniers. 14.
- Page 17 Use and Care Manual for DRY AGER DX 500 Premium ® Are you ready for professional dry aging? Perfect - get started with DRY AGER ®...
-
Page 18: Dry Aging
Locking and unlocking door Loading the Device with Food We wish you much joy and pleasure with Dry Aging. Select food Founder of the DRY AGER Manufacture ® Wait for temperature setpoint to be reached Fill the device Christian, Aaron &... -
Page 19: Safety Instructions And Warnings
Safety Instructions WARNING and Warnings Do not use mechanical devices or other me- ans to speed up defrosting other than those recommended by the manufacturer. • T o prevent injury or damage to the unit, the appliance should be unpacked and set up by two people. • In the event that the appliance is damaged on delivery, con- WARNING tact the supplier immediately before connecting to the mains. -
Page 20: Climate Rating
Climate rating Disposal notes The climate rating indicates the ambient temperature at which The appliance contains reusable materials and should the appliance may be operated in order to achieve full cooling be disposed of properly - not simply with unsorted capacity. -
Page 21: Quick Starter Tips
The quick starter tips do not replace the elaborate operation instructions, warning and danger notes in the other chapters of this manual. Clean the inside of the DRY AGER Hang the half saddle on the hanger of your DRY AGER ® ®... -
Page 22: Dimensions
Dimensions Description of the Appliance Control panel Door contact switch °C Door handle Hanger (optional) (Item no. DX0013) Grid shelf (optional) Full shelf for meat, item no. DX0026 UVC System Charcuterie shelf, item no. DX0023 Interior light (LED) Type plate Activated charcoal filter Saltair tray (optional) Item no. -
Page 23: Integration Drawing
Minimum size: 200 cm . Possible on the side or at the back. Overall dimension with opend door: 615 mm. Overall dimension body + door (protruding): 610 mm. Covering of distance possible by DRY AGER moulding ® Hanger Available as an accessory in our shop: www.dry-ager.com/shop. -
Page 24: Operating The Appliance
Operating the Appliance Overview of Control Panel Controller Display and Symbols Led 2 Led 3 Temperature display Humidity display Controller Keys Led 4 Increases the displayed value. To turn On / Off the UVC disinfection, press the Led / Symbol Mode Function button for a minimum of 5 sec. -
Page 25: Starting The Operation
Starting the Operation 1. Electrical connection 6. Setting temperature Carefully read section Electrical Safety (page 20), before 1. Press set temp. key: The temperature set value is connecting the appliance to the mains socket. displayed and flashing. 2. The arrow keys can be used to change 2. -
Page 26: Loading The Device With Food
Loading the Device with Food Option 1: position food lying down 1. Select food IMPORTANT Only use food with a maintained cold chain that was handled under good hygienic conditions. Some hints for suitable meat: • Use fresh meat on the bone at maximum 5 days after slaught- ering or max. -
Page 27: Consider Aging Time
Option 2: position food hanging 4. Consider aging time The optimal aging time depends on many parameters. Typical aging times, which can be considered as a rough reference, are as follows: Fresh meat of beef: ~ 21-28 days Fresh meat of pork: ~ 14-21 days Vacuum packed meat (remove foil before aging): up to ~ 14-18 days During Device Operation... -
Page 28: Cleaning Instructions
(see section Customer Service, page 29). • R emove all accessories such as shelves, hanger, tray from the appliance. 2. Cleaning the accessories • C lean the hanger, the shelves and the tray with warm water and a suitable detergent such as the DRY AGER SPECIAL ® CLEANER. • C lean other accessories according to the cleaning instruc- tions specified in the respective manuals. -
Page 29: Error Messages
Error Messages Action Order only the original DRY AGER UVC replacement bulb ® (item no. DX0101) and the activated charcoal filter (item no. The error messages in the following table are indicated in the DX0110) and replace both parts according to the correspon- display. -
Page 30: Changing Over Door Hinges
Changing over Door Hinges Door hinges should only be changed by a trained expert. 6. Adjust the hinges and cover Changing the door hinges must be done by two people. plates to the opposite side. Remove the cover plate 7. Unscrew the bolt with the Important enclosed wrench. - Page 31 11. Screw the hinge angle. 12. Tighten the bolt. Attention the door must be held by a second person! 13. Place the door on the bolt and guide it to the top of the hinge. 14. Insert bearing bolts. Align the door sideways and tighten the bearing bolts.
- Page 32 Landig + Lava GmbH & Co. KG – DRY AGER Manufaktur Mackstraße 90 – 88348 Bad Saulgau Telefon: +49 7581 90 43 0 – E-Mail: info@dry-ager.com Web: www.dry-ager.com www.facebook.com/thedryager www.facebook.com/thedryager twitter.com/Dry_Ager twitter.com/Dry_Ager www.instagram.com/dryager www.instagram.com/dryager www.dry-ager.com www.dry-ager.com DX0500P_263174_F32_G60_H37_20A_2010_1...
Need help?
Do you have a question about the DX 500 Premium and is the answer not in the manual?
Questions and answers