Table of Contents
Advertisement
Advertisement
Table of Contents

Related Manuals for Echelon CONNECT SPORT


Summary of Contents for Echelon CONNECT SPORT
- Page 1 C O N N E C T S P O R T I N S T R U C T I O N M A N U A L...
- Page 3 Hello, I am Lou Lentine, President of Echelon, and I would like to welcome you to the Echelon community. You’ve made a great decision for yourself and your family. The Echelon Experience is an innovative combination of fitness products integrated with our state-of-the-art Echelon Fit App. This brand-new, fitness lifestyle connects your family, friends, the Echelon community, and Echelon instructors together to help you with your fitness goals.
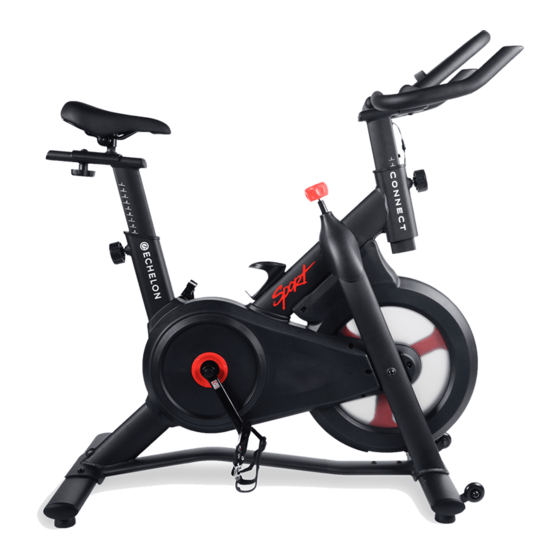
- Page 4 INCLUDES Handlebar height adjustment lever Handlebar post f rame Resistance knob/brake lever Crank arms Seat height adjustment lever Front bracket Rear bracket Wheel chock (not visible) Handlebars 10. Front foot Rear foot 12. Handlebar post 13. Seat 14. Water bottle holder 15.
- Page 5 Go to member.echelonfit.com and follow the on-screen instructions to choose a plan and setup your account. This info will be needed to login to your account on the Echelon Fit App. All account info and plans are managed at member.echelonfit.com and use the same login. After creating your account login on member.echelonfit.com, write down your login info.
- Page 6 DOWNLOAD THE ECHELON FIT APP Ensure latest version of the Echelon Fit™ App is installed from the Google Play Store or the App Store. OPERATIONAL INSTRUCTIONS Connect to the Echelon Fit App to access tutorials and operation instructions.
- Page 7 Lay the Connect Sport its side and Using your wrench or f ingers, pull Place the f ront foot with wheels remove wheel chock bolts with hex wheel chock out and set aside. facing forward under the key and set to the side.
- Page 8 Place seat onto seat post and secure Unscrew handlebar height Connect the coiled wire f rom the with included wrench. adjustment lever, but do not remove. bike to the wire at coming out of the Pull lever out and fully insert handlebar post.
- Page 9 The threads are reversed on LEFT pedal and nut. Finger tighten nut counterclockwise back onto pedal bolt. Screw left pedal onto crank arm Use double sided wrench to ensure counterclockwise. pedal is f irmly seated against crank arm. Hold pedal with double sided Remove nut f rom right pedal by Screw right pedal onto crank arm wrench and use single sided wrench...
- Page 10 Plug power adapter into port located The assembly of your Echelon® on the rear foot bracket, then plug Connect Sport bike is now into wall outlet. complete!
- Page 11 ‘Show system apps’. Select ‘Bluetooth Share’, then ‘Storage’, and then either ‘Clear Data’ or ‘Clear Cache,’ depending which button is highlighted. Restart the Echelon Fit™ App and attempt connection again. If you have any issues after completing this process, please contact us at...
- Page 12 Turn handlebar adjustment lever To level the Connect Sport, adjust counterclockwise until you are the pads on the f ront and rear feet able to pull the lever halfway until stable. out. Pull and hold the handlebar adjustment lever and raise or lower the handlebars to desired position.
- Page 13 There are two different positions (shown below) you will see during classes on the Echelon Fit™ app. Fig. 1 demonstrates a relaxed upper body while in seated position. Fig. 2 demonstrates proper hand placement and weight distribution while in an upright position.
- Page 14 To adjust the resistance while using the Echelon Connect Sport, turn ® the resistance adjustment knob to the left or right, as shown in Fig. 3. To stop the bike press down on the resistance adjustment knob, as shown in Fig. 4.
- Page 15 SPECS Input: 100-240V~ 50/60Hz 0.2A Output: 9V 0.5A QDID: 60912 FCC ID: 2AMDBBLE002 CAN ICES-3 (B)/NMB-3(B) HVIN: 1.0 IC: 22882-BLE002 DIMENSIONS: 42" L × 20.5" W × 45" H Changes or modifications not expressly approved by the party responsible for compliance could void the user's authority to operate this device.
- Page 16 FCC RF RADIATION EXPOSURE STATEMENT: 1. THIS TRANSMITTER MUST NOT BE CO-LOCATED OR OPERATING IN CONJUNCTION WITH ANY OTHER ANTENNA OR TRANSMITTER. 2. THIS EQUIPMENT COMPLIES WITH RF RADIATION EXPOSURE LIMITS SET FORTH FOR AN UNCONTROLLED ENVIRONMENT. THIS EQUIPMENT SHOULD BE INSTALLED AND OPERATED WITH A MINIMUM DISTANCE OF 20 CM BETWEEN THE RADIATOR AND YOUR BODY.
- Page 17 POSITION AND BRING THE MACHINE TO A COMPLETE STOP. THE MANUFACTURER RECOMMENDS TO PLACE THE ECHELON® CONNECT SPORT BIKE IN A SPACE WHERE YOU HAVE TWO FEET OF CLEARANCE ON ALL SIDES OF THE BIKE FOR SAFE MOUNTING AND DISMOUNTING OF THE EXERCISE BIKE.
- Page 18 DANGER - To reduce the risk of electric shock: 1. Always unplug this appliance from the electrical outlet immediately after using and before cleaning. WARNING - To reduce the risk of burns, fire, electric shock, or injury to persons: 1. An appliance should never be left unattended when plugged in. Unplug from outlet when not in use, and before putting on or taking off parts.
- Page 19 · Are you over 35 years old and physically inactive? · Have you been told by a doctor that you should NOT exercise? IF YOU ANSWER “YES” TO ANY OF THE ABOVE QUESTIONS, YOU SHOULD SEEK FURTHER ADVICE FROM YOUR DOCTOR PRIOR TO USING THE ECHELON CONNECT. ®...
- Page 20 WARNINGS • ALWAYS use the Echelon Connect Sport on solid, level ground and in a well lit and ventilated area. ® • ALWAYS check that the seat and handlebars are securely fastened before use. • NEVER allow children to play on or around the bike. This helps protect them from injury from moving parts.
- Page 21 • NEVER use the Echelon® Connect Sport in a standing position at high revolutions per minute (RPM) (see OPERATION section, Fig. 2). • ALWAYS keep your pelvis positioned over the center line of the Echelon Connect Sport.
- Page 22 ® Contact Echelon customer service at 833-937-2453 or at cs@echelon.com to determine whether it is necessary to return the unit. To return, securely ® pack the entire unit. Be sure carton clearly identifies sender by name and address. Attach a letter or card describing defect and original sales receipt.
Need help?
Do you have a question about the CONNECT SPORT and is the answer not in the manual?
Questions and answers
I can't logon because of an error message "Connectioin time out" Help