D-Link DAP-2662 User Manual
Nuclias connect
Hide thumbs
Also See for DAP-2662:
- Quick installation manual (12 pages) ,
- Quick installation manual (9 pages)
Table of Contents
Advertisement
Quick Links
Advertisement
Table of Contents

Related Manuals for D-Link DAP-2662


Summary of Contents for D-Link DAP-2662
- Page 1 Business Class Networking 2020 NUCLIAS CONNECT DAP-2662 User Guide V 1.01...
-
Page 2: Table Of Contents
Table of Contents Nuclias Connect .................4 Performance .................25 Introduction ................... 4 Wireless Resource Control ............27 Nuclias Connect Key Features ..........5 Multi-SSID ................29 Package Contents ................. 6 VLAN ..................31 System Requirements ..............6 VLAN List ................31 Port List ................32 Hardware Overview ..............7 Add/Edit VLAN ...............33 LEDs .................... - Page 3 MAC Bypass ..............60 Console Settings ..............81 DHCP Server .................61 Ping Control Settings ............81 Dynamic Pool Settings ..........61 LED Settings................81 Static Pool Setting ............62 Country Settings ..............81 Current IP Mapping List ..........63 DDP Settings ................82 Filters ..................64 Nuclias Connect Settings ..........82 Wireless MAC ACL ............64 Firmware and SSL Upload ..........83 IP Filter Settings .............65...
-
Page 4: Nuclias Connect
Nuclias Connect Introduction Nuclias Connect is D-Link’s centralized management solution for Small-to-Medium-Sized Business (SMB) networks. Nuclias Connect makes it easier to analyze, automate, configure, optimize, scale, and secure your network — delivering the convenience of an Enterprise-wide management solution, at an SMB price. Nuclias Connect gives you the financial and technical flexibility to expand from a small network to a larger one (up to 1,000 APs), while retaining a robust and centralized management system. -
Page 5: Nuclias Connect Key Features
Remote Config. & Batch Config. • Multilingual Support • Intuitive Interface • Multi-Tenant & Role-Based Administration • Payment Gateway (Paypal) Integration and Front-Desk Ticket Management For more information on how to use Nuclias Connect with DAP-2662, please refer to the Nuclias Connect User Guide. -
Page 6: Package Contents
• Power Adapter • Mounting Plate and Hardware Note: Using a power supply with a different voltage rating than the one included with the DAP-2662 will cause damage and void the warranty for this product. System Requirements y Computers with Windows®, Macintosh®, or Linux-based operating systems with an Ethernet Adapter... -
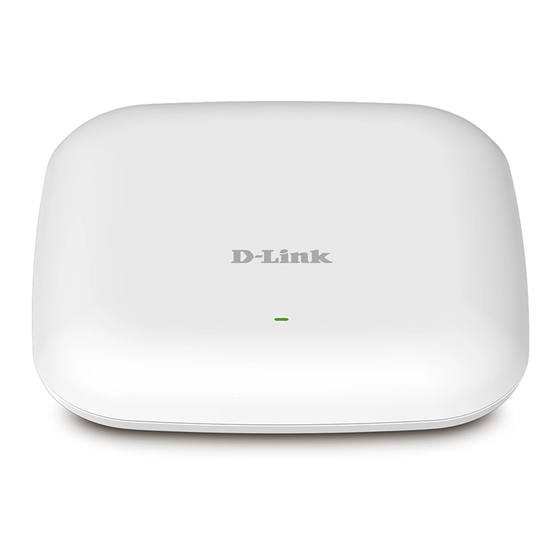
Page 7: Hardware Overview
LAN (PoE) Port Power/Status Blinking Red This LED will blink during boot-up. via an Ethernet cable. Indicates that the DAP-2662 is working Press and hold for five seconds to reset the access point Solid Green properly. Reset Button to the factory default settings. Press and hold for one... -
Page 8: Basic Installation
To power on the DAP-2662, you can use ONE of the following methods: 1. Plug one end of your Ethernet cable into the LAN port of the DAP-2662, and the other end into a port on a 802.3at PoE switch. - Page 9 Basic Installation To set up and manage the DAP-2662, use one of the following methods: 1. Connect the access point and your computer to the same PoE switch. Manage the access point from the computer. Enter dap2662.local in the address field of your browser.
-
Page 10: Setup Wizard
Setup Wizard Setup Wizard The first login instance displays the System Settings window which requires a change in password. Additional settings include the System Time and System Country functions. After logging in to the user interface, fill in the New Password and Confirm New Password fields. In the System Time function, select Using Network Time Protocol (NTP) or Manually to define the system time. -
Page 11: Web User Interface
Web User Interface The DAP-2662 supports an elaborate web user interface where the user can configure and monitor the device. Launch a web browser, type in http://dap2662.local/ and then press Enter to login. The default username and password is: admin Most of the configurable settings are located... -
Page 12: Wireless
Web User Interface Wireless On the wireless settings page, you can setup the basic wireless configuration for the access point. The user can choose from 4 different wireless modes: • Access Point - Used to create a wireless LAN • WDS with AP - Used to connect multiple wireless networks while still functioning as a wireless access point •... - Page 13 Web User Interface Channel: To change the channel, first toggle the Auto Channel Selection setting to Disable, and then use the drop-down menu to make the desired selection. Note: The wireless adapters will automatically scan and match the wireless settings. Channel Width: Allows you to select the channel width you would like to operate in.
-
Page 14: Wds With Ap Mode
Web User Interface WDS with AP Mode Wireless Band: Select either 2.4GHz or 5GHz from the drop-down menu. Mode: WDS with AP mode is selected from the drop-down menu. Network Name (SSID): Service Set Identifier (SSID) is the name designated for a specific wireless local area network (WLAN). - Page 15 Web User Interface Remote AP MAC Enter the MAC addresses of the APs on your network that will serve as bridges to wirelessly connect multiple networks. Address: Click on the Scan button to search for available wireless networks, then click on the available network that you want to Site Survey: connect with.
-
Page 16: Wds Mode
Web User Interface WDS Mode Wireless Band: Select either 2.4GHz or 5GHz from the drop-down menu. Mode: WDS is selected from the drop-down menu. Network Name (SSID): Service Set Identifier (SSID) is the name designated for a specific wireless local area network (WLAN). The SSID’s factory default setting is dlink. - Page 17 Web User Interface Site Survey: Click on the Scan button to search for available wireless networks, then click on the available network that you want to connect with. Authentication: Use the drop-down menu to choose Open System, or WPA-Personal. • Select Open System to communicate the key across the network.
-
Page 18: Wireless Client Mode
Wireless Client mode. Channel: The channel used will be displayed, and matches the AP that the DAP-2662 is connected to when set to Wireless Client mode. Channel Width: Use the drop-down menu to choose 20 MHz or Auto 20/40 MHz. -
Page 19: Wireless Security
Web User Interface Wireless Security Wireless security is a key concern for any wireless network installed. Wireless networks will broadcast it’s presence for anyone to connect to it. Today, wireless security has advanced to a level where it is virtually impenetrable. There are mainly two forms of wireless encryption and they are called Wired Equivalent Privacy (WEP) and Wi-Fi Protected Access (WPA). -
Page 20: Wi-Fi Protected Access (Wpa / Wpa2)
Web User Interface Wi-Fi Protected Access (WPA / WPA2) WPA was created by the Wi-Fi Alliance to address the limitations and weaknesses found in WEP. This protocol is mainly based on the 802.11i standard. There are also two variations found in WPA called WPA-Personal (PSK) and WPA-Enterprise (EAP). WPA-Enterprise requires the user to install a Radius Server on the network for authentication. - Page 21 Web User Interface WPA Mode: When WPA-Enterprise is selected, you must also select a WPA mode from the drop-down menu: AUTO (WPA or WPA2), WPA2 Only, or WPA Only. WPA and WPA2 use different algorithms. AUTO (WPA or WPA2) allows you to use both WPA and WPA2.
-
Page 22: Lan
Web User Interface LAN is short for Local Area Network. This is considered your internal network. These are the IP settings of the LAN interface for the DAP-2662. These settings may be referred to as private settings. You may change the LAN IP address if needed. The LAN IP address is private to your internal network and cannot be seen on the Internet. -
Page 23: Ipv6
Enable IPv6: Check to enable the IPv6 Get IP From: Auto is chosen here. Choose this option the DAP-2662 can get IPv6 address automatically or use Static to set IPv6 address manually. Other fields here will be grayed out when Auto is selected. -
Page 24: Advanced Settings
Web User Interface Advanced Settings In the Advanced Settings Section users can configure advanced settings concerning Performance, Multiple SSID, VLAN, Security, Quality of Service, AP Array, Web Redirection, DHCP Server, Filters and Scheduling. The following pages will explain settings found in the Advanced Settings section in more detail. -
Page 25: Performance
Web User Interface Performance On the Performance Settings page users can configure more advanced settings concerning the wireless signal and hosting. Wireless Band: Select either 2.4GHz or 5GHz. Wireless: Use the drop-down menu to turn the wireless function On or Off. Wireless Mode: The different combinations of clients that can be supported include Mixed 802.11n, 802.11g and 802.11b, Mixed 802.11g and 802.11b... - Page 26 Web User Interface Transmit Power: This setting determines the power level of the wireless transmission. Transmitting power can be adjusted to eliminate the overlapping of wireless area coverage between two access points where interference is a major concern. For example, if wireless coverage is intended for half of the area, then select 50% as the option.
-
Page 27: Wireless Resource Control
APs. If this function is enabled and when the number of users ex- ceeds this value, or the network utilization of this AP exceeds the percentage that has been specified, the DAP-2662 will... - Page 28 Network Utilization: Set the maximum utilization of this access point for service. The DAP-2662 will not allow any new clients to associate with the AP if the utilization exceeds the value the user specifies. Select a utilization percentage between 100%, 80%, 60%, 40%, 20%, or 0%.
-
Page 29: Multi-Ssid
Web User Interface Multi-SSID This device supports up to four multiple Service Set Identifiers. You can set the Primary SSID under Basic > Wireless. The SSID’s factory default setting is dlink. The SSID can be easily changed to connect to an existing wireless network or to establish a new wireless network. Enable Multi- Check to enable support for multiple SSIDs. - Page 30 Web User Interface Encryption: When you select Open System, toggle between Enable and Disable. If Enable is selected, the Key Type, Key Size, Key Index (1~4), Key, and Confirm Keys must also be configured. Key Type: Select HEX or ASCII. Key Size: Select 64-bit or 128-bit.
-
Page 31: Vlan
The DAP-2662 supports VLANs. VLANs can be created with a Name and VID. Mgmt (TCP stack), LAN, Primary/Multiple SSID, and WDS connection can be assigned to VLANs as they are physical ports. Any packet which enters the DAP-2662 without a VLAN tag will have a VLAN tag inserted with a PVID. -
Page 32: Port List
Web User Interface Port List The Port List tab displays the current ports. If you want to configure the guest and internal networks on a Virtual LAN (VLAN), the switch and DHCP server you are using must also support VLANs. As a prerequisite step, configure a port on the switch for handling VLAN tagged packets as described in the IEEE 802.1Q standard. -
Page 33: Add/Edit Vlan
Web User Interface Add/Edit VLAN The Add/Edit VLAN tab is used to configure VLANs. Once you have made the desired changes, click Save to have your changes take effect. VLAN Status: Use the radio button to toggle to Enable. VLAN ID: Provide a number between 1 and 4094 for the Internal VLAN. -
Page 34: Pvid Settings
Web User Interface PVID Settings The PVID Setting tab is used to enable/disable the Port VLAN Identifier Auto Assign Status as well as to configure various types of PVID settings. Click Save button to have your changes take effect. VLAN Status: Use the radio button to toggle between Enable and Disable. -
Page 35: Intrusion
Web User Interface Intrusion The Wireless Intrusion Protection window is used to classify APs as Valid, Neighborhood, Rogue, or a New group. Click Save for the changes to take effect. Wireless Band: Click the drop-down menu to select the wireless band, 2.4GHz or 5GHz. -
Page 36: Schedule
Web User Interface Schedule The Wireless Schedule Settings window is used to add and modify scheduling rules on the device. Click Save for your changes to take effect. Wireless Schedule: Use the drop-down menu to enable the device’s scheduling feature. Name: Enter a name for the new scheduling rule in the field provided. -
Page 37: Internal Radius Server
Internal RADIUS Server The DAP-2662 features a built-in RADIUS server. Once you have finished adding a RADIUS account, click the Save to have your changes take effect. The newly-created account will appear in this RADIUS Account List. The radio buttons allow the user to enable or disable the RADIUS account. Click the icon in the delete column to remove the RADIUS account. -
Page 38: Arp Spoofing Prevention
Web User Interface ARP Spoofing Prevention The ARP Spoofing Prevention feature allows users to add IP/MAC address mapping to prevent ARP Spoofing attack. ARP Spoofing Prevention: This check box allows you to enable the ARP Spoofing prevention function. Gateway IP Address: Enter a gateway IP address. -
Page 39: Bandwidth Optimization
Web User Interface Bandwidth Optimization The Bandwidth Optimization window allows the user to manage the bandwidth of the device and arrange the bandwidth for various wireless clients. When the Bandwidth Optimization rule is finished, click the Add button. To discard the Add Bandwidth Optimization Rule settings, click the Clear button. - Page 40 Web User Interface Band: Use the drop-down menu to toggle the wireless band between 2.4GHz and 5GHz. SSID Index: Use the drop-down menu to select the SSID for the specified wireless band. Downlink Speed: Enter the download speed limit in either Kbits/sec or Mbits/sec for the rule. Uplink Speed: Enter the upload speed limit in either Kbits/sec or Mbits/sec for the rule.
-
Page 41: Hotspot 2.0
Web User Interface Hotspot 2.0 Hotspot 2.0 (HS2) is a new networking standard designed to make the process of connecting to public wireless hotspots easier and more secure with seamless authentication and encryption between your device and access points. This is based on the IEEE 802.11u standard and uses WPA2- Enterprise for authentication between clients and access points. -
Page 42: Interworking
Web User Interface Interworking Interworking: Choose enable to turn on interworking function. Access Network Type: Specify type of network. Internet: Choose to enable or disable Internet access for this network. ASRA: Choose enable if the network has Additional Steps required for Access. ESR: Choose enable to indicate that emergency services are reachable through this device. -
Page 43: Wan Metrics
Web User Interface WAN Metrics WAN Link Status: Information about the status of the Access Point’s WAN connection. WAN Symmetric Link: Set to 1 if the WAN link is symmetric (upload and download speeds are the same), or set to 0 if not. -
Page 44: List
Web User Interface LIST Network Auth Type: Identifies whether this is an unsecured network. IP Address Type Identifies IP address version and type that Avilability: the Hotspot Operator uses and that would be allocated and available to a mobile device after it authenticates to the network. -
Page 45: Osu
Web User Interface OSU SSID: Specify the SSID that the device will associate and connect to when accessing the OSU server. OSU Server URI: Specify the Uniform Resource Identifier (URI) of the OSU Server. OSU Method List: Spcify preferred list of encoding methods that the OSU server supports in order of priority. - Page 46 Web User Interface OSU Icon Name: Specify icon name. OSU Icon Width: Specify width of the icon, in pixels. OSU Icon Height: Spcify length of the icon, in pixels. OSU Icon Type: Specifiy icon file type, where the icon type is any mim-type graphic format.
-
Page 47: Captive Portal
Static IP (Manual) is chosen here. Choose this option if you do not have a DHCP server in your network, or if you wish to assign a static IP address to the DAP-2662. When Dynamic IP (DHCP) is selected, the other fields here will be grayed out. - Page 48 Web User Interface IP Address : Assign a static IP address that is within the IP address range of your network. Subnet Mask : Enter the subnet mask. All devices in the network must share the same subnet mask. Gateway : Enter the IP address of the gateway/router in your network.
-
Page 49: Authentication Settings- Username/Password
VLAN Group : Static IP (Manual) is chosen here. Choose this Get IP From : option if you do not have a DHCP server in your network, or if you wish to assign a static IP address to the DAP-2662. When Dynamic... - Page 50 Web User Interface IP (DHCP) is selected, the other fields here will be grayed out. Please allow about 2 minutes for the DHCP client to be functional once this selection is made. IP Address : Assign a static IP address that is within the IP address range of your network. Subnet Mask : Enter the subnet mask.
-
Page 51: Authentication Settings- Passcode
Static IP (Manual) is chosen here. Choose this option if you do not have a DHCP server in your network, or if you wish to assign a static IP address to the DAP-2662. When Dynamic IP (DHCP) is selected, the other fields here will be... - Page 52 Web User Interface grayed out. Please allow about 2 minutes for the DHCP client to be functional once this selection is made. IP Address : Assign a static IP address that is within the IP address range of your network. Subnet Mask : Enter the subnet mask.
-
Page 53: Authentication Settings- Remote Radius
Static IP (Manual) is chosen here. Choose this option if you do not have a DHCP server in your network, or if you wish to assign a static IP address to the DAP-2662. When Dynamic IP (DHCP) is selected, the other fields here will be grayed out. - Page 54 Web User Interface IP Address : Assign a static IP address that is within the IP address range of your network. Subnet Mask : Enter the subnet mask. All devices in the network must share the same subnet mask. Gateway : Enter the IP address of the gateway/router in your network.
-
Page 55: Authentication Settings- Ldap
Web User Interface Authentication Settings- LDAP After selecting LDAP as the Authentication Type, we can configure the LDAP authentication that will be applied to each wireless client in this network. Session Enter the session timeout value here. This value can timeout(1-1440) : be from 1 to 1440 minutes. - Page 56 Web User Interface Subnet Mask : Enter the subnet mask. All devices in the network must share the same subnet mask. Gateway : Enter the IP address of the gateway/router in your network. DNS : Enter a DNS server IP address. This is usually the local IP address of your gateway/router. Server: Enter the LDAP server’s IP address or domain name here.
-
Page 57: Authentication Settings- Pop3
Get IP From : Static IP (Manual) is chosen here. Choose this option if you do not have a DHCP server in your network, or if you wish to assign a static IP address to the DAP-2662. When Dynamic IP... - Page 58 Web User Interface (DHCP) is selected, the other fields here will be grayed out. Please allow about 2 minutes for the DHCP client to be functional once this selection is made. IP Address : Assign a static IP address that is within the IP address range of your network. Subnet Mask : Enter the subnet mask.
-
Page 59: Login Page Upload
Web User Interface Login Page Upload In this window, users can upload a custom login web page that will be used by the captive portal feature. Click the Browse button to navigate to the login style, located on the managing computer and then click the Upload button to initiate the upload. Upload Login Style In this field the path to the login style file that will From Local Hard Drive:... -
Page 60: Mac Bypass
Web User Interface MAC Bypass The DAP-2662 features a wireless MAC Bypass. Once a user is finished with these settings, click Save for changes to take effect. Wireless Band: Select the wireless band for MAC Bypass. Select the SSID for MAC Bypass. -
Page 61: Dhcp Server
The DHCP address pool defines the range of the IP address that can be assigned to stations in the network. A Dynamic Pool allows wireless stations to receive an available IP with lease time control. If needed or required in the network, the DAP-2662 is capable of acting as a DHCP server. -
Page 62: Static Pool Setting
IP addresses automatically without the need to manually assign IP addresses. Select Enable to allow the DAP-2662 to function as a DHCP server. Assigned IP: Use the Static Pool Settings to assign the same IP address to a device every time you start up. -
Page 63: Current Ip Mapping List
Web User Interface Current IP Mapping List This window displays information about the current assigned DHCP dynamic and static IP address pools. This information is available when you enable DHCP server on the AP and assign dynamic and static IP address pools. Current DHCP Dynamic These are IP address pools the DHCP server has Profile:... -
Page 64: Filters
Web User Interface Filters Wireless MAC ACL This page allows the user to configure Wireless MAC ACL settings for access control. Wireless Band: Displays the current wireless band rate. Access Control List: Select Disable to disable the filters function. Select Accept to accept only those devices with MAC addresses in the Access Control List. -
Page 65: Ip Filter Settings
Web User Interface IP Filter Settings Enter the IP address or network address that will be used in the IP filter rule. For example, an IP address like 192.168.70.66 or a network address like 192.168.70.0. This IP address or network will be inaccessible to wireless clients in this network. Wireless Band: Click the drop-down menu to select the wireless band, 2.4GHz or 5GHz. -
Page 66: Wlan Partition
Web User Interface WLAN Partition This page allows the user to configure a WLAN Partition. Wireless Band: Displays the current wireless band. Select Enable or Disable. If the Ethernet Link Integrity: connection between the LAN and the AP is disconnected, enabling this feature will cause the wireless segment associated with the AP to be disassociated from the AP. -
Page 67: Traffic Control
Web User Interface Traffic Control Uplink/Downlink Setting The uplink/downlink setting allows users to customize the downlink and uplink interfaces including specifying downlink/uplink bandwidth rates in Mbits per second. These values are also used in the QoS and Traffic Manager windows. Once the desired uplink and downlink settings are finished, click the Save button to have your changes take effect. -
Page 68: Qos
Web User Interface Quality of Service (QoS) enhances the experience of using a network by prioritizing the traffic of different applications. The DAP-2662 supports four priority levels. Once the desired QoS settings are finished, click the Save to have your changes take effect. -
Page 69: Traffic Manager
Web User Interface Traffic Manager The traffic manager feature allows users to create traffic management rules that specify how to deal with listed client traffic and specify downlink/ uplink speed for new traffic manager rules. Click the Save to have your changes take effect. Traffic Manager: Use the drop-down menu to Enable the traffic manager feature. -
Page 70: Status
Web User Interface Status In the Status Section the user can monitor and view configuration settings of the access point. Here the user can also view statistics about client information, WDS information and more. The following pages will explain settings found in the Status section in more detail. -
Page 71: Device Information
This page displays the current information like firmware version, Ethernet and wireless parameters, as well as the information regarding CPU and memory utilization. Device Information: This read-only window displays the configuration settings of the DAP-2662, including the firmware version and the device’s MAC address. -
Page 72: Client Information
Web User Interface Client Information This page displays the associated clients SSID, MAC, band, authentication method, signal strength, RSSI, and power saving mode for the DAP-2662 network. Client Information: This window displays the wireless client information for clients currently connected to the DAP-2662. -
Page 73: Wds Information Page
Web User Interface WDS Information Page This page displays the access points SSID, MAC, band, authentication method, signal strength, and status for the DAP-2662’s Wireless Distribution System network. WDS Information: This window displays the Wireless Distribution System information for clients currently connected to the DAP-2662. -
Page 74: Statistics
Web User Interface Statistics Ethernet Traffic Statistics Displays wired interface network traffic information. Ethernet Traffic Statistics: This page displays transmitted and received count statistics for packets and bytes. -
Page 75: Wlan Traffic Statistics
Web User Interface WLAN Traffic Statistics Displays throughput, transmitted frame, received frame, and WEP frame error information for the AP network. WLAN Traffic Statistics: This page displays wireless network statistics for data throughput, transmitted and received frames, and frame errors. -
Page 76: Log
Web User Interface View Log The AP’s embedded memory holds logs here. The log information includes but is not limited to the following items: cold start AP, upgrading firmware, client associate and disassociate with AP, and web login. The web page holds up to 500 logs. View Log: The AP’s embedded memory displays system and network messages including... -
Page 77: Log Settings
Web User Interface Log Settings Enter the log server’s IP address to send the log to that server. Check or uncheck System Activity, Wireless Activity, or Notice to specify what kind of log type you want it to log. Log Server / IP Address: Enter the IP address of the log server. -
Page 78: Maintenance Section
Web User Interface Maintenance Section In the Status Section the user can monitor and view configuration settings of the access point. Here the user can also view statistics about client information, WDS information and more. The following pages will explain settings found in the maintenance section in more detail. -
Page 79: Administration
Web User Interface Administration Limit Administrator Check one or more of the five main categories to display the various hidden administrator parameters and settings displayed on the next five pages. Each of the nine main categories display various hidden administrator parameters and settings. Click Save when done. Limit Administrator VLAN Check the box provided and the enter the specific VLAN ID that the administrator will... -
Page 80: System Name Settings
System Name Settings Each of the five main categories display various hidden administrator parameters and settings. System Name: The name of the device. The default name is D-Link DAP-2662. Location: The physical location of the device, e.g. 72nd Floor, D-Link HQ. -
Page 81: Console Settings
Web User Interface Console Settings Each of the five main categories display various hidden administrator parameters and settings. Status: Status is enabled by default. Uncheck the box to disable the console. Console Protocol: Select the type of protocol you would like to use, Telnet or SSH. -
Page 82: Ddp Settings
Web User Interface DDP Settings Choose to enable or disable DDP. Status: Click to disable. (By default it is enabled.) Nuclias Connect Settings Choose to enable or disable Nuclias Connect. Enable Nuclias Connect: Choose from drop down list to enable or disable Nuclias Connect. -
Page 83: Firmware And Ssl Upload
This page allows the user to perform a firmware upgrade. A Firmware upgrade is a function that upgrade the running software used by the access point. This is a useful feature that prevents future bugs and allows for new features to be added to this product. Please go to your local D-Link website to see if there is a newer version of the firmware available. -
Page 84: Configuration File Upload
File: configuration file to your local disk. Note that if you save one configuration file with the administrator’s password now, after resetting your DAP-2662 and then updating to this saved configuration file, the password will be gone. Upload Nuclias Connect... -
Page 85: Time And Date Settings
Web User Interface Time and Date Settings Enter the NTP server IP, choose the time zone, and enable or disable daylight saving time. Current Time: Displays the current time and date settings. Enable NTP Server: Check to enable the AP to get system time from an NTP server from the Internet. -
Page 86: Configuration And System
Web User Interface Configuration and System These options are the remaining option to choose from in the top menu. Configuration allows the user to save and activate or discard the configurations done. System allows the user to restart the unit, perform a factory reset or clear the language pack settings. Logout allows the user to safely log out from the access point’s web configuration. -
Page 87: System Settings
On this page the user can restart the unit, perform a factory reset of the access point or clear the added language pack. Restart the Device: Click Restart to restart the DAP-2662. Restore to Factory Default Click Restore to restore the DAP-2662 Settings: back to factory default settings. -
Page 88: Help
Web User Interface Help The help page is useful to view a brief description of a function available on the access point in case the manual is not present. Help: Scroll down the Help page for topics and explanations. -
Page 89: Knowledge Base
Wireless Basics D-Link wireless products are based on industry standards to provide high-speed wireless connectivity that is easy to use within your home, business or public access wireless networks. D-Link wireless products provides you with access to the data you want, whenever and wherever you want it. -
Page 90: Wireless Installation Considerations
Wireless Installation Considerations The D-Link Access Point lets you access your network using a wireless connection from virtually anywhere within the operating range of your wireless network. Keep in mind, however, that the number, thickness and location of walls, ceilings, or other objects that the wireless signals must pass through, may limit the range. -
Page 91: Troubleshooting
Close your web browser (if open) and open it. • Access the web management. Open your web browser and enter the IP address of your D-Link access point in the address bar. This should open the login page for your the web management. -
Page 92: How To Check Your Ip Address
Troubleshooting How to check your IP address? After you install your network adapter, by default, the TCP/IP settings should be set to obtain an IP address from a DHCP server (i.e. wireless router) automatically. To verify your IP address, please follow the steps below. -
Page 93: How To Statically Assign An Ip Address
Troubleshooting How to statically assign an IP address? If you are not using a DHCP capable gateway/router, or you need to assign a static IP address, please follow the steps below: Step 1: Windows® 2000: Click on Start > Settings > Control Panel > Network Connections Windows XP: Click on Start >... -
Page 94: Technical Specifications
Technical Specifications Technical Specifications Standards LEDs • IEEE 802.11ac • Power/Status • IEEE 802.11n • IEEE 802.11g Temperature • IEEE 802.11a • Operating: 0˚C to 40˚C • IEEE 802.3b • Storing: -20˚C to 65˚C • IEEE 802.3u • IEEE 802.3ab Humidity •... -
Page 95: Antenna Pattern
Maximum Power Consumption • 11 Watts Antenna Pattern Temperature • Operating: 0 to 40 °C (32 to 104 °F) • Storage: -20 to 65 °C (-4 to 149 °F) Humidity • Operating: 10% to 90% non-condensing • Storage: 5% to 95% non-condensing Antenna Pattern Certi cations •...
Need help?
Do you have a question about the DAP-2662 and is the answer not in the manual?
Questions and answers