Advertisement
Quick Links
Advertisement

Related Manuals for Bush Baby BB4KWiFiWallOutlet


Summary of Contents for Bush Baby BB4KWiFiWallOutlet
- Page 1 Bush Baby 4K Wi-Fi Wall Outlet Hidden Camera SKU: BB4KWiFiWallOutlet Version 1.1...
- Page 2 THANK YOU FOR PURCHASING THE BB4KWIFIWALLOUTLET Please read this manual before operating the BB4KWIFIWALLOUTLET and keep it handy. Your purchase should include: 1 x BB4KWiFiWallOutlet 1 x Manual 1 x Tweezers 1 x 128GB MicroSD Card 1 x Micro SD Card Reader...
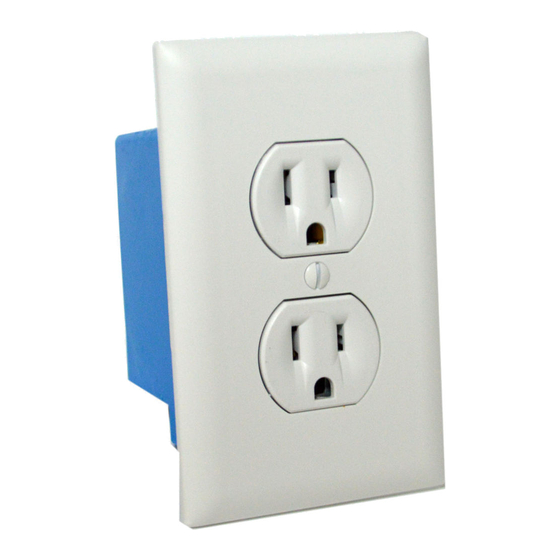
- Page 3 GET FAMILIAR WITH YOUR BB4KWIFIWALLOUTLET Version 1.1...
- Page 4 OPERATING THE BB4KWIFIWALLOUTLET BEFORE YOU START 1. First you must download the LookCam app from the Google Play Store or the iPhone App Store. o Android: https://play.google.com/store /apps/details?id=com.view.pp o iPhone: https://apps.apple.com/us/ap p/lookcam/id1460758870 2. If you wish to enable SD Card recording, you must insert a MicroSD card into the unit.
- Page 5 network. Otherwise, the device will not connect to the new network. Note: If you are not located in the US, or if you intend to use this product anywhere other than the US, you will need to purchase a converter in order to use the AC wall plug in and avoid damaging the product.
- Page 6 In order to view your device remotely, you must complete the following two-part sequence of steps. 1. Plug the device into the wall using the sample plug or hardwire the device where you want it. We suggest a professional installation. 2.
- Page 7 access. If you see this, choose to connect to the network anyway. 4. After connecting to the Wi-Fi Signal with your mobile device, open the LookCam App. NOTE: For iOS devices you must wait until the Wi-Fi Signal appears next to your Phone Carrier Name in the status bar at the top of your phone screen.
- Page 8 NOTE: You will be prompted to change the device password the first time you view the camera video feed. We suggest that you do change this to prevent any unauthorized viewing of your camera. IMPORTANT: You must keep this password in a safe place.
- Page 9 choose to use the device without connecting to your home Wi-Fi. The device will only be paired to your smartphone, and you will only be able to control and view it when you are within its range. 1. If you have followed the steps for “Connecting to Your Device Directly”, your phone should already be paired to the device.
- Page 10 complete this part 2 for connecting to your home Wi-Fi network. 1. From the home screen of the app, tap the settings gear next to the camera name. 2. Next choose “WiFi Config”. 3. Select your network from the list of available networks, and then enter your Wi-Fi password and press OK.
- Page 11 its own Wi-Fi signal, and you should be connected to your own Wi-Fi. o NOTE: If you still see a network broadcasting that is the named after the UID on the back of your device, connecting to your Wi-Fi has failed. Please repeat steps 3- 7 above and pay careful attention to the network password you entered.
- Page 12 3. In the top right of the screen there will be a video quality setting (4K, 2K, 1080P, and 720P). Choose the quality according to your preference. HOW TO SET UP MOTION ALARM RECORDING 1. To set up the motion alarm, return to the home screen of the app and tap the settings gear next to your camera.
- Page 13 6. Tap the “Alarm Record” toggle so it is in the on position, and tap the “Auto Record” to the off position. 7. Tap OK at the bottom of your screen to save your settings. o NOTE: You must have an SD Card inserted into the device for this to work.
- Page 14 You will feel some spring resistance before the card clicks in to place. a. Never force the card into the Card Slot under any circumstances. Otherwise the unit or the MicroSD card itself will be damaged. 3. To remove the SD card, gently push the card in so that it clicks.
- Page 15 2. Use the SD Card Reader to connect the MicroSD card to your computer. 3. Locate “Removable Disk” inside the (My) Computer folder. AutoPlay Removable Disk > Open folder to view files Or… Version 1.1...
- Page 16 Go to Start > Computer > Removable Disk 4. Open the Removable Disk drive. 5. Open the folder containing the files. 6. Double click the file you want to view. Note: You can also view, control, and delete your MicroSD card recordings from your smartphone app.
- Page 17 COPYING AND DELETING YOUR FILES The video files created are just like any other file on your computer, and can be managed in the exact same manner. To save a file, you want to select the file, right click your mouse on the file name, and then choose “Copy”...
- Page 18 you delete a file. If this is not done, the SD card will fill with hidden files, and the device will no longer record new files. Version 1.1...
-
Page 19: Troubleshooting
TROUBLESHOOTING THE DEVICE WON’T TURN ON Make sure the device is correctly wired. We suggest a professional installation. CANNOT RECORD TO SD CARD Confirm you have inserted a MicroSD Card into the unit. HOW TO SOFT RESET THE DEVICE ... - Page 20 Most of the time, you will need to send the device in for us to perform a factory reset. Please contact us at the number below for more information. CAN’T FIND DEVICE’S WIFI SIGNAL Please unplug the device, wait 30 seconds, plug your camera back in, and try again.
- Page 21 Call our technical support at 770–694– 6921 Version 1.1...
-
Page 22: Specifications
SPECIFICATIONS Video Resolution Streaming 4K, 2K, 1080P, 720P Resolution Recording 720P Resolution Video Format .MP4 Type of Memory External MicroSD Card Memory Capacity Up to 128GB Recording Capacity ≈ 5 hours per 1GB USB Interface 2.0 USB Player Software Time Date Stamp Loop Recording Operating Systems Windows XP &... - Page 23 Version 1.1...
- Page 24 QUALITY CONTROL CHECKLIST ☐ MicroSD Card Reader ☐ BB4KWiFiWall Outlet ☐ MicroSD Card ____GB ☐ Manual ☐ Tweezers QC Tech Name: _______________________________ Date: ______________________________ Version 1.1...
Need help?
Do you have a question about the BB4KWiFiWallOutlet and is the answer not in the manual?
Questions and answers