Table of Contents
Advertisement
Advertisement
Table of Contents

Related Manuals for Limerick Joy


Summary of Contents for Limerick Joy
- Page 1 Owners Manual...
- Page 2 Overview Using your new Joy Multi-User hospital grade breast pump READ THE ENTIRE MANUAL BEFORE OPERATING PUMP *This overview is not intended to provide complete user instructions. 1. Sanitize before use See page 8 2. Pump setup and assembly See page 19 3.
- Page 3 Symbols and the meaning Warning! Caution! Sterile Class B Caution: If the accessory kit is not labeled sterile, see page 10-5 for instructions on sanitizing the accessory kit. Sanitizing the accessory kit needs to be done before the first time you use it. After the first time you use the pump, the accessory kit will only need a simple cleaning procedure found on page...
-
Page 4: Table Of Contents
Accessory Kit Components Introduction to Your Joy Breast Pump Pump Description Purpose of Joy multi-user hospital grade breast pump Reasons to use a breast pump Benefits of using Joy electric breast pump Accessory Kit Sanitizing Before using the accessory kit for the first time... - Page 5 Display Functions and Indications Functions Timer Display Functions-Minute Timer Problem indication Excess Temperature: Excess Vacuum: Internal Fault: Vacuum Time Out: Other problems that may occur without a fault message Situation “A” Situation “B” Situation “C” Accessory Kit Setup and Assembly Double Pumping Setup Expressing milk from both breasts Single Pumping Setup...
- Page 6 Pump Care and Cleaning When to change the filter How to change the filter Transportation Information Accessory Care and Cleaning After each use Wash these parts Don’t wash these parts Troubleshooting Ordering Replacement Parts or Optional Accessories Warranty Register your pump at limerickinc.com Customer Service...
-
Page 7: Health And Safety
6. Never operate your pump if it has a damaged power supply cord or plug. Only use the electric power supply/cord that comes with the Joy multi-user hospital grade breast pump. Page 1 Health and Safety... - Page 8 16. In the case of an emergency, do not place the breast pump in an area that restricts or prevents manual disconnection. 17. The electrical rating of the Joy pump is 12V 2A DC. Page 2 Health and Safety...
- Page 9 1. Your Joy hospital grade electric breast pump should never be left unattended when plugged into an electric outlet. 2. Use the pump only for its intended use as described in this manual.
-
Page 10: Pump Components
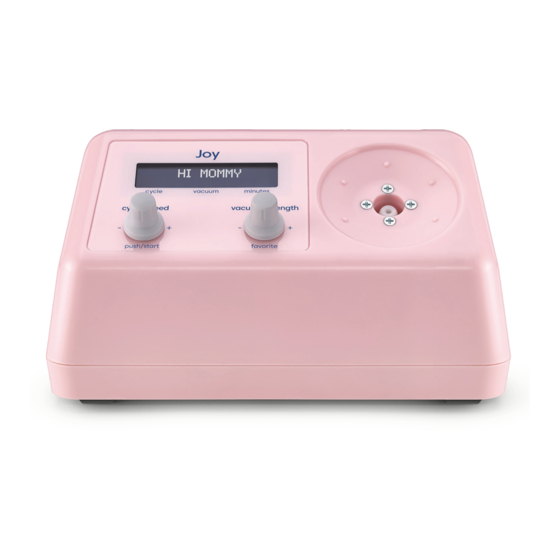
Pump Components Filter connector (5) Vacuum adjustment knob (2) Storage container holder (7) Power/cycle knob (1) Storage container holder slot (6) Power supply (8) The pump, power supply and storage container holders may be shared by two or more women. For details, see “Multiple User Instructions”... -
Page 11: Accessory Kit Components
This Accessory Kit with filter has been designed for single- personal use and should not be shared between mothers. Use ONLY Limerick parts; other brands will not work properly with this pump. The use of other brands’ accessories will void the warranty. -
Page 12: Introduction To Your Joy Breast Pump
Reasons to use a breast pump The intended use of the Joy multi-user hospital grade breast pump is to express milk from the breast of a lactating woman. Breast milk is the best possible nutrition you can give your baby. -
Page 13: Benefits Of Using Joy Electric Breast Pump
Lawrence, RA, Lawrence, RM: Breastfeeding: A Guide for the Medical Profession, Edition 8, Missouri, 2016, Mosby Benefits of using Joy electric breast pump • Establish and maintain milk production by emptying the breast if breast-feeding is temporarily interrupted •... -
Page 14: Accessory Kit Sanitizing
Accessory Kit Sanitizing Before using the accessory kit for the first time Caution! Unless there is a label stating sterile on the kit, the accessory kit is not supplied sterile. It’s not necessary that the parts be sterile, but some must be sanitized before the first time you use the pump. -
Page 15: Disassemble The Following Parts As Shown And Boil Them According To The Instructions
Disassemble the following parts as shown and boil them according to the instructions 1. Remove filter with tubing assembly (9-13) from both breast cup assemblies (23) 2. Unscrew breast cup assembly (23) from storage container (18). 3. Remove the gaskets (17). It’s not necessary to remove the breast cups (15) and breast cup braces (16) from the breast cup assembly caps (14) 4. - Page 16 8. Drain water and remove parts from pan using tongs. 9. Place on a clean towel and allow to air dry. 10. Before each use, visually inspect the individual components for cracks, chips, tears, discoloration, or deterioration. In the event that damage to the device is observed, please discontinue use until the parts have been replaced.
-
Page 17: Pump Setup And Assembly
Pump Setup and Assembly 1. Place pump on a level surface. 2. Insert the two storage container holders (6) into the storage container holder slots ( 7 ) on either side of the base of the pump. 3. Connect the power supply cord (8) to the back of the pump and the wall outlet. -
Page 18: Controls And Features
(more comfortable). Adjust the cycle speed only after you have used the pump 2-3 times and feel comfortable with your Joy breast pump. The cycle speed is used to fine-tune the suction rhythm to best mimic your baby’s suckling. -
Page 19: Vacuum Strength Knob
Adjusting the cycle speed will not change the vacuum level. Cycle speed is independent of vacuum strength. When you begin to use Joy breast pump, it’s recommended that you use a fast suction rhythm (cycle) and low suction strength (vacuum). -
Page 20: Secondary Features
Secondary Features Dry Mode: Push Cycle Speed knob to turn pump on. Once pump is on, hold cycle speed knob down until Dry Mode appears on display. (This will take about 5 [five] seconds). Release knob. Attach filter and tubing without breast cup assembly and press power to start drying mode. -
Page 21: Power Off Pump Prior To Removing The Breast Cups From Breast
Vacuum: Pump for the first minute or two before adjusting the vacuum. It’s recommended to increase the vacuum in small increments up to the level that feels comfortable to you. Recommended pumping time is about 15-20 minutes or 2 minutes after milk stops to flow. -
Page 22: Display Functions And Indications
This fault means that the temperature inside the pump enclosure is higher than expected. After the pump cools, it may be used again. This fault is not typical, so if it happens repeatedly, contact Limerick as the pump may need to be returned for repair. -
Page 23: Internal Fault
Cycle/Power knob (1). (See the illustration on page • If the problem persists, contact Limerick as the pump may need to be returned for repair. Other problems that may occur without a fault message Situation “A”... -
Page 24: Situation "B
remember to turn off pump first before removing breast cups from breast. This will minimize risk for back flow of milk. Situation “B” You may see moisture accumulate in the tubing. This is normal due to the difference in body temperature versus room temperature. If this occurs after you have finished pumping, remove the tubing from breast cup assembly caps, let the tubing hang down, and use Mode. -
Page 25: Accessory Kit Setup And Assembly
Accessory Kit Setup and Assembly Caution! Use only Accessory Kits made by Limerick, Inc. The Joy pump operates differently than other pumps so other kits manufactured by another company will not work properly with Joy breast pump and will void warranty. - Page 26 Step 3 Attach white silicone tube (10) to bottom of the “Y” connector (11) push in securely. Step 4 Attach the ends of the clear tubes (12) to ends of “Y” connector (11) as shown. Step 5 Attach a white tube connector (13) to the other end of each of the long clear tubes (12).
- Page 27 Step 6 Attach white silicone tube (10) to narrow end of filter (9). End of filter (9) must touch Y connector (11) inside tubing (10). If not, tubing can kink and stop vacuum. Step 7 Insert the wide end of the filter (9) into the filter connector (5) on the front of the pump.
-
Page 28: Double Pumping Setup
Double Pumping Setup Expressing milk from both breasts For the amount of time it takes to double pump, see page 27-5. Place storage container in storage container holders on the sides of the pump until you are ready to express your milk. Step 8 Attach white tube connectors (13) to the breast cup assembly caps (14). -
Page 29: Single Pumping Setup
Single Pumping Setup Expressing milk from one breast at a time For the amount of time it takes to single pump, see page 27-5. Step 8 Open tube clamp (19) wide to slide the tube connector (13) and clear tubing (12) through one end of the filter assembly. Then squeeze the tube clamp until it clicks closed to prevent the loss of vacuum. -
Page 30: Expressing Your Milk
Expressing Your Milk Preparing to express breast milk • The environment and your frame of mind are very important when you are getting ready to express your breast milk. • Wash your hands thoroughly with soap and water before expressing your milk. •... -
Page 31: Expressing Breast Milk
Air dry. The filter must be replaced if it gets wet or if milk gets inside. See page Storing breast milk for term infants at home or away Your Joy breast pumps are equipped with storage containers for Page 25 Expressing Your Milk... - Page 32 collection and storage of milk. Also supplied are caps to hold the white seal for storage of breast milk (parts 20-21, on page For information on purchasing additional storage containers and accessories, see “Ordering Replacement Parts or Optional Accessories” on page •...
-
Page 33: Pumping Methods And Patterns
Pumping Methods and Patterns Follow one of these pumping methods and follow the pattern unless otherwise prescribed by your physician or health care professional. Double pumping Pumping both breasts at the same time is recommended as it yields higher milk volume. This method takes approximately 15-20 minutes. See “Double Pumping Setup”... - Page 34 Caution! Do not allow storage containers to overfill If overfilled, milk can enter the tubing and filter. In that case, filter and tubing must be replaced (see page 30-5). Page 28 Pumping Methods and Patterns...
-
Page 35: Multiple User Instructions
Multiple User Instructions The Joy hospital grade breast pump can be shared by multiple women, for example, in a hospital. (Only one woman can use the pump at any time. Multiple users cannot pump simultaneously.) WARNING! ONLY THE PUMP ITSELF IS TO BE SHARED. -
Page 36: Pump Care And Cleaning
Pump Care and Cleaning When pump is shared by multiple users, such as in the hospital, wipe unit with a damp cloth containing a germicidal detergent. Dry with a soft cloth. Wash holders in detergent, using germicide when more than one person uses them. DO NOT IMMERSE PUMP IN WATER. -
Page 37: Accessory Care And Cleaning
Accessory Care and Cleaning Before the first time you use your pump, you must sanitize the parts that come into contact with your milk. See “Accessory Kit Sanitizing” on page After each use 1. Remove tube connector/clear tubing assembly (10-13) from both breast cup assemblies (14-16). -
Page 38: Wash These Parts
that damage to the device is observed, please discontinue use until the parts have been replaced. Wash these parts Storage Breast cup assembly (23), parts (14 - 16) container (18) Breast cup Assembly Silicone cap (14) breast x2 storage cup (15) container cap (20) Breast cup... -
Page 39: Troubleshooting
If you have any questions about the use or assembly of your Joy breast pump, see “Accessory Kit Setup and Assembly” on page 19 and/or go to limerickinc.com... - Page 40 14. Turn pump on, place both of the breast cups onto a hard smooth surface, such as a tabletop. 15. Both breast cups should be compressing and releasing. 16. If pump is still not working, call Limerick Customer Service. Problem C: Suction has become weak Instruction: 1.
- Page 41 • For other difficulties, contact Limerick, Inc. for assistance. • You may also try calling the location where you obtained your breast-feeding product.
-
Page 42: Ordering Replacement Parts Or Optional Accessories
Ordering Replacement Parts or Optional Accessories For replacement parts or a catalog, go to limerickinc.com or call +1 818-566-3060. To identify parts, see page 4-5. • Filter with tubing • Breast cup assembly • Cleaning brush • Storage container • Clamp (for single pumping) •... -
Page 43: Warranty
Before you make a claim under this warranty, it may save time and expense to call Limerick’s Customer Service toll-free: +1 818-566-3060 If you wish to make a claim under this warranty, first call Limerick’s Customer Service to get a Return Merchandise Authorization number. -
Page 44: Customer Service
Customer Service Limerick, Inc. 2150 N. Glenoaks Blvd. Burbank, CA 91504 Available by phone 8:30 AM - 5:00 PM PST +1 818-566-3060 limerickinc. com/support Page 38 Customer Service... - Page 45 Index Accessories Safety 1, 6, 17, 33 Accessory care and cleaning Sanitizing ii, iii, 8 Accessory kit iii, 2, 6, 8, 33 Share 19, 29 Benefits Single pumping Breast cup 9, 10, 32, 36 Storage container 9, 10, 31, 32, 36 Breast cup assembly 5, 9, 10, 32, Storage container cap...
Need help?
Do you have a question about the Joy and is the answer not in the manual?
Questions and answers