Table of Contents
Advertisement
Quick Links
Advertisement
Table of Contents

Related Manuals for Eminent EM4558


Summary of Contents for Eminent EM4558
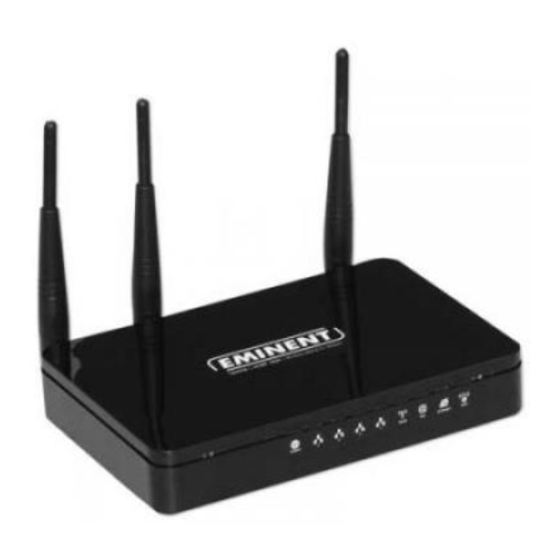
- Page 1 EM4558 - 300N Wireless ADSL2/2+ Modem router (Analog)
-
Page 2: Table Of Contents
1.1 Functions and features ..................3 1.2 Packaging contents ..................3 1.3 Explanation of the front..................3 1.4 Explanation of the back ..................4 1.5 Explanation of the side of the EM4558..............5 2.0 Installation using the wizard...................5 3.0 Manual installation....................5 3.1 Connecting the EM4558 ...................5 3.2 Logging in to the EM4558.................6... -
Page 3: Introduction
Power supply • Network cable • CD-rom with Wizard • User manual • 1.3 Explanation of the front The EM4558 has several LED’s at the front. Below you will see a display of these LED’s and the explanations of these LED’s. -
Page 4: Explanation Of The Back
Will blink when a WPS connection is being established. 1.4 Explanation of the back At the back of the housing, the EM4558 has several connections. You will find a display of these connections and the explanation of the connections below. -
Page 5: Explanation Of The Side Of The Em4558
WPS. Only applicable when using WPS adapters. 2.0 Installation using the wizard The easiest way to install the EM4558 is by using the installation wizard, as described in this chapter. This wizard allows you to setup your modem for your internet provider, give your wireless network a name and secure your wireless network. -
Page 6: Logging In To The Em4558
3.2 Logging in to the EM4558 In order to manually set the EM4558 for an internet connection, you have to make a connection with the EM4558 first. You can make a connection with the EM4558 using the following procedure. -
Page 7: Configuration For Dhcp Providers (Tele2, Babyxl, Online Family)
ENGLISH Fill in your ADSL username at the ‘Username’ field. Bear in mind that in some cases, a provider demands you to use an extension behind your username. Refer to the documentation the ISP has provided you. 10. Fill in the ADSL password at the ‘Password’ field. 11. -
Page 8: Manually Setup And Secure The Wireless Network
ENGLISH 16. The modem will automatically obtain a connection with your provider. It can take up to a few minutes to connect with your provider the first time. Hint: If you have already made a provider configuration, and you want to add a new provider configuration, there is no need to remove your old connection. -
Page 9: Wpa Security
ENGLISH You can change the name of your wireless network at the ‘SSID’ field. After settings up another name, this name will be seen as a wireless network. Click at he field behind the ‘Authentication Type’ and select ‘WPA2-PSK’. Click at the field behind ‘Pre-Shared Key’. Fill in a password which contains at least 8 characters, with a maximum of 63 characters. -
Page 10: Setting Up The Wireless Network On Your Computer
Note: In case your are working wirelessly already: The connection will be terminated the moment the security has been set in the EM4558 (WPA(2), WEP) and not yet in your wireless adapter. The moment you have set the security in wireless card too, the connection will be established again. -
Page 11: Setting Up A Wireless Network Using Windows Vista
Fill in your security key. 11. Choose ‘Connect’. If you filled in your security key correctly, your computer will establish a connection with the EM4558. 12. Windows will ask to save and automatically start this connection. You are now able to go online. -
Page 12: Control Your Internet Connection
Then press for about 3 seconds the ‘WPS’ button of the EM4554. 10. The EM4554 will start searching for the EM4558. 11. The EM4554 and the EM4558 both agree to use a security key. As soon this process is done, you will get the notification ‘Get WPS profile successful’. -
Page 13: Wireless Mac Address Filter
13 | ENGLISH In most cases a MAC Address can be found on a sticker placed on the network product itself. You can also retrieve the MAC Address yourself by following the next steps. Click ‘Start’. Click ‘Run’’. Type ‘CMD’. Press the ‘Enter’... -
Page 14: Opening Ports (Port Forwarding)
In the following steps we will explain how to open ports in the EM4558’s firewall. We will use port numbers 5000 till 5010 as example. But as a reminder: Find out, using the documentation of the program, which ports numbers must be used. -
Page 15: Frequently Asked Questions
This message appears when the computer did not receive a correct IP address from the router. Make sure all cables are correctly connected. If necessary, reset the EM4558 and try again. It is recommended that you configure the router using a cabled connection (not wireless). When the cabled connection is working properly you can setup the wireless connection as explained in this manual. - Page 16 I am not able to use a wireless computer at the moment. Can I disable the wireless functions of the EM4558? By pressing the ‘WLAN’ button at the side of the EM4558 for about 2 seconds, you can disable the wireless function. The EM4558 stops broadcasting at that moment and the ‘WLAN’...
-
Page 17: Service And Support
The five-year Eminent warranty applies to all Eminent products unless mentioned otherwise before or during the moment of purchase. When having bought a second- hand Eminent product the remaining period of warranty is measured from the moment of purchase by the product’s first owner. - Page 18 EM4558 | 07-2009...
Need help?
Do you have a question about the EM4558 and is the answer not in the manual?
Questions and answers