IKEA LAGAN Installation Instructions Manual
Hide thumbs
Also See for LAGAN:
- User manual ,
- Manual (506 pages) ,
- Installation instructions manual (160 pages)
Table of Contents
Advertisement
Quick Links
Advertisement
Table of Contents

Related Manuals for IKEA LAGAN


Summary of Contents for IKEA LAGAN
- Page 1 LAGAN...
- Page 2 ENGLISH...
-
Page 3: Table Of Contents
Injector table Technical Data Safety information Installation Product description Knob Replacement Daily use Environmental concerns Helpful hints and tips IKEA WARRANTY Maintenance and cleaning What to do if General Information When the burners are lit check that Read this handbook carefully before the flame is always regular. -
Page 4: Safety Information
Safety Information Your safety and the safety of others call the fire department. are very important. Installation service must This manual and the appliance itself performed by a qualified installer, provide important safety messages, to service agency or the gas supplier. be read and observed at all times. - Page 5 Domestic animals should be kept away from the appliance. In case of prolonged use, additional ventilation may be necessary (by opening a window or increasing the hood extraction speed). After use, make sure the knobs are in off position and close the main gas supply cock or the gas cylinder valve.
-
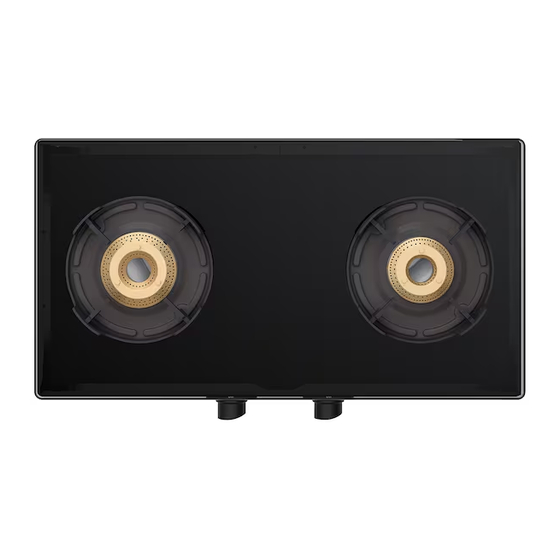
Page 6: Product Description
Product description Large Burner pan support Large Burner Small Burner pan support Small Burner Glass Top Bottom Frame LH Burner Knob RH Burner knob Legs Symbols Tap closed Maximum opening/delivery Minimum opening or reduced delivery... -
Page 7: Daily Use
Daily use the operation with the knob turned to Do not let the burner flame small flame setting. extend beyond the edge of the pan. Important: when the hob is in use, the entire hob area may become hot. To ignite one of the burners, turn the relative knob anti-clockwise to the maximum flame setting. -
Page 8: Maintenance And Cleaning
Maintenance and cleaning All the enamelled and glass parts baked-on food should be removed should be cleaned with warm water with a toothpick or needle. and neutral solution. Stainless steel surfaces may be stained by calcareous water or aggressive detergents if left in contact for too long. -
Page 9: What To Do If
What to do if... Problem Possible cause Solution The burner fails to ignite The gas tap could be Check that the gas tap is closed open Burner crown may Clean burner crown The gas ring burns unevenly occluded according cleaning food residues instructions to make sure that the burner crown is clear of... -
Page 10: Injector Table
Injector table Reduced Gas pressure Nominal Type of Type of Injector Nominal heat (mbar) heating gas used burner marking consumption capacity capacity kW min. nom. max. small 0.77 192g/h Large 260g/h Model configuration Nominal heating Nominal Type of gas used 2 BURNERS capacity kW consumption... -
Page 11: Installation
Installation In order to prevent damage of the Combustion products are discharged product, please voltage outdoors through specific hoods or wall stabilizer. and/or window mounted electrical fans. The outer surface of the furniture or After unpacking the hob, make sure that appliances adjacent to the hob are heat it has not been damaged during transport. - Page 12 Use pressure regulators suitable for the gas pressure indicated in the Instruction. The gas nozzles must changed by After Sales Service or a qualified technician. Nozzles not supplied with the appliance must be ordered from After Sales Service. Adjust the minimum setting of the taps.
- Page 13 At this stage, light up the with current safety burners and turn the knobs from regulations. Failure install max position to sim position to appliances correctly may lead to check flame stability. prosecution. Upon completion of adjustment, It is in your own interest, and that of reseal the work surface using sealing safety, to ensure that the law is wax or an equivalent material.
-
Page 14: Knob Replacement
KNOBS REPLACEMENT Push each of knob on the valve shaft until Be sure that your hob is switched- off! All knobs must be in closed you feel the end of sliding (sparking may occur). position. Make sure that all the knobs are in the Pull upwards each knob of the cooktop right position. -
Page 15: Environmental Concerns
Environmental concerns Packing The symbol product packing materials accompanying documentation indicates 100% recyclable and marked that this product should not be treated with recycling symbol as domestic waste but must be taken to a suitable centre for collection and recycling of electrical and electronic equipment. -
Page 16: Ikea Warranty
(a) IKEA will replace it with the same or a of the appliance. comparable product or (b) refund it as • The Serial number or barcode label of... - Page 17 However these conditions do not limit in any way While IKEA will make every effort to carry consumer rights described in the local out repairs/ replacement of parts under this legislation.
- Page 18 23221 AA-2181439-3 © Inter IKEA Systems B.V. 2019...
Need help?
Do you have a question about the LAGAN and is the answer not in the manual?
Questions and answers